QuietStove.com

Sunday, December 3, 2017

Deal Alert! (Soto WindMaster on sale)

The Soto WindMaster is on sale for $55 on Massdrop (a "group buy" site) – if just ten people sign up.  That's an outstanding deal for a stove that often retails for $20 more (i.e. $75 is normal).

Adventures in Stoving is typically about evaluating stoves, not about promoting sales, but a lot of people have expressed interest in the WindMaster, and this is as good of a deal as I've seen.

Please understand that I derive no percentage of the sales.  There are no "affiliate links" or anything like that.  This is just a good deal I noticed.

Links

Note that if you use that link (if you aren't already a member), you get a $10 credit, and I also get a $10 credit. 
Cold weather testing the WindMaster.

The Stove
It's no secret that I consider the Soto WindMaster to be the best quality upright canister stove on the market today.  See my review of the Soto WindMaster.  It's wind resistant in a way other stoves of this class just aren't (well, except for its budget minded cousin, the Amicus), and it's a good balance of versatility, efficiency, and weight.  Not only that, it's just quality in every respect.

The Soto WindMaster
Rumor Control
There were rumors that Soto was going to discontinue distribution of the WindMaster in North America, but, no.  I spoke to the Soto rep, and Soto has no plans to discontinue the WindMaster.

Simul-testing the WindMaster against a "control" stove.
The WindMaster is at left.
No matter the conditions, the WindMaster always came out ahead – while using less fuel.

I hope this is helpful to someone, and I do hope you will forgive the commercial intrusion on this, a site focused on what we do in our lives outside of work (well, unless you're a guide or something).

HJ


Performance testing the Soto WindMaster against a "control" stove.
Note:  The individual in the photo is a highly trained stove professional.
Don't try this at home (seriously, go for a hike; you have a much better stove already in your kitchen at home).
Apologies for the waste generating food shown in the photo.  We got a free case because they were due to expire.

Tuesday, September 19, 2017

The Kovea EZ Eco – "Canisterless" Canister Stove

Last year, I wrote a review of the EZ Eco version of Kovea's Alpine Pot.  At the time, the EZ Eco was having some "technical difficulty."  Kovea did not market the product at that time and went back to the drawing board to work out some of the kinks based on my feed back.

A few months ago, they sent me a re-worked version.  I have reviewed the stove, and there is now a New Review of the Kovea EZ Eco on SectionHiker.com.

The stove I used in my review was sort of a pre-production version, the version they started selling in Korea before they started selling them here in the US.  Just after I finished my review, I got a production US version, with the same markings and color as the version now commercially available in US.  Naturally, it had to come a week or two after I had already written and submitted my review, lol, but other than the color and some other cosmetic changes, the stove I reviewed is the same stove as is now for sale in the US. I will include a couple of photos here of the production version just so you can see what it looks like and exactly what you will get if you buy one.
What's in the box?
Top, L to R:  Stove bag, pot, and lid
Bottom, L to R:  Cup, burner, and instructions
Between the instructions and the lid, notice the adapter.  See review for details.

Here's a top down look at the whole assembly.
Note the rubber band like "straps" to retain the lid.

OK, not a whole lot to see here, so head on over to Section Hiker and have a look at the full review.

Thanks for joining me,

HJ

Monday, August 21, 2017

Interactive Canister Gas Estimation Spreadsheet

I've put together something that I hope will be useful.  It's an Excel spreadsheet that you can customize to fit your particular stove and your particular situation.  You can use Google Sheets if you don't have Excel on your device.

This spreadsheet should work for conventional stoves (e.g. Pocket Rocket, GigaPower, Crux, etc.) as well as high efficiency stoves (e.g. Jetboil).  The download link will be down at the bottom of this post, after the explanations

Headed out for a week? Nice!  Uh, how much fuel do you need?
Purple Lake, John Muir Wilderness, Sierra National Forest, Sierra Nevada, California.
Enter Your Numbers
So, it's relatively straightforward. You, based on your needs and your experience, enter four numbers into the spreadsheet as listed, below.  I'll go through some examples after the list to hopefully help you understand how this works.  It's pretty simple, really.
  1. The number of cups (about 250 ml per cup for those of you who prefer metric) of water you plan to boil per day, on average.
  2. The number of grams of fuel your particular stove burns to boil one cup of water.  If you don't know, I recommend that you use 4 g for conventional stoves and 3 g for high efficiency stoves (like a Jetboil) until you get a better idea of what your stove requires.  You might add a gram (i.e. 5 g and 4 g, respectively) for water temperatures around 5 C/40 F or lower.  Double the estimate (i.e. 8 g and 6 g) if you're melting snow.
  3. The length of your trip (number of days).
  4. Your margin for error.  This is sort of a "fudge factor".  You add a bit more extra gas in case it's windy or maybe you just underestimated how much water you'd need to boil.  As you gain more experience, you can dial this back.
Remember, all four of these numbers are under your total control.  You set the parameter, and the spreadsheet will tell you what size canister it thinks you should bring.  Note that I have the following canister sizes programmed into the spreadsheet:  100, 110, 220, 230, and 450 grams.
Isn't this a great spot?  Say, we did bring enough fuel to have dinner tonight, didn't we?
Duck Lake, John Muir Wilderness, Sierra National Forest, Sierra Nevada, California.
Example 1.
In this example, I'm going to go out for five days.  See the chart, below.  I'm going out with a partner.  Say, on average, that we both boil about five cups per day and that we have a conventional stove like, say, a Pocket Rocket.  We're going to enter all the numbers that describe our trip and our needs in the gray shaded cells.  The spreadsheet will then recommend in the yellow shaded cell what size of canister at a minimum that you should bring based on the parameters that you've entered.

Let's go through the example:
Line 1.  If we both boil 5 cups each, then we'd boil a total of 10 cups per day, on average.  Enter the number 10 on line one in column "B" in the gray, shaded area on line 1.

Line 2.  Since we have a conventional stove, we'll use "4" as the number of grams we expect to burn per cup on line 2.  Now, this assumes that you know the Basics of Stove Fuel Economy.  If you're not familiar with how to get good fuel economy with a backpacking stove, I suggest that you read through the Basics of Stove Fuel Economy.

Line 3.  Next, let's enter then number of days our trip will be.  I said five, but I'm going to enter just 4.5.  Why?  Well, I'm planning to exit on the last day well before supper time.  Really, the last day is only going to be a half day, so I'm adjusting the amount of fuel I think I'll need by dropping the length of the trip by 1/2 a day.

Line 4.  Do not touch line four.  Remember, only enter numbers into the gray shaded cells.

Line 5.  Now, Line 5 is your "fudge factor," your safety margin.  We are NOT going to estimate the number of grams we think we'll need and cut it off exactly there.  No, we're going to add just a bit more in case something goes wrong or we're off somewhere.  Now, if you really know your stove, your usage, and the Basics of Stove Fuel Economy, then have at it.  Cut the margin down to zero if you like.  It's your spreadsheet once you download it, but I'm going to recommend a 10% safety margin until you know differently.

Based on our estimate that we, on average, will boil 10 cups of water per day (line 1) and that with our conventional stove will need 4 g of fuel per cup boiled (line 2) and that our upcoming trip will be 4.5 days long (line 3) and that we want a 10% margin for error (line 5), the spreadsheet determines (line 6) that you need 198 g of fuel.  The spreadsheet then, in line 7, tells you what minimum canister size you should bring in order to have that 198 g of fuel.  In this case the spreadsheet recommends that you bring at least a 220 g sized fuel canister.

Now, notice line 8.  This is the amount of fuel we will have over our estimated need.  We need 198 g but our canister holds 220 g which means we have 22 g of fuel in excess of our estimated need.

The spreadsheet then tells you (line 9) about how many extra cups that excess fuel will give you if you need it.

Lastly, the spreadsheet tell you how many additional cups you could boil per day based on this excess fuel (line 10).

Why might you want to know how many additional cups per day you have the capability to boil?  Well, half way through our last trip, someone gave us some coffee they weren't going to use.  Suddenly, we had enough coffee to have not one but two cups of coffee each morning.  But do we have enough gas?  Hopefully, with line 10 of the spreadsheet, you'll know if you have the gas for that second cup of coffee.

Let's see, it's three more days until we re-supply.  You did bring enough gas for three more days, right?
The Silver Divide, John Muir Wilderness, Sierra National Forest, Sierra Nevada, California.
Example 2.
In this example, I'm going to go out for three days.  See the chart, below.  Again, I'm going out with a partner.  Again, let's say, on average, that we both boil about five cups per day, but this time we're going to be sharing a Jetboil type stove.

Let's go through the example:
Line 1.  If we boil 5 cups each per day, then we'd enter "10" on line one in column "B" in the gray, shaded area.

Line 2.  Since we have a Jetboil stove, we'll use "3" as the number of grams we expect to burn per cup, on line 2.

Line 3.  Next, let's assume our trip lasts a full three days.  Therefore, I enter "3" on line 3.

Line 4.  Do not touch line four.  Remember, only enter numbers into the gray shaded cells.

Line 5.  Let's just stick with 10% as our safety margin.

Now, on line 6, our baseline estimate + our margin for error comes to a total of 99 g.  The spreadsheet therefor in line 7 recommends that you buy a 100 g canister.  Is that cutting it too close?  Probably not.  Remember, that we've already got a 10% margin for error in there.  However, 110 g canisters are typically just as cheap as 100 g canisters.  I personally would just get the 110 g canister just so I have a slightly larger margin for error, but each to his or her own.

But notice line 8.  You only have 1 g in this example of "excess" fuel.  Just one gram.  In other words, if someone gives you coffee or something, you may not have the gas to boil water for it.  This is important!  I wouldn't want to eat a cold backpacking dinner in the evening because I had burned up all my fuel on a second cup of coffee in the morning.  If I don't have the gas to do something, then I want to know, in advance.  This estimation spreadsheet gives you an idea of how much slack you do – or do not – have.

Conclusion
Thanks for bearing with me through all the explanations.  I hope I was reasonably clear.  If it wasn't clear, please use the comments section, below, to ask questions.  There are no dumb questions.  If it's not clear, ask.

Now, the link.  You can download the Excel spreadsheet using Google Docs.  If you don't have Excel on your device, you can open the spreadsheet with the Google Sheets app.

Please let me know in the comments, below, if you have any problems with the link or the spreadsheet.

Thanks for joining me,

HJ
The author at Sallie Keys Lakes on the John Muir Trail.
You're danged right I had enough gas!

Sunday, May 21, 2017

What is a Light (or Ultralight) Canister Stove?

The words "light" and "ultralight" get thrown around like so much chump change.  Marketers play fast and loose with those terms hoping to score a few more gear sales.  Is there a way we can assign real meaning to these terms?
An FMS-116T "Gnat" stove weighs less than two ounces.
Actually, there is.  We can "grade on the curve."

What the heck do I mean by that?  Well, when I was in school, some instructors would look at the scores on their tests, expecting to see a "normal" (bell shaped) curve.  If the center of the curve didn't line up with "average" performance, they might adjust the test scores.  In other words, students were judged not just on their test scores alone but on how well they did in relation to the class as a whole.  This is referred to as "grading on the curve."

So also, we can judge canister stoves not just on their weight alone but also on how their weights compare to other stoves in their class.
Some stoves today weigh under one ounce, giving new meaning to the term "ultralight."
With that in mind, take a look at the below chart.  This chart applies to upright (top mounted) canister stoves only.  Obviously "integrated" canister stoves (like a Jetboil or Reactor) and remote canister stoves (like an MSR WindPro or Kovea Spider) have to have their own categories in order for those categories to be meaningful.
Upright Canister Gas Stove
Weight Classes
(Less Than or Equal To)
OuncesGrams
Heavy
 4+
113+
Moderate< 4< 113
Light< 3< 85
Ultralight (UL)< 2< 57
Super Ultralight (SUL)< 1< 28

Upright canister stoves today weigh as little as 25 grams – less than one ounce! There are five commercially available stoves that weigh less than two ounces.

Given the light weight of stoves available today, it's reasonable to insist on that a stove be truly light in order for it to belong to the class of "ultralight" and to be even more demanding of weight savings for a stove to earn the title "super ultralight."
We give meaning to terms like "light" and "ultralight" by categorizing stoves relative to one another.
Here then are four examples:
Top row, right:  MSR Pocket Rocket, 3.1 oz (Midweight) 
Top row, left:  MSR Pocket Rocket 2, 2.6 oz (Light)
Bottom Row, left:  FMS-116T ("Gnat"), 1.7 oz (Ultralight)
Bottom Row, right:  BRS-3000T, 0.9 oz, (Super Ultralight)
In summary, based on what is available today, real meaning can be given to terms like "light" and "ultralight" by looking at a given stove's weight in relation to other stoves.  Based on those relative weights, I have created the following upright canister stove weight classes:
  • SUL:  If an upright canister stove weighs less than or equal to an ounce (28 g), it's super ultralight.
  • UL:  If a stove weighs less than or equal to two ounces (57 g) but more than one ounce, then it's ultralight.
  • Light:  If a stove weighs less than or equal to three ounces (85 g) but more than two ounces, then it's light.  
  • Moderate:  If a stove weighs less than or equal to four ounces (113 g) but more than three ounces , then it's moderate.  
  • Heavy:  If it weighs more than a quarter pound (4 oz/113 g), then, by modern standards, it's heavy.  
The above is a reasonable categorization, given the state of the art and the stoves commonly available today.

Next time you read an ad or hear a salesman say that a three (or more) ounce stove is "ultralight," just nod your head and say "unh hunh, sure," and have yourself a little chuckle.  Now, you know better.

Thanks for joining me,

HJ

For Further Reading:
The Purpose of this Post:
As a brief post script, let me just reflect for a moment.  I wrote this post with two things in mind:
1.  To let people know, particularly those less familiar with backpacking stoves, what's out there.  There are stoves being marketed as "ultralight" that are above three ounces in weight.  That's actually on the heavy end of the scale.  It's not even light let alone ultralight.  If you're shopping for a stove and trying to get your base weight down, you need to know that you can do better.
2.  ALL WEIGHT CATEGORIES ARE ARBITRARY including those that talk about total base weight. I like weight categories insofar as they give me a goal that I can challenge myself with, but I don't like weight categories if they lead to one upmanship or a loss of focus on the true bottom line:  enjoyment.  Reduced gear weight should facilitate the enjoyment of one's hiking.  Increased enjoyment of hiking is the true bottom line, not some arbitrary weight class.  

Thursday, May 11, 2017

The 1.8 L MSR Windburner vs the 1.8 L Jetboil Sumo

Recently, I was asked what the weight "penalty" is in carrying the 1.8 L MSR Windburner vs. the 1.8 L Jetboil Sumo.  Excellent question.  I have both, so I pulled out my scale, and I created the below table of weights.

For full reviews of the Windburner, please see:
For a more comprehensive look at Integrated canister stoves, please see:
For a look at the entire realm of Canister Stoves, please see:
An MSR Windburner warming up.

Here's what I came up with:
MSR Windburner 1.8 L Jetboil Sumo 1.8 L
Grams Ounces Grams Ounces
Burner 200 7.0 150 5.3
Pot 227 8.0 196 6.9
Cozy 71 2.5 53 1.9
Lid 20 0.7 24 0.9
Bowl 54 1.9 47 1.7
Stand 20 0.7 26 0.9
TOTAL 592 20.8 496 17.6
Difference 96 3.2

Basically, at least on my scale, there's a 3.2 ounce difference when a Windburner is compared to the Jetboil Sumo.  OK, not so good.
A 1.8 L MSR Windburner, left.  A 1.8 L Jetboil Sumo, right.
But there is a trade off here.  The gain with the Windburner is wind proofness.  Jetboils just aren't very good in wind.  Take a good look at the two videos at this link:  Wind Testing – Windburner vs. Jetboil.
A Jetboil's heat exchanger is completely open to the wind.
A Windburner will act like nothing is happening in conditions that shut a Jetboil down.  Those three ounces get you a stove that will work in conditions in which a Jetboil won't.  I always bring a Windburner for desert hiking.  It's always freaking windy in the desert.  The Windburner works; the Jetboil doesn't; screw the 3.2 ounces.
A Jetboil's heat exchanger is open.  Wind can blow in one side and out the other.
A Windburner's heat exchanger is enclosed.  Air enters only through the burner and exits only through the vents.
There are some "side" benefits that you're getting with the Windburner:
  • A functional bowl of about 850 ml vs. a not terribly functional bowl of about 400 ml with the Sumo.  The Sumo's bowl has notches cut in the side (so it will clip on to the bottom of the pot).  Things spill out through those notches.
  • A snap tight lid that you can pour with using only one hand.
  • A handle that actually functions as a handle.  A Jetboil's "handle" really isn't.
The 1.8 L Windburner has a very useful 850 ml bowl.
You can kind of use the 1.8 L Jetboil's 400 ml pot protector as a bowl, but it's better left at home.
The above side benefits are all well and fine, but if you don't need the wind proofness, honestly, I think the weight of a Windburner is hard to justify.
MSR Windburner radiant burner, left.  Jetboil conventional burner, right.
The Windburner's burner is amazingly windproof, but it's heavy.
When it is windy, the Windburner is your best friend ever.  Even in moderate winds where people often will build rock walls or crawl behind some boulders to cook, yeah, those techniques work, but sometimes I'm just beat and don't want to screw with it.  A Windburner cooks.  Period.  No screwing around.  Wherever you plop your self down, that's where you cook.
Cooking after a late arrival in camp.
Sometimes, you just don't want to screw around.
So, there's a weight and features comparison between the two stoves.  I hope you found the post useful.

HJ

The MSR Windburner in a desert wash.


Sunday, May 7, 2017

The MSR Windburner – New 1.8 Liter Size

The MSR Windburner is basically your best friend in really windy conditions.  Hungry?  Windburner.  Done.

Recently, I pulled into camp late, exhausted.  I didn't want to screw around with building a rock wall or crawling behind some boulders to cook.  With the Windburner, it basically doesn't matter.  There's no screwing around with trying to get your stove to work in wind.  It just works.  Boy, was I glad I had brought a Windburner that trip.

UPDATE 12 May 2017:  I have now created a Comparison of the 1.8 L MSR Windburner with the 1.8 L Jetboil Sumo.

For a more comprehensive look at Integrated canister stoves, please see:
For a look at the entire realm of Canister Stoves, please see:
The MSR Windburner with 1.8 L pot.
I think many people look at the Windburner as only a "personal" cooking system (i.e. for just one person), which it is – in its original form.  But no more.

When I wrote my initial review of the MSR Windburner, that's all that was available, a "personal" system with a one liter pot.  Yes, the Windburner is fast enough that you could just take turns, but if you had a meal that required a bit more capacity or you wanted to eat together, the Windburner, back then, really wasn't your set up.  Then MSR introduced their new 1.8 liter pot for the Windburner.
NOTE:  The burner is the same size for all versions of the Windburner.  All Windburner pots and pans fit with all Windburner burners.  The 1.8 L pot will, for example, work with the burner from a 1.0 L set.  Likewise the pan will fit the burner from either a 1.8 L set or a 1.0 L set.
The 1.8 L pot for the MSR Windburner
Now, I could just make this a slam-dunk review.  I mean, the 1.0 L size is a really great stove, so I could just say "same stove, bigger size, works great, the end," and be done with it, but I thought I'd say just a bit more – and there are a few changes as well that I thought I'd point out.

The bulk of the system is in fact the same, so by all means you should read my original review:  The New MSR Windburner.

Let me just say here that since the publication of my original review just over three years ago, the Windburner has become my absolute favorite desert backpacking stove.  Why?  Because it's always freaking windy in the desert.  Really windy.  And, no, sticking it behind a rock just doesn't cut it in high gusty winds.
The Whitewater River flowing into the California desert from the San Bernardino Mountains
When the desert winds come wailing down those desert canyons, there's no better stove than the MSR Windburner (well, maybe the MSR Reactor, but that's the same technology).  Trip after trip, the Windburner has earned my trust and confidence.  Whether desert canyons, open plains, or windswept ridges, this is the stove to have if you're going out into windy conditions.  If you're interested in my real world testing of the Windburner, please see my latest trip report:
The Road to Hell is Paved with... Weather Balloons?

Canister Stand
One of the things that's different here are the new, and I think improved, canister stand (sometimes also called a "canister legs" or "canister feet").
The new 1.8 L version of the Windburner comes with improved canister legs.
There were some complaints that the original canister stand that came with the Windburner took too much room and was too fragile.  MSR quickly put out an improved version 2.  This current version is the third version that I'm aware of, and it's a good one as far as I'm concerned.

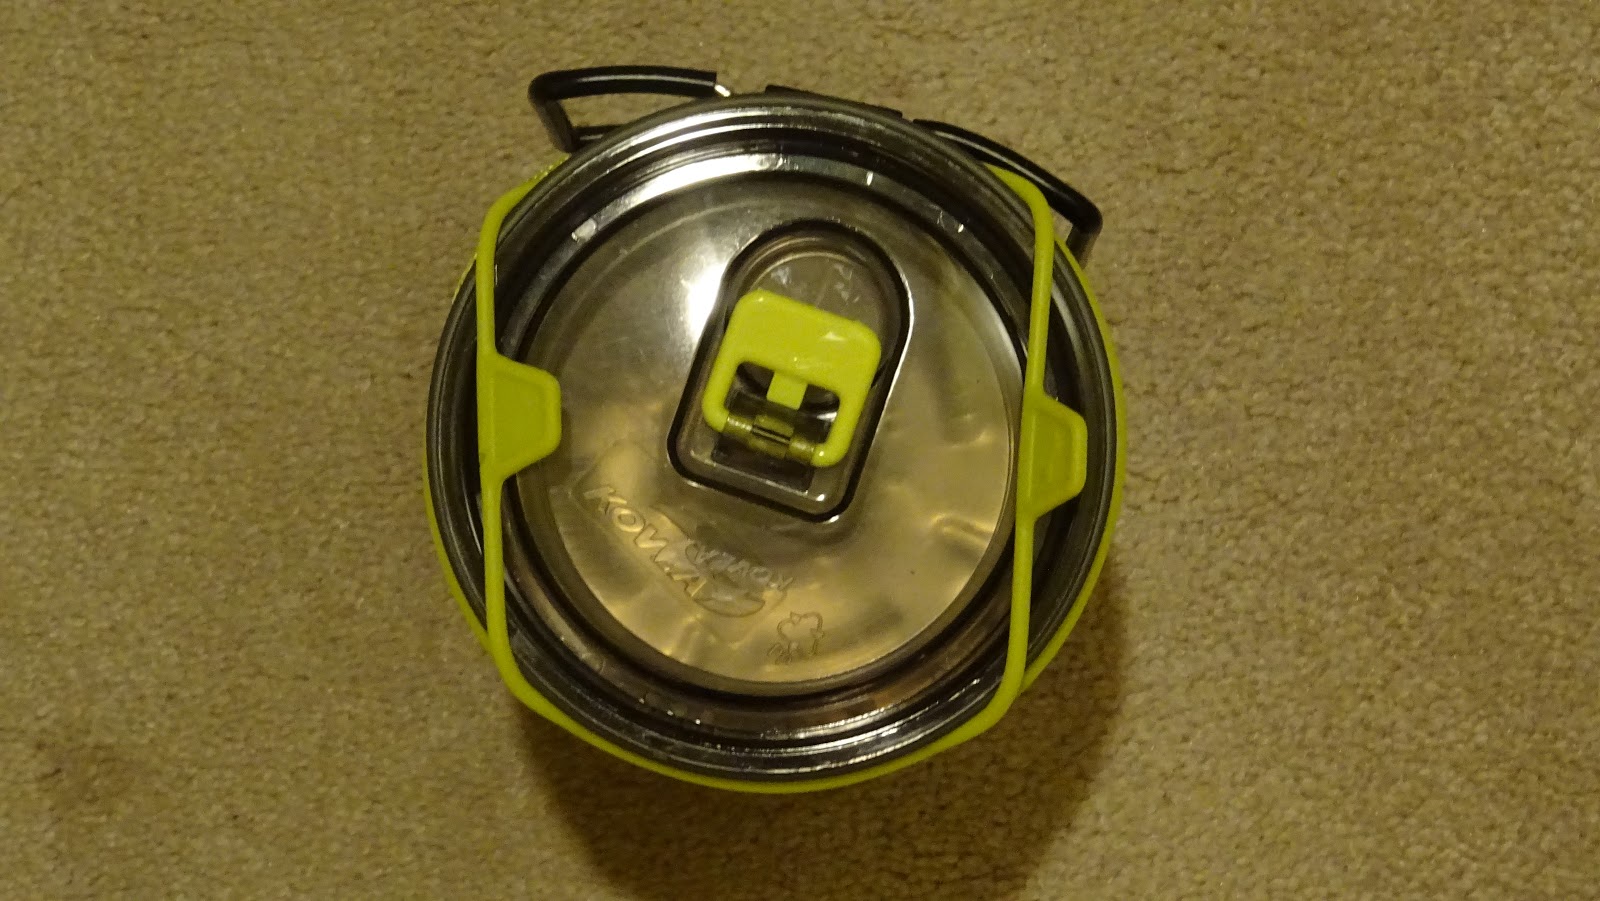
The new Windburner canister stand folds
What's new and improved?  It stretchy and it folds.  There's nothing brittle or fragile about it.  You can easily find a place to pack it inside the capacious 1.8 L pot.
There's plenty of room inside the 1.8 L pot for a spoon, lighter, and the canister stand.
The new canister stand fits any size of canister.  One never knows what you may find in a small town.  All that may be available is some other brand of canister, a canister that does not have the same diameter as an MSR canister.  Coleman 220 g canisters for example are a little bit bigger than MSR 227 g canisters.  Likewise, the old Primus 220 g canisters are a little smaller than MSR 227 g canisters. If you've only got two settings on your canister stand (the width of an MSR 110 g or 227 g sized canister), good luck with other brands, especially if you're traveling in Asia where who knows what you'll find.  The new Windburner canister stand stretches and will fit just about any canister diameter from about 8 cm to about 12 cm.

What Fits Inside?

First, I wrap everything in a bandana, see above, so that I don't scratch up the pot.  With that in mind, the following will fit:
  • A 110 g sized canister fits easily with room to spare the burner, the 110 g canister, a spoon, the canister stand, and a large windproof torch type lighter.
  • A 227 g sized canister fits the burner, the 227 g canister, the canister stand, and a small lighter.  The canister stand is a bit of a trick, but if you fiddle with it a bit, it all fits.  I couldn't fit my particular spoon into the pot with the 227 g canister, but different spoons may fit.
  • A 450 g sized canister will fit, but not much else will fit.  You cannot fit in the burner if you put a 450 g sized canister inside.  The canister stand and a lighter will fit even with a 450 g size canister.  NOTE:  MSR does not recommend the 450 g size for use with the Windburner since the resultant assembly would be so tall.
The pot is fairly deep, so a 8.5"/21 cm spoon is a good fit.
Recommended Utensils
The 1.8 L pot is about 7 inches/17.5 cm deep.  I think a spoon (or other untensil) of about 8.5 inches/21.5 cm is about right.  In order to fit your spoon in the pot, you'll want a collapsing or folding spoon.  I recommend plastic so that you don't scratch up the nice anodized pot.  

The 1.8 L Windburner's bowl is a very functional 850 ml size.
The pot lid snaps to the bowl in addition to the pot.

The Bowl
The bowl has a nice improvement over the original:  It doesn't get jammed onto the pot.  On the original, sometimes the bowl would ride up too far on the pot, and it was all you could do to get it off again.  MSR, thankfully, has corrected the problem, and the bowl pops on and off the pot easily.

As with the original, the pot lid fits the bowl equally well as it fits the pot.  The bowl is a full 850 ml (about 29 fluid ounces) in size, which is great for mixing things in – or eating out of.  The bowl is well marked with volume increments.
The bowl has English units up through 24 oz/3 cups or metric units to 600 ml
For travel with two, one person can eat out of the bowl and the other out of the pot. No measuring cup is needed since both the bowl and the pot have volumetric markings.

Functional Pot Size
The pot has volume markings up to 44 oz and 1.4 L.
Maximum recommended fill is 1.0 L.
Maximum recommended fill is 1.0 liter for safety, however, I think that if a person were careful and the pot were on firm ground, 1.5 liters would be practical.  There's a lot of power in this stove, and a boil over is a real possibility.  Your best bet is to keep the stove on a relatively low setting if you're going to put more in it than the recommended maximum amount.  DO NOT let the stove boil over.  If the stove boils over, 212 Fahrenheit/100 C water will be spilling onto the canister beneath.  What's the maximum temperature specification of the canister per the EN 417 standard?  50 Celsius (122 Fahrenheit).  Boiling water is twice as hot as the specification.  That could get ugly.  Do not let the stove boil over.

The vents on the Windburner are on three sides of the pot.
Turn the side without the vents into the wind.
Wind Tips and Tricks
I haven't seen this documented anywhere on MSR's site, but I always turn the portion of the pot without vents into the wind.  This gives the best results in my experience.

Sometimes getting the stove lit can be a bit of a trick in high winds.  Regular matches and regular lighters don't work very well.  Personally, I like using a torch style lighter like the Soto Pocket Torch.  Note however any lighter with a piezoelectric ignition will become unreliable somewhere around elevations of 8000'/2400m or higher.  Fire steels also work well in windy conditions and are not affected by elevation.

In addition to the new 1.8 L pot (seen at left in blue), MSR has also introduced a Windburner skillet.
What Else Is New?
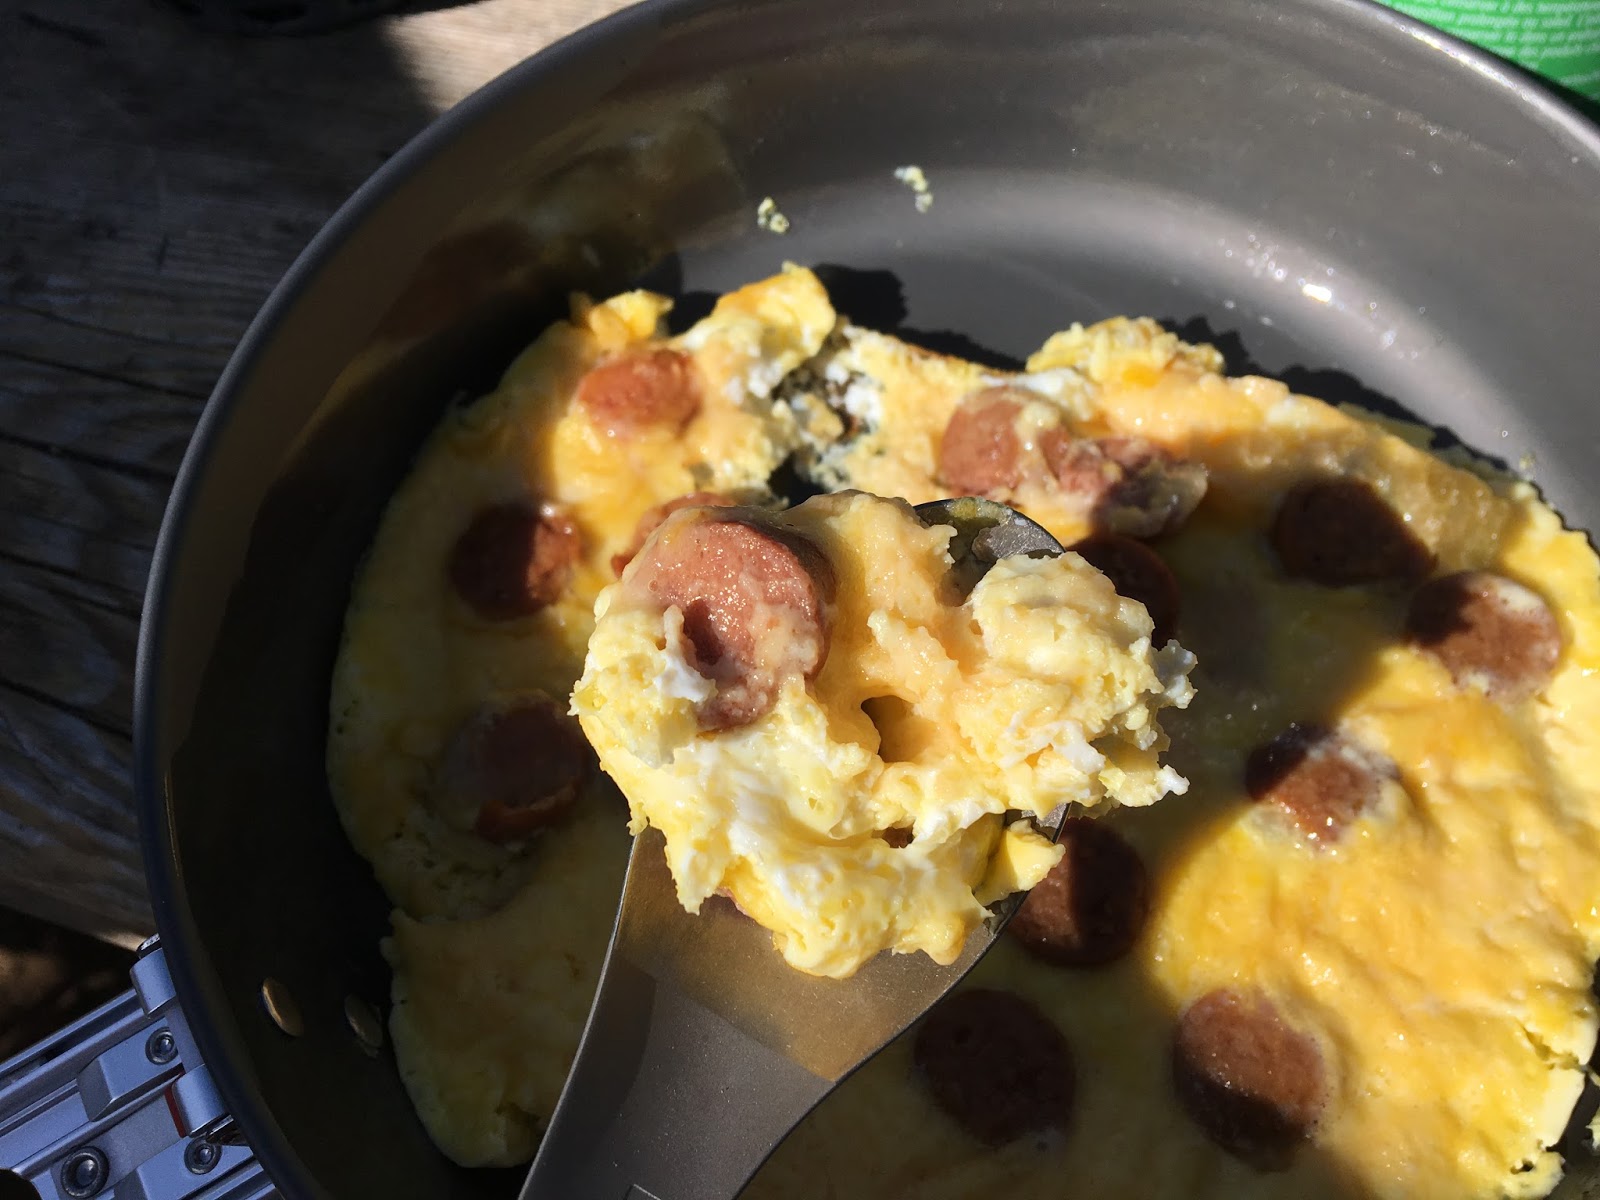
MSR has also introduced a hard anodized frying pan/skillet for use with the Windburner.  In my testing, I found the skillet to be a very capable cooking implement.
A very nice, moist omelette prepared in a Windburner skillet.

Problems
There is one minor problem with the 1.8 L MSR Windburner pot, and I'm a little disappointed here.  This same problem existed in the original version of the Windburner, and I really would have expected MSR to have corrected this by now.  The problem is simply this:  MSR hasn't really figured out a good way to secure the pot cozy in place.  Why does that matter?  Well, if the pot cozy slides up, as it sometimes does, then the lid will not seal fully.  You'll get a little dribble under the pour spot which will go down inside the cozy.
Using the pour spout on the the lid of the MSR Windburner.
Nice feature, but you have to make sure the pot cozy is moved down a few mm or it won't seal.
A little dribble isn't too big of a problem if you're just using water, but soups etc can be a big mess if they go down inside the honey comb plastic under the surface of the cozy.
You don't want food spills to go down inside the plastic honeycomb of the pot cozy.
The "fix" is fairly simple:  Just manually slide down the cozy a couple of mm and then seal the pot lid.  This isn't too big of a deal, but you do have to remember to do it.  My preference would be for MSR to have corrected the issue.  The pot cozy should, in my opinion, be designed such that it just can't slide up past a certain point and cause a leak, no matter how minor that leak may be.
Slide the pot cozy down a couple of mm in order to get the lid to seal properly.
The MSR Windburner is such a nice, well-thought out system that it's a shame to have this one minor flaw, and, yes, in the greater scheme of things, this is a pretty nit-picky complaint.  Hey, I'm a stove nerd; what can I say?  :)  Overall, it's a great system.  This little flaw certainly doesn't keep it out of my pack.

Summary – The MSR Windburner, 1.8 L Size

What's Good About It?
  • Utterly bombproof in wind
  • Good fuel efficiency and good speed
  • Nice bowl (with volume markings)
  • Nice pot capacity for two (and can accommodate spoon, lighter, etc.)
  • Robust and durable
  • Good heat control (It can do a lot more than just boil water)
  • Twelve attachment openings (so that it doesn't matter which way you turn the pot)
  • A handle that actually works

What's Not So Good About It?
  • If the pot cozy slides up, the lid may not seal properly for pouring.
  • It would be nice if they could make it an ounce or two lighter.  Note that the Windburner is about the same as other stoves in this class; this is just a "wish list" kind of a thing.
The MSR Windburner, 1.8 L Size:  Highly Recommended

Please see also all weights and technical data in Appendices I and II, below.

Thanks for joining me on another Adventure In Stoving,

HJ


Appendix I – Component Weights

Windburner stove system with 1.8 L  pot
Item Grams Ounces
Burner 200 7.0
Pot 227 8.0
Cozy 71 2.5
Lid 20 0.7
Bowl 54 1.9
Stand 20 0.7
TOTAL 592 20.8
Manufacturer's stated weight is 19.25 oz whereas my measured weight is 20.8 oz, about a 1.5 oz difference.  They may not be including the canister stand in their weight or perhaps the bowl.  My weights include everything that comes with the set.

Windburner skillet
Item Grams Ounces
Pan 234 8.3
Note:  All weight were measured in grams.  There may be minor inconsistencies in weights stated in ounces due to rounding or cumulative errors.

Appendix II – Manufacturer and Technical Data

Date Available:  January 2016.  Currently available as of this writing
Manufacturer:  Mountain Safety Research (MSR), a subsidiary of Cascade Designs.
Manufacturer's Website:  http://www.cascadedesigns.com/MSR
MSRP:  $160 for the Windburner system with 1.8 L pot.  $140 for the Windburner system with 1.0 L pot.  $90 for just the 1.8 L pot.  $70 for just the skillet.
Weight (measured):  See Appendix I
Materials:  Aluminum pot.  Plastic and nylon cozy.  Polypropylene bowl and lid.  Burner is primarily steel with brass threads.  The regulator valve assembly is brass.  The burner grip is plastic.
Packed dimensions:  8" x 5" (20.5 cm x 12.5 cm).
Size/Model tested:  1.8 L pot.
Colors available:  Blue or black.
Requirements:   A standard threaded canister of gas, sold separately.
Warranty Information:  Contact Cascade Designs through their website (see above).

The author, climbing a wind-swept desert ridge near Desert Hot Springs, California.
The MSR Windburner is the ultimate desert cooking machine.


Monday, April 24, 2017

Canister Stoves, Compared – A Compendium of Canister Stoves

Canister gas stoves are the most popular type of stove for backpackers today, but what type makes sense for what use? It's not always clear what the advantages of say a Jetboil are compared to say a Pocket Rocket. Why are some canister stoves better in cold weather than others? Let's see if we can get a high level view and make sense of the world of canister gas stoves.

Canister gas stoves.
A Soto Amicus, left, and an MSR Pocket Rocket 2, right.
Types of Canister Stoves
Three are three general classes of canister stoves.  I'll say a little in brief here and then break things down in detail further on.

The types are:
  • Upright (top mounted) canister stoves.  These are the type of canister stoves that screw directly onto the canister.  The stoves in the photo above are upright canister stoves.  Generally these are the most compact, lightest, and least expensive.  On the downside, they tend to be more vulnerable to wind and pot stability on some is limited.
  • Integrated canister stoves.  Think Jetboil.  This type of stove is sold as a set and includes a pot and stove that are designed to work together.  They may also include some type of cup or bowl.  Often the pot on this type of stove will have a heat exchanger for improved efficiency (fuel economy).  This tends to be the most expensive type of canister stove, but you do get complete set and don't have to buy a separate pot.
  • Remote canister stoves.  This type of canister stove consists of a burner that is connected to the fuel via a hose.  This type of stove can be used with a full 360 degree windscreen without the danger of overheating the canister, has good pot stability, and, on certain models, can be run with the canister upside down (inverted) for greatly improved cold weather operation.  On the down side, remote canister stoves are typically more expensive, heavier, and bulkier than upright canister stoves.  However, remote canister stoves are typically less expensive than integrated canister stoves.
Upright (Top Mounted) Canister Stoves
I recently wrote up a sort of "survey" of what's out there in terms of the typical upright canister gas stove.  The survey is in order by weight, lightest to heaviest, and lists a lot of facts like MSRP, weight, and BTU's/hr as well as my personal remarks.  See:
Upright Canister Stoves – the State of the Art.

Of the stoves that have come out in the last year or so, my two personal favorites are shown above, the Soto Amicus and the MSR Pocket Rocket 2.  If you have any interest in either of those two stoves, I have an article that compares them:   The MSR Pocket Rocket 2 vs. the Soto Amicus.

The Soto WindMaster operating in the Sierra Nevada on a PCT/JMT section hike.

This isn't exactly a new stove, but another one of my favorites is a stove that came out several years ago, the Soto WindMaster, which is the world's lightest stove with piezoelectric ignition.

One note on upright canister stoves:  You should not use a full 360 degree windscreen on them. If you fully enclose the canister and burner, you can overheat the canister.  That might be, uh, bad.  Explosion, flying shrapnel, you know, bad.  Don't do that.  Upright canister stoves do need to be protected from wind, but you need to be safe.  Please see:  Canister Stoves and Wind.

Integrated Canister Stoves
Some people of course are going to want something "more" than an upright canister stove, something like, say, a Jetboil.  This class of stoves is typically referred to as an "integrated" canister stove.  They're a little heavier, but they really save fuel and they're oh-so-convenient.

I've got a survey article on this type of stove:
Integrated Canister Stoves – The State of the Art.

A Primus Eta Express stove system is one example of an integrated canister stove.
One review I completed recently is for the Primus Eta Express stove system (see photo above).

Another popular integrated canister stove – a stove that is utterly "bomb proof" in wind – is the MSR WindBurner (see photo below).

Note:  The Windburner was originally named the Windboiler.  If you see or hear "Windboiler" instead of "Windburner" in my blog or in my videos, don't freak out.  They are one and the same stove.

The MSR Windburner

And of course there's always the Jetboil line of stoves.  I wrote a review of the Jetboil Sol which was featured in Seattle Backpacker's Magazine.  This review should give you some idea of the general features of a Jetboil even if you're considering other Jetboil models (Zip, Flash, Flash Lite, MiniMo, MicroMo, etc.).

Remote Canister Stoves
There are several reasons you might want to go with a remote canister stove.
1.  Stability.  They're generally lower to the ground and wider.  They're typically better for bigger pots as in group cooking.  Families with small children, Scouts, etc. may in particular value the improved pot stability of this type of stove.
2.  Wind resistance.  With an upright canister stove where the fuel is directly under the burner, if you put a windscreen around the stove, you also put a windscreen around the fuel.  Overheat a canister, and Boom!  You can kiss your dinner and possibly a whole lot more goodbye.  With a remote canister stove, the fuel is off to one side, connected by a hose.  A windscreen separates the fuel from the flame.  In other words, a windscreen actually makes a remote canister stove safer (the opposite of an upright canister stove).
3.  Cold weather operation.  If a given remote canister stove has a way to vaporize the fuel before the fuel reaches the burner head, then the stove can be run with the canister upside down (inverted). Hunh? Who cares?  Well, you do if you're out in cold weather.  If you're headed out into cold weather, a remote canister stove capable of inverted operation will handle the cold weather better than any other canister stove.  This is a bit complicated, so I've written a separate article on it.  Please see:  Gas Stoves in Cold Weather – Regulator Valves and Inverted Canisters.

I don't have a survey article (yet) on remote canister stoves, but below are some links to remote canister stoves I've reviewed:
Below is a photo of a remote canister stove, a Kovea Spider, running in inverted mode.  Note how the fuel is connected to the stove via a hose.  Note also the use of a full, 360 degree windscreen (don't do this with an upright type canister stove!).
A Kovea Spider remote canister stove.
Note how the canister is upside-down (inverted).
Conclusion
In addition to all of the above, there are a whole lot more articles on my blog if you want to geek out on stoves.  You can Google search to your heart's content.  If you prefix your Google search with "site:AdventuresInStoving", then Google will search just my blog.

Now, whatever stove you pick, I hope it serves you well out there on the trail.  Of course, even the safest designs need a smart operator in order to be safe.  So, be careful out there – but of course enjoy.

Happy hiking,

HJ