QuietStove.com

Saturday, March 30, 2013

Kovea Enters the US Stove Market

Kovea is the best known brand that you've never heard of (if you're an American).  Kovea has been making high quality stoves and other gear for names like MSR and Snow Peak for some time.  I had heard of the Kovea name (and it's excellent reputation) from friends overseas.
The MSR PocketRocket (left) and the MSR MicroRocket (right), both commonly said to be made by Kovea for MSR
But Kovea has never sold stoves under it's own name in the US.  True, you could get them on eBay, but not from any US based retailer.
The Kovea Spider, a first class stove
Well, all that has now changed.  Kovea has announced it's first venture in selling its stoves (and other gear) directly in the US market through a collaboration with  The Gear House, a Colorado based retailer.  Other retail agreements may follow.  Among the interesting offerings is the Alpine Pot which appears to be Kovea's answer to the Jetboil.  I'd love to test one of those some time.
The Kovea Alpine Pot stove system


If you've read my recent review of the Kovea Spider, you'll know that Kovea is putting out good stoves at competitive prices.  I think Kovea is a stove company to watch.

Thanks for joining me on another Adventure in Stoving,

HJ

Monday, March 25, 2013

The New, Lighter 1.0L MSR Reactor

MSR has just released (January, 2013), a new, lighter weight version of their Reactor stove system, with a 1.0L pot.  Think of it as a "mini Reactor" (my name for it, not MSR's).
The original Reactor (1.7L), left, and the new "mini" Reactor (1.0L), right.
A Substantially Lighter Version
Now, I know what you're thinking, "well, of course it's lighter, it's smaller."

Yes, I understand that, but I mean this one really is lighter, substantially lighter, lighter than you would expect just based on size alone.  Typically, a larger pot is actually lighter per unit of volume.   For example, my 0.9L Primus LiTech kettle weighs 164g, which is a ratio of 0.182g/ml.  My 1.5L kettle of the same brand and type weighs 219g, which is a ratio of 0.145g/ml.  Yes, the larger kettle is heavier overall, but it's lighter per unit of volume.

The original Reactor pot weighs 341g (without lid), which is a ratio of  0.20g/ml.  The new Reactor pot weighs 172g, which is a ratio of 0.17g/ ml.   So even though smaller pots usually weigh more per unit of volume, the new Reactor actually weighs less per unit of volume.  The weight savings here aren't just from a smaller pot but rather from a redesign.  Note:  Both the original and the new mini Reactor use the same burner.

Update 25 March 2013:  MSR informs me that there is also a newer version of the 1.7L Reactor pot that has the same welded fins as the new 1.0L Reactor pot.   The newer version of the 1.7L Reactor pot is lighter by about three ounces (~80g) than the original 1.7L Reactor pot.  If you have the newer version of the 1.7L Reactor pot, your weight savings will not be quite as substantial if you switch to the 1.0L Reactor pot.

OK, so the new Reactor is lighter than just what we would expect based on the smaller pot size, how did they do it? Well, clearly MSR set out with lightening up in mind.  The heat exchanger, a significant source of weight, has been revamped.
The original Reactor, left, and the new "mini" Reactor, right
Just take a look at the above photo.  The number and thickness of the heat exchanger fins has been reduced.  Notice also that on the original Reactor, the heat exchanger fins and pot appear to be of one piece where in the new mini Reactor the fins are clearly welded on.  The net effect of these changes is significant:  The mini Reactor is a just plain lighter set up.   The mini Reactor is so much lighter that you notice it right away when you pick up the pot.

Now, MSR may face some criticism from some quarters for this design change.  In the original design, the entire heat exchanger fin was in contact with the pot.  In the new design, the fin only contacts the pot at the weld.  And of course there are fewer fins.  Clearly, there is going to be some reduction in heat transfer.  Indeed, MSR lists the boil time for one liter of water as 3.0 minutes for the original design but 3.5 minutes for the new design.

I would answer such criticism as follows:
1.  Everything in life is a tradeoff.  In order to lighten things up, the heat exchanger had to be redesigned.
2.  Entrainment of hot exhaust gasses continues undiminished (more on this in Appendix II).
3.  The level of heat transfer effected is still exceptional – far above that of a "plain" pot.

So, yeah, you're giving up some degree of efficiency, but you're gaining a much lighter system, a system that still works exceptionally well at transferring heat.  Beyond that, if you're really worried about that lost little bit of heat transfer efficiency, then just go out and buy the original version and carry the extra weight.  MSR will continue to offer both versions, so take your pick.  It's the best of both worlds, really.

Update 25 March 2013:  As I mentioned above, there is a newer version of the 1.7L Reactor pot available.   The newer version of the 1.7L Reactor pot still has higher efficiency than the 1.0L version.  The original version of the 1.7L Reactor pot has been discontinued.

Now, I listed "entrainment of hot exhaust gasses" as one of the things that contributes to the Reactor's amazing heat transfer efficiency.  Just what the heck does that mean?  Please see Appendix II, below, for an explanation.

New Features
Not only is the new pot lighter, but they've added some new features and options.  They're all nice, but I think the first is actually pretty important, particularly for serious climbers:  MSR has come out with a hanging kit.
A 1.0L mini Reactor in the new hanging kit
I'll review the hanging kit separately, but for now let me just say that the kit works well and that the kit is designed to fit all pot sizes for the Reactor system. Note:  I've only tested the hanging kit with the 1.0L sized pot so far.

Another great new feature:  They've added a pour spout.  Yeah, it's just a little thing, but darn is it handy.  Thank you, MSR!  I for one appreciate MSR's attention to detail.
The pour spout on the new 1.0L MSR Reactor pot
In conjunction with the pour spout is a new feature on the lid:  A drinking hole/strainer. 
Holes on the lid of the new 1.0L MSR pot can be used for drinking or as a strainer.
The knob on the lid has been changed.  The new knob can be used to hold the lid.  This may not be such a big deal for hikers and backpackers, but this might be really useful for climbers.
The knob on the pot lid can be used to suspend the lid
Now notice also that there's a hole in the center of the knob.
The hole in the center of the knob can accommodate a coffee press
MSR is now offering a French press that fits the new 1.0L pot.  Fresh morning coffee, anyone?  Nice!  I'll review the coffee press in an upcoming post.  Note:  MSR is also offering a separate, larger French press attachment for the original 1.7L Reactor pot.

Packability
OK, so it's smaller and lighter while still being efficient, and it's got some nice new features and optional extras.  That's all great, but can I still pack everything inside the pot like I could with the original version? 

Well, as a matter of fact, yes, you can still pack everything inside.  But, pay attention:  Along with the new 1.0L version of the MSR Reactor, MSR also introduced a new canister format for their 4 ounce class canisters.  The new canister format is more packable and contains essentially the same amount of gas as their old canisters.  See The New MSR Gas Canister for more details.  You must use the new canisters if you want to pack everything inside the pot.
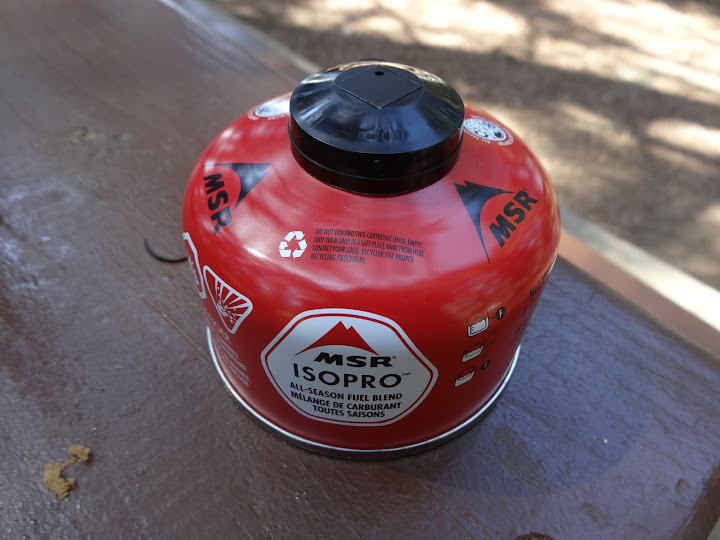
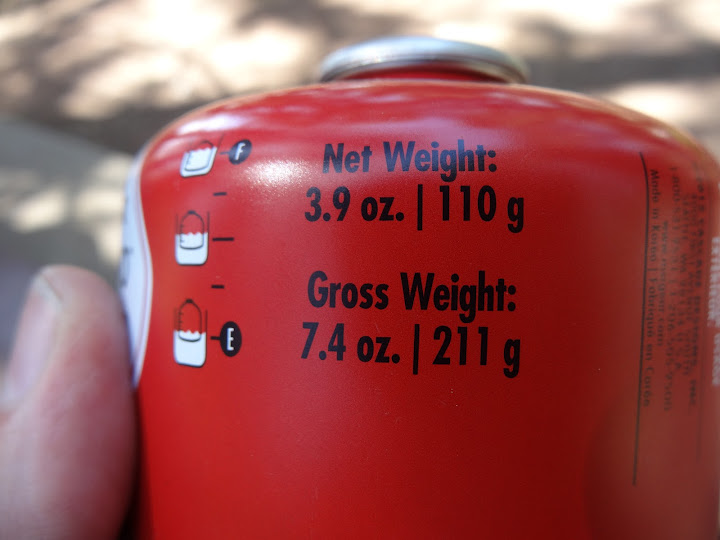
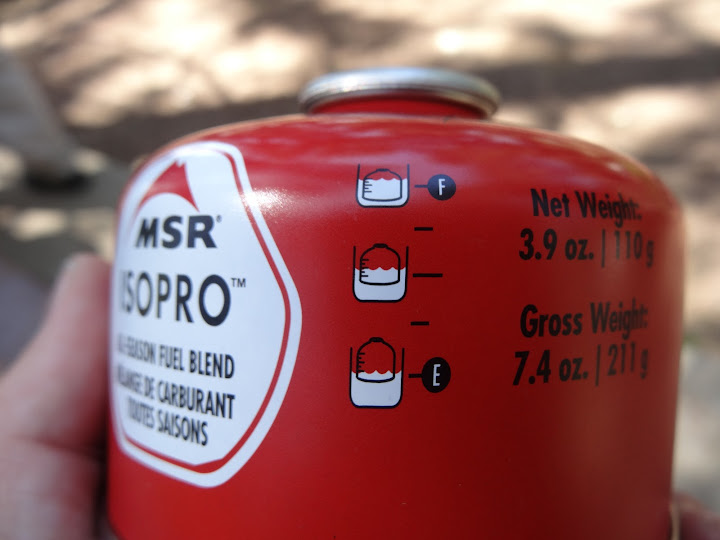
The new, more packable version of the MSR 4 ounce class canister (which is now 3.9 oz/110g)
To pack things up, first put the included little pack cloth into the bottom of the pot.  This is actually fairly important for reasons that I'll explain in a minute.
First, place the pack cloth into the bottom of the pot.
Then, place the canister in the pot upside down.  Again, you must use the new 3.9oz/110g MSR canisters (or a similar canister of another brand).  The old 4.0oz/113g MSR canisters will NOT fit.  Go ahead and leave the cap on the canister; there is room.
Second, place the canister in upside down.
After that, place the burner, face down, into the pot.  Make sure you put the valve control into the pour spout of the pot.
Third, put the burner upside down into the pot, being careful to point the valve into the pour spout.
It's a tight fit, you may have to give it just a bit of a shove.  Now, here's where that bit of pack cloth comes in handy.  The end of the valve spindle will scratch up the pot. 
Scratches in the pour spout from the end of the valve spindle
So rather than scratch up your pot, merely position one corner of your pack cloth such that it protects the pour spout, like so:
Use the pack cloth to cover the tip of the valve spindle and protect your pot from scratching
Voila!  Problem solved.

It's a tight fit, but everything does fit, and you've got a very compact unit.

Capacity
So, the pot is billed as a 1.0L pot, and if you fill the pot right to the brim, yes you can fit a liter in there.  On the other hand, MSR recommends that you put only 0.5L in the pot at a time.  What?  Only use half the capacity of the pot?  What gives?  Well, the Reactor is one of the most powerful backpacking stoves in existence.  You can get a violent boil very quickly, a boil that could overtop the pot in the blink of the eye and presents a very real scalding risk.  And boiling hot water hitting a canister?  Yipes!  The pressure inside the canister could go through the roof.  Your stove could flare up or behave in unexpected, dangerous ways.  Not something I'd want to risk!

That said, I think a careful user, a user who kept the stove turned down and watched the pot like a hawk, could easily boil 0.75L at a time or maybe even 0.8L.  However, if you boil more than 0.5L at a time, you are going against the manufacturer's recommendations and you do so at your own risk.  The consequences of a boil over could be quite severe if your canister becomes overheated.  Beware!

Who the Heck Needs a Reactor?
People often ask me:  "Who the heck needs so much stove?"  Indeed, who does need such a powerhouse?

Well, perhaps not someone who is traveling in comparatively benign conditions.  But for those who travel in heavily windswept areas, particularly mountaineers who venture into high altitude, exposed terrain, the wind proofness of an MSR Reactor makes it just the stove you want.  The Reactor is the most wind proof upright canister stove, bar none.  When other stoves fail to even bring a pot to the boil, the Reactor hums along as though nothing unusual were happening.  If I were on a barren, windswept, high altitude plateau, there is no upright canister stove that I'd rather have.  Indeed, it is MSR's contention that the Reactor is the most windproof stove of all classes.  I haven't yet been able to corroborate that with my field testing, but it's certainly a credible claim.

But there's another application where the power of a Reactor can be properly brought to bear:  snow melting.  Think about it:  You pull into your camp for the night.  You need to melt enough snow for drinking and cooking that evening as well as enough water for your next day.  You might need as many as six liters.  That takes a lot of time.  The Reactor's power and efficiency can be a real asset for those who need to get into the bag ASAP and get up early for an "Alpine start."

I think therefore that the Reactor will appeal most to serious climbers and mountaineers, but there will certainly be an appeal to anyone who faces significant winds or needs to melt snow quickly.  In it's new compact, lighter format, the Reactor may also hold appeal to adventure racers.

Concluding Remarks
I bought an original Reactor several years ago.  To be honest, I really haven't used it all that much.  Is it a bad stove?  No, not at all, but I'm generally not willing to carry all that weight unless I really need it.  If I'm not going to need to melt some serious snow or expecting really windy conditions, I'm going to go with something lighter. With the new version, I expect to get a lot more use out of the stove.

The new version is certainly going to appeal to soloists, particularly serious climbers and mountaineers, but a Reactor is so stinkin' fast that I think the 1.0L pot can still be of use to a small team that wants to travel light and fast.  One just needs to "re-imagine" how to use the system. Instead of cooking everything at once, make small but quick courses.  It would take a bit of getting used to and a bit of thinking through in advance, but the new mini Reactor is fast enough to make it practical and would allow a small team to have real weight and space savings


The new 1.0L MSR Reactor 

What's good about it?
  • Significantly lighter than the original 1.7L pot (and also lighter than the newer 1.7L pot, but not as dramatically)
  • Great new options (hanging kit, coffee press)
  • Nice new features (pour spout, drinking holes)
  • Most windproof upright canister stove known to humankind, period (true of all Reactor sizes)
  • Powerful snow melting capabilities (true of all Reactor sizes)
What's bad about it?
  • Slightly less efficient (but hey, just go buy the 1.7L version if you really need that level of efficiency)
  • Like all upright canister stoves, the Reactor is adversely affected by cold weather.  Assume that you can go no colder than 20F/-7C with propane/isobutane fuel unless you know the "tricks."  See Appendix III, below, for further information.  
  • The burner can only use Reactor specific pots (true of all sizes)
The new 1.0L MSR Reactor:  Highly recommended

I thank you for joining me for another Adventure in Stoving,

HJ


Appendix I – Component Weights

ItemGrams MeasuredStated GramsOunces MeasuredStated Ounces
1.0L Pot1721976.16.9
Burner1781796.36.3
Lid36361.31.3
Pack Cloth440.10.1
Total39041613.814.7
Update 25 March 2013:  I've weighed my 1.0L pot at least ten times now.  I get 172g.  I talked to MSR.  They weighed a pot there in Seattle and confirmed 197g.  That's a difference of 25g (nearly an ounce).  I'm not sure what the issue is here.  My pot seems fine, but maybe I got an odd pot?  If I can, I'll head to a local store and see if I can measure another pot, but these are new, so I haven't seen them in any stores yet.  If you decide to purchase one, don't count on your pot being 172g; it may be 197g.  Regardless of the precise weight, the system is well designed, well put together, and is clearly lighter than the original Reactor. 


Appendix II – Entrainment of Hot Exhaust

What do I mean when I say that the Reactor "entrains hot exhaust gasses?"

Well, first let's take a look at the Reactor system.  How does air flow through the system?  Look at the exhaust vents built into the pot itself.  Notice that the vents are well up the sides of the pot.  This is important.
The exhaust vents on a Reactor pot.
 The hot gases produced by combustion exit through these vents.

OK, if that's where the exhaust goes out, how does air enter the system?  The burner nests tight against the bottom the pot.  Air can't come in around the sides of the burner.
The burner on a Reactor nestles up inside the pot.

So how does the air get in?  Through  the burner.  Take a look at a Reactor's burner.  Air is entering the system through the air inlet holes in the sides of the burner (well, specifically through two Venturi type ports on either side of the valve, but the essential idea is that the air comes in through the burner assembly).
Vent holes in the sides of the burner funnel air into the Reactor system.
OK, so we've got fresh air entering through the sides burner, proceeding through the combustion area of the burner, flowing along the heat exchanger fins, then up the sides of the pot, and finally exiting through the exhaust vents.  Note that the exhaust vents are well above the bottom of the pot.
Airflow in a Reactor system.
Blue = cool.  Red = hot.
With a conventional pot, the hot exhaust from the burner just flows out around the bottom of the pot and dissipates into the surrounding air.  With the Reactor, the hot gasses are trapped inside the heat exchanger assembly and channeled along the sides of the pot.  The hot gasses cannot exit until they reach the exhaust vents.  These hot exhaust gasses transfer additional heat to the pot, heat that is normally lost in other set ups.  The trapping of the hot output from the burner is what I mean by "entrainment of hot exhaust gasses" and is something that is unique to the Reactor among canister stoves.  This entrainment of hot exhaust gasses is part of what gives the Reactor its very high efficiency.

Appendix III – Cold Weather and Canister Gas Stoves

Canister stoves are generally limited in their operational temperature range to about 20F/-7C at sea level towards the end of the canister if you use propane/isobutane fuel (but there are "tricks;" see the article list, below).  I emphasize "at sea level" here because the higher you go, the colder you can operate a canister stove.  Generally, you can operate 2 Fahrenheit degrees colder per thousand feet of elevation that you gain (About 1 Celsius degree per 300m gain).  Of course with a fresh canister, you can go colder than that, but performance will fall off as the canister empties.  It is difficult if not impossible to determine how soon the performance will drop off as the canister empties, so I recommend the practice of assuming that you can go no colder than 20F/-7C at sea level with propane/isobutane fuel.  Note that 20F/-7C is the coldest temperature that you can operate at, so don't expect to start at 20F/-7C and be able to cook for long with a half empty canister; canisters get colder as you use them.  Note also my emphasis on using a propane/isobutane fuel.  You cannot use regular butane fuel in cold weather and expect decent results.  You must use a fuel that contains isobutane.

Sound complicated?  Don't despair!  It does take some getting used to, but it's actually not too bad.   For "tricks" to operating in cold weather, please see:   Cold Weather Tips for Gas Stoves

As alluded to above, it matters which brand of gas you buy for cold weather.  Please see:
What's the Best Brand of Gas for Cold Weather?

I've got a whole series of related articles if you'd like to read up.  Here's the whole list:

Saturday, March 23, 2013

The New MSR Gas Canister

In conjunction with the release of the new, lighter 1.0L Reactor stove, MSR has changed the format of their 4 ounce (113g) class gas canisters.  Note the emphasis on the word "class."  We'll return to that in a minute.
The new 3.9 oz/110g MSR gas canister
Yes, I'm writing a post about the shape of a gas canister.  :)  But I think this is actually news, and good news at that.  For some time, MSR, which has the best cold weather gas available (at least in the US market), has made a big, ungainly 4 oz/113g canister.
The old MSR 4 oz/113g canister (left) and the new more packable 3.9oz/110g canister (right)
Now, this is not to criticize MSR.  I think MSR was very nobly trying to provide better service to their customers.  The wider 108mm diameter MSR canister was clearly more stable than the 90mm industry standard.  But with the advent of readily available canister stands ("legs"), such stability is no longer so much a concern.
The old MSR canister format (bottom).  The new MSR canister format (top).

Now that MSR has accepted the 90mm industry standard, I can buy any four ounce class of canister and know exactly in which pots it will fit and which it won't.  The guess work and having to remember which is which is gone.
MSR and Jetboil, now the same diameter (90mm)
Lighter Weight
In addition, the new four ounce class canister is lighter for the amount of gas it contains.  The old canisters weighed 8.6oz/244g.  The new canisters weigh 7.4oz/211g -- for basically the same amount of gas.  More gas per unit of weight?  That's pretty nice if you ask me, and I have no objection whatsoever to saving an ounce in weight per canister.
MSR, Snow Peak, Optimus, and Jetboil four ounce class canisters now all have the same diameter (90mm)
Now, note my emphasis on the word "class" when I say four ounce class.   That's because the amount of gas in canister varies a bit brand by brand.  Jetboil for example contains 100g, and the old MSR canister contained 113g (exactly 4 oz).  With the change, MSR, Optimus, and Snow Peak will all uniformly have 110g (3.9 oz) of gas.  Jetboil is the outlier with only 100g.  I figure a 110g canister will last about 5 days for a person who is conservative and doing simple cooking in good weather or 3 days for two people.  For tougher weather or more complex cooking, you'll have to bring more gas of course, particularly if you're melting snow.
The new four ounce class canister actually contains 110g (3.9oz) instead of 113g (4.0oz).  A 3g difference?  No big deal.
MSR has also printed the gross (total) weight on the canister (7.4oz/211g), which is handy.

The Fuel Gauge
But what the heck are those little markings on the canister to the left of the weight?
The "fuel gauge" on the side of the new MSR canister
Interestingly, they're a sort of fuel gauge.  When the canister is full, it will float low in water.  When the canister is empty, it will float high in water.  Out on the trail, all you have to do is drop your fuel canister in a bowl or pot of water, and wherever the waterline hits on the "fuel gauge" is approximately how much fuel you've got left in your canister.  Pretty cool -- and for zero weight penalty.

I asked my contacts at MSR where they had gotten the idea, and they told me that it was from my article in Seattle Backpacker's Magazine, How Much Gas Do I Have Left?  Yes, of course it's flattering to me that a major stove company adopted my idea, but think about what this really means:  MSR is listening.  I for one have been very impressed by what's been coming out of MSR in the last half dozen years.  They're really paying attention to what the backpacking community wants, even to the point of small details like this.  I doubt that MSR will be making piles of money on this "fuel gauge."  It's just part of MSR's attitude of excellent customer service.  Good work, MSR.

The new 3.9 oz/110 g MSR gas canister.

So, let's see:  More packable, more gas for the weight, and a simple yet effective way to tell how much fuel I've got when I'm out on the trail?  What's not to like?  The new MSR canister:  I welcome it.

Thank you for joining me on another Adventure in Stoving,

HJ

Tuesday, March 12, 2013

The Soto Microregulator (OD-1R)

Soto Outdoor is a high end stove manufacturing concern based in Japan.

Previously, I've done the following reviews of Soto gear:
Today, I'd like to review an upright canister gas stove from Soto, the Microregulator (OD-1R) which is the world's lightest upright canister stove with auto ignition.  Note:  In Japan, for whatever reason, the stove is referred to as the SOD-300 instead of the OD-1R.
The Soto Microregulator on high.
I've characterized Soto as a high end stove manufacturer, and indeed they are.  Their manufacturing quality is very high, and their stoves show a level of attention to detail that very few other stove manufacturers can rival.  Dare I call a stove beautiful?  If any stove may bear that appelation, it is a Soto.  Soto stoves are a study in precision manufacturing.
The burner head of a Soto Microregulator.  Note the piezoelectric ignition at the very top of the burner head.
While I think quality of manufacturing sets Soto apart from the crowd, there's another thing that makes the Soto Microregulator stand out in particular:   The Microregulator is the world's lightest upright canister gas stove with auto ignition.  Soto's site advertises a weight of 73g.  On my gram scale at home, I register a mere 70g.  Either way, it's about 2.5 ounces and is very light weight.
The piezoelectric auto ignitor of a a Soto Microregulator
Not only did Soto come up with a lightweight auto ignition, they did a darned fine job of it.  Whereas most auto ignitions look like they just crudely bolted an ignition to the side of the stove as more of an afterthought, the Soto Microregulator's ignition was clearly part of the design from the beginning.  The wire for the piezoelectric ignition runs up through the center of the burner column and isn't bolted to the side.  This is no small trick, for running the ignition wire up the center of the stove means that the wire will go through the mixing chamber where the fuel and the air are combined in the proper ratios for efficient combustion.
If you look closely, you can see a copper wire through the opening of the mixing chamber.
How on earth the Soto engineers were able to run that wire through there without messing up the fuel-air mix, I'll never know, but it speaks well indeed of the engineering expertise at Soto.  The top of the ignitor exits in the center of the burner head and is relatively more well protected than side mounted piezoelectric ignitions.  Note:  No ignition system, no matter how well designed, is ever 100%; always bring a lighter or matches (or some other means of ignition) with you on every trip.
The strip of metal that can be seen in the center of the burner head is the upper end of the Microregulator's ignition.
The pot supports and valve adjustment lever fold up well, and the stove is quite compact.
The Microregulator folds up well.
The Microregulator has a nice wide burner head which helps prevent "hot spotting" in the center of your pan which in turn helps prevent burnt food.
The burner head of a Microregulator
The pot supports swing up...
The pot supports rotate
...and lock into place.
After rotating, the pot supports slide into and lock in place.
I've seen some criticism that the pot supports slip too easily out of place.  What I've found after using the stove for a while is that the supports tighten up a bit after they've been exposed to food and weather.  I think they're reasonably stable, and there is absolutely no chance they're going to move when the weight of a pot or pan is on them.  See the video review below for, among other things, a demonstration regarding the pot supports.
Note:  Soto has introduced (Summer, 2012) a new version of this stove, the OD-1RX that has different pot supports.  I have not yet seen the new stove but the new pot supports are said to be improved.

Speaking of pot supports, I think that pots up to about 1300ml work well with the stove although I'm sure some will feel more comfortable with even larger pots.
A 1300ml Evernew UL titanium pot on a Microregulator
I also found that my MSR Blacklite pan which has a 7 5/8" (19.5cm) diameter worked well with the Microregulator. The Microregulator's pot supports have serrations that grip a pot or pan's bottom well.
An MSR Blacklite Pan on a Microregulator
Now, I've said that the wide burner head of the Microregulator will help prevent hot spots.  So, how does it do in actual cooking?  It was a little bit stormy the day I took this series of photos, so please excuse my Z-Lite pad which I was using as a partial windscreen (do NOT use a full 360 degree windscreen with an upright canister stove!).
Getting started with an omelette using a Microregulator
And how did it turn out?  Quite well, I thank you.  A bit of normal browning on the bottom, but...
An omelette cooked on a Microregulator.  Nicely done.
...quite moist and delicious on the inside.
A very nice moist omelette, thanks to the Microregulator.

Myths concerning the Soto Microregulator
For whatever reason, there are two myths out there concerning the Soto Microregulator.

Myth #1 is that the Soto Microregulator will somehow draw more gas out a canister than other stoves. Uh, no.  Not only is there no basis in either physics or chemistry for such an assertion, my testing has verified what theory suggests:  A canister that is empty to another stove will be empty to the Microregulator as well.  In other words, a Microregulator cannot pull more gas out of a given canister than another stove.  I have no idea where such a myth might originate or what could prompt such odd speculation, but there is no basis in fact to that myth.  For those interested in my testing, please see Advantages (?) of Regulator Valved Stoves, Part I

Myth #2 is that the Soto Microregulator will somehow operate better in cold weather compared to other upright canister stoves with a conventional needle valves.  Again, no.  A Soto Microregulator will not run any better in cold weather than any other upright canister stove.  The pressure in a canister is determined by a) the composition of the fuel, b) the temperature of the canister, and c) the ambient atmospheric pressure.  A regulator valve can hold back pressure, but it cannot produce pressure.  In order for a regulator to function it must have something to regulate.  When the pressure inside a canister falls off due to cold, a regulator valve has nothing to regulate and does no better than a needle valve.  This is a complex subject, but if you're interested in it, please see my testing in Advantages (?) of Regulator Valved Stoves, Part II

So, why a regulator valve?
OK, so a Microregulator cannot get more out of a canister than other stoves and a Microregulator can't run any better in cold weather than other stoves, so why a regulator valve?  Excellent question.  A regulator valve can do a couple of things for you:
1.  A regulator valve can control excessive pressure, as in hot weather.  For example, if you're doing the Pacific Crest Trail and you're crossing a desert section in the southern reaches of the trail, you could encounter some very hot weather.  In hot weather, a canister might actually have too much pressure and can "overpower" a stove.  A regulator can tamp down that pressure and keep the stove safe to operate.
2.  A regulator valve can keep a flame more constant if the canister pressure drops provided that there is additional pressure to be had within the canister.  In other words, a regulator valve can open up more on its own allowing more pressure to flow if there is additional pressure available in the canister.  A regulator valve can "smooth out" changes in pressure.  Thus, a regulator valve can give you a more constant flame.  You can think of a regulator valve as a sort of "cruise control" for your stove.    Again, though, there has to be additional pressure available inside the canister in order for the regulator valve to have something to work with.  But couldn't you just reach over and open up the valve a bit wider on a regular needle valved stove?  Yes, you could.  The Microregulator just does it for you automatically.  This automatic adjustment doesn't seem like a hugely valuable feature to me, but to some it may hold appeal.

Concluding remarks
The Soto Microregulator, OD-1R, is a well built, well designed stove, and it's the world's lightest stove with auto-ignition.  The Microregulator is certainly an excellent choice for someone desiring to do simple backpacking style cooking, but because of it's fairly wide burner head, the Microregulator can take on more complex cooking tasks as well.

There is however a lot of confusion about just what the regulator valve is supposed to do, confusion that in my opinion Soto hasn't done enough to dispel.  I think that everyone should just forget that there's a regulator valve on this stove and focus on the fact that this is an excellent stove and that this is the world's lightest stove with auto ignition.  In practical terms for someone out on the trail, the regulator valve is very much a non-event. 

Summary
The Soto Microregulator (OD-1R)
What's good about it?
  • World's lightest stove with auto-ignition.
  • Excellent design and manufacturing quality.
  • Wide burner head which makes this a good stove for real cooking for backpackers.
  • Serrated pot supports make your pot or pan less likely to slip off.
What's bad about it?
  • There is a lot of confusion about the regulator valve.
  • Perhaps the pot supports could lock into place a bit more solidly (but that's a pretty minor complaint on an otherwise excellent stove).
The Microregulator stove from Soto:  Highly recommended.

I thank you for joining me on another Adventure in Stoving,

HJ
The beautiful blue flame of a Soto Microregulator.  Truly a nice stove.

Sunday, March 10, 2013

Cooking with the Kovea Spider

The Kovea Spider (KB-1109) is a relatively new remote canister stove.  I recently wrote a review of the Spider.  The Spider has a relatively small burner head, which is good in that it makes the stove compact, but apparently there's some concern out there that the small burner head might make the Spider a poor cooking stove (perhaps small head = small flame = a burned spot in your food?).

Now the fact of the matter is that the burner head angles the flames outward which gives a well distributed flame.  No "hot spotting" here.
The flame on a Kovea Spider is well distributed.
But the "proof of the pudding is in the eating" as they say, so let's do some actual cooking.  It's Saturday morning, so how about a delicious breakfast omelette?  Yum!  Let's get started.

First, the ingredients.
The makings of a nice omelette
For today's omelette, I've brought along:
  • Boxed milk of the type that needs no refrigeration.
  • Some leftover bacon and ham
  • Five eggs
  • Some shredded cheese
  • A bit of olive oil (to grease the pan)
And for the cooking, we'll need the proper tools.
The tools needed for cooking an omelette
For today's cooking, I'll be using the following:
  • MSR Blacklite pan (aluminum, not titanium or stainless steel)
  • A Jetboil spatula
  • A set of Open Country pot grippers
Note that I'll be using an aluminum pan.  For real cooking, I have a strong preference for aluminum cookware.  Aluminum conducts heat far better than stainless steel or titanium and does a really good job with foods that need low, even heat -- like an omelette.  I suppose one could use cast iron as well, but shall we say that cast iron is none too light to carry.

Well, then, let's crack the eggs.
Our eggs, laid out nicely in a bowl
And add our milk.
Milk makes for a really good omellete
I like to add about 25ml of milk per egg.  Milk gives an omellete a rich, creamy taste.

Next, beat the eggs and milk with a fork until well blended.
Beat the eggs and milk to as reasonably uniform a consistency as you can
There are those who say that the whites should be "beaten until stiff" and then the yolks should be "folded" in.  What a lot of unnecessary faffing about!  You want everything blended together in the end.  Go there directly.  "Beating the egg whites until stiff" is the province of those who sit at home and have no appetite!  I like to roam about the countryside in the out-of-doors.  "I'm hungry, let's get on with it!" is my philosophy.

I then pour the blended eggs and milk into my pan which I have already greased with a bit of olive oil and sprinkle in the cheese.
Eggs in our pan with the cheese sprinkled on.
Yes, I add the cheese before I start cooking.  I like my cheese well melted, and I like all my ingredients good and hot out on the trail.

Next, I break up a bit of bacon.  Today I brought bacon cooked earlier that day, but a package of bacon bits from the market works quite well and is generally more practical for the trail.
Bacon, added to the mix
Lastly, a special treat for today, I add some ham.
Ham, added to the mix
There we are!  Now, we're ready to start cooking, so let's set up our little Spider.
The Kovea Spider, legs deployed.
Now, I know what you're thinking:  "How are you going to cook a proper omelette on that little thing?"  Ah, skeptical reader, bear with me, and you shall see.

I like to add a little disc of aluminum underneath.  The aluminum disc will reflect heat upwards and also prevent any scorching of the picnic table I'm set up on.  The disc doesn't come with the stove, but it's easy enough to buy or make one.  The disc I have is from Flat Cat Gear and has a small hole punched out in the very center where the disk folds.  This hole prevents tearing at the crease, which is a nice feature.
An aluminum disk reflects heat up to your pot and protects the surface you're working on.
Next, I enclose the stove in a windscreen.  Here, I'm using a standard MSR windscreen, but any windscreen will do.  Whereas the aluminum disk is pretty much an optional extra, a windscreen is not.  A windscreen will allow you to use less fuel and give you greater control over your cooking, particularly at low flame.  I recommend using a windscreen any time you cook.

Recall also that one of the benefits of using a remote canister stove as opposed to the more typical upright canister stove is that you can use a fully enclosing windscreen.  Use a full windscreen with an upright canister stove and your canister might just overheat and explode.

So!  Eggs on, let's get cooking.
Cooking the omelette
To start, I use a medium heat.  I want the eggs to start bubbling.  Recall that you want the milk to boil.  It is the boiling milk that puts all those little bubbles into your omelette, giving it that light, fluffy texture.
Eggs, just starting to bubble.
However, just as soon as things start to bubble, you want to turn the heat down to very low.  I've got five eggs here in a relatively small pan.  In order to cook things all the way through evenly without having a burnt bottom, I'm going to have to use a very low heat.  Now, this ought to be a good test of the Spider.  Will that little burner head give me a burnt bottom?  Will it give me a ring of blackened eggs in the center of my pan?  Or will it be able to give me a nice, even heat and cook all parts of the omelette properly?  Let's see.

Looks like things are coming along nicely.  The toughest part of the omelette to get to cook properly is the very top.  Here, I've pushed the edge of the omelette in a bit on the left hand side and allowed any remaining liquid eggs to flow into the resultant gap.  Perhaps that's "cheating," but I look at that as being strictly a practical measure to ensure full cooking of that last little bit of liquid egg that always remains on top -- even when I cook omelettes at home.
Almost done now.
There!  Done at last.  And how did we do?  Let's pull it out of the pan and have a look.
The completed omelette.
Looks good!  Let's pull it out of the pan and have a closer look.
Looking at the omelette, edge on.
The omelette is fairly easy to pick up and move, which shows good cohesion -- meaning that it's cooked all the way through.  The edges look good, showing a nice bit of golden brown.  They're done just exactly right.  The eggs have fluffed up nicely; the omelette is a good bit thicker than my thumb.  I'd say our little Spider has passed with flying colors, but let's continue to examine our omelette.

Looking inside, I see that the eggs are fluffy and still moist but are definitely fully cooked.  All of the cheese is fully melted and has made a nice topping.
A very nice omelette indeed!
The omelette slices cleanly yet easily indicating that while it is fully cooked, it is not overdone.
Sliced, the omelette holds a good ege and reveals it's fluffy inner texture.
Let's flip over a piece and have a look at the under side.  Looks nice and golden brown.  No burning on the bottom.  Nice.
Flipping over a section of the bottom, we see a light browning.  Looks good!
And our pan?  Not that there was any question, but:  no burning.
No burnt on food on the pan.
Well, I for one am fully satisfied with the cooking capabilities of the little Kovea Spider.  I've been able to whip up a number of tasty dishes.  I hope this will dispel an idea that the Spider's diminutive size will somehow prevent it from being a good cooking stove.  I find that though the burner head is small, it's well designed and does a proper job on cooking tasks.

Personally, I find that a remote canister stove is a cook's stove, far more than any upright canister stove that I've used, including ones with larger burner heads.  A remote canister stove permits the use of a full windscreen which allows me to use a very low flame without worrying about the flame being blown out.  The windscreen also creates a very hot environment under that pan, and environment that allows me to have a lot more control over the heat of cooking than I would have with a typical upright set up which is open on the sides.  A remote canister set up also gives me a very stable cooking platform with a lower center of gravity than an upright setup.  I really like a remote canister set up if I want to do some real cooking.

Now, if you'll excuse me, I've got some eating to do.

I thank you for joining me on another Adventure in Stoving,

HJ
Time to eat.  (it was most delicious, I assure you)