Investigations into and adventures with backpacking stoves including solid fuel (e.g. ESBIT), alcohol, gas, "white" gas (Coleman type fuel), wood, and kerosene.
Canister gas stoves are extremely reliable. Reliable as they are, gas stoves are a mechanical device and do have their problems including:
Blocked jets due to either carbon build up or detritus from the canister or fuel line.
Kinked fuel hoses (due to improper storage typically).
Stripped threads due to cross threading or long term heavy use.
Melted parts due to using something that deflects heat downward somehow (improper use of a windscreen, too large of a pot, a heat diffuser, etc.)
Crud in the threads (due to being set base down in the dirt or the like)
Hardened "O" rings, gaskets, or seals (don't store canister stoves in your trunk or other hot places for long periods and never store in direct sunlight)
General mechnical failures. I've actually seen a cheap Chinese stove fail at the stove's valve: the valve jammed, and the knob unscrewed itself off the valve shaft. The only way I could fix it was to dissassemble the whole thing. The valve was poorly designed and poorly machined. Not all Chinese stoves are bad, but I personally would stay away from "no name" cheapies.
One trick to keeping your stove in good operating condtion is to store the stove in your pot. Your pot should protect it and keep crud out of the threads.
Packing your stove in your pot helps protect your stove and keep it clean.
The pot is an 850ml MSR Titan kettle. The stove is a Kovea Spider (KB-1109).
With care and proper use, you can avoid most of the problems except the occasional blocked jet. It's so rare on upright gas stoves that most people don't carry any tools to work on such a stove. There's a little more chance of your jet jamming however if you're using a remote canister stove with the canister upside down (for cold weather). Think about it: You're sucking fuel off the bottom. If there's any rust or crud in the canister, it's going to get sucked right into your jet.
A Kovea Spider (KB-1109) remote canister stove running with the canister inverted.
The pot is an Evernew 1300ml ultralight titanium.
If you want to be prepared to clear a blocked jet, you need to carry a) the tools necessary to disassemble the stove to the point where you could get at the jet and b) a very thin wire that you can use to "prick" the jet (slide the wire through the orifice and physically clear any blockage). Be careful though. If you use a wire too much or use a wire that's too large, you can alter the soft brass of your jet and ruin your stove. Some stoves, like the two shown below, simply unscrew; no tools are required.
Dissassembling canister stoves to get at the jet.
An MSR Superfly (left) and a Monatauk Gnat (right).
The jet is the small brass object at the top of the base portion of each stove.
Always dissassemble on a clean surface!
Ad hoc field maintenance: Once I met some Boy Scouts who had a gas stove that wouldn't work. I disassembled it for them and blew out the jet in the direction opposite that the gas would normally flow. I reassembled the stove, and it worked fine. Moral of the story? Sometimes "mouth power" works works in a pinch. :) Note: Some stoves aren't necessarily meant to be disassembled. Check your instructions.
The only other form of maintenance (other than keeping the stove generally clean and keeping the threads clear) you might want to do is to use silicon lubricant on your "O" rings as a form of preventative maintenance, but personally I've never felt it necessary.
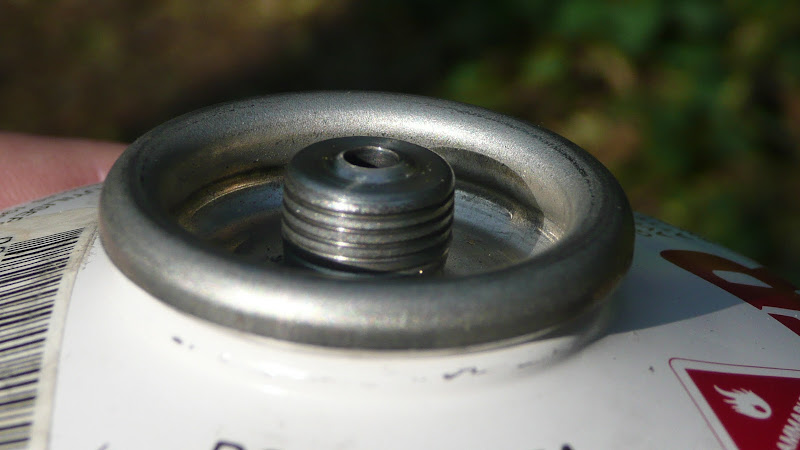
Always keep the connector on your stove free of debris.
Silicon lubricant can be employed to help preserve "O"rings like the black one shown above (inside the connector).
Also canisters themselves have their problems. Sometimes the canister's valve doesn't re-seat properly. Rare, but it happens. When it does happen, gas rushes out of the canister in an uncontrolled fashion, sometimes at full volume. Therefore, NEVER put on or take off a canister by candlelight or near a hot lantern or stove. If you have a valve that doesn't reseat properly when you remove the stove from a canister, just calmly screw the stove back on. The valve on the stove will hold back the gas just fine. Try unscrewing the stove again. Often, simply putting on and taking off the stove again will be enough to reseat the valve properly. If not, just leave the stove on the canister and use the stove's valve to control the gas. Be very careful if you pack a canister with the stove attached. You might want to put duct tape or something over the valve knob to make sure it stays closed.
Always keep the threads on your canister and your stove clean and free of debris.
Lastly, always save (and use!) the cap that came with your canister when it's not in use. Keeping those threads clean is important. Coleman brand canisters don't come with a cap, so I always save a few caps from used canisters just in case I buy a Coleman canister or lose a cap out on the trail.
Always keep the plastic cap on your canister when not in use.
Always keep the threads on your stove clean. Be careful not to set them down in the dirt.
The pot is a Snow Peak 780ml titanium pot.
I thank you for joining me,
HJ
P.S. Feb 28 2013:
Reader Jim H. reminded me of the burning down of the Gleann Dubh Lighe "bothy" (a bothy is bascially a mountain hut) which was caused by, you guessed it, a canister stove.
Apparently someone took their canister off their stove by candlelight, the valve on the canister stuck open, the gas ignited, and within seconds the whole place was ablaze. The people inside apparently lost all their gear and basically were very lucky to escape unscathed. Had they been in a tent with only one door in the end of the tent, the results might have been very different. Canisters are normally very safe, but NEVER change a canister near an open flame or a heat source.
Until recently, the Monatauk Gnat (aka the FMS-116t, aka the Olicamp Kinetic Ultra) was the world's lightest canister stove at 48g/1.7oz. Until recently.
The Monatauk Gnat, 48g (1.7oz).
The maker of the "Monatauk" Gnat is really Fire Maple in China. Fire Maple's nomenclature for the stove is FMS-116t (The "T" denotes "titanium"). Well, Fire Maple has now come out with a new, even lighter stove, the FMS-300t, which they have named the "Hornet." The Hornet weighs in at a scant 45g (1.6oz).
The Fire Maple Hornet (FMS-300t), 45g (1.6oz)
Wait, wait, wait just a second. Hikin' Jim do you mean to tell me it's only three measly grams lighter? Three grams!? Why that's only 0.1 ounce! Who Cares?!
Well, and you've got a bit of point there actually, but that's not the whole story. Whereas the Gnat is a rather wide stove even when you fold up the pot supports, the Hornet is quite compact.
The Hornet (FMS-300t) folds up compactly
Fire maple lists it's folded dimensions as 37mm X 52mm (1.5" X 2").
What's that you say? With a tiny little burner head like that the flame must be extremely focused; why I'll burn my supper! Actually, no. The videos I've seen and the reports I've read indicate that the flame fans out reasonably well (Note: I have not yet had a chance to get a Hornet myself for testing). The stove is however reputed to be quite loud when in operation on high flame.
Of course, it remains to be seen how pot stability compares to other stoves. The radius of the Hornet's supports is fairly small, and a pot will only have three points of contact because of the angle of the Hornet's pot supports.
The Hornet's pot supports are angled.
Wow! So, where can I get one?
Fire Maple stoves are not currently available for purchase in the United States through normal channels, but even though Fire Maple stoves can't be bought from US sources, one can always buy them direct from China on eBay. Liberty Mountain does carry some stoves built by Fire Maple under the Olicamp name, but I don't yet know if the Hornet will become available under the Olicamp brand or not.
UPDATE 5 April 2013: There have been some problems reported with jet blockages in the Fire Maple Hornet. Apparently there is a sintered brass filter in the base of the jet. If any gunk gets in the filter and blocks the flow of gas, there is no way to restore flow short of drilling out the filter. A blockage would be impossible to clear in the field. My advice is to hold off buying a Hornet until Fire Maple gets the problem corrected. I'll post an update as more information becomes available.
At this juncture, I don't have any further information, but I wanted to at least pass it on that there was a new light weight champion in the upright canister stove category and mention the new stove's very compact design.
Two lightweight champions in a row. Well done, Fire Maple.
In my first post on the subject, I linked to a video produced by Soto Outdoors showing their Microregulator Stove (OD-1R) in a "burn off" against a non-regulator stove. The video seems to imply that there is some advantage to having a regulator valved stove in cold weather over a conventional needle valved stove.
There's just one problem here: It doesn't make sense from the standpoint of physics and chemistry. I mean, the relative pressure in a canister is a function of the fuel inside, the pressure outside, and the temperature. Compressed gases, such as those in the canister of a backpacking stove, follow certain rules of physics and chemistry. Changing the valve type won't cause that pressure to change. I've talked to engineers, chemists, and physicists. No one seems to think that a regulator valve will be of any benefit in cold conditions.
So, I thought I'd try a cold test of my own to see what I might find out. I define cold here, in the context of an upright canister stove, as a fuel temperature (not necessarily air temperature) less than ten Fahrenheit degrees (about 5 Celsius degrees) above the boiling point of the fuel.
Now, in Soto's test, we don't really know how cold the water is, we don't know what's in those fuel canisters, etc. In other words, we really don't know much about the test conditions. So, before I go on, let me lay out my test conditions. Hopefully this section isn't too boring. :)
Testing Conditions
Elevation: Approximately 6,000'/1825m.
Temperature: 31F/-0.5C as measured on a digital probe type cook's thermometer. No calibration was employed on the thermometer.
Conditions: Light wind. No precipitation.
Fuel used: 100% n-butane. No isobutane or propane was used.
Air pressure: Unmeasured.
Canister temperature at initiation of test: Unmeasured but assumed to be ambient. The canisters were left out for a considerable time while I did various things at the location I stopped at, including setting up the test.
Important Chemistry and Stove Facts
Boiling point of n-butane at sea level: 31F/-0.5C
Boiling point of n-butane at 6,000'/1800m: About 19F/-7C
Normally, the temperature of a compressed gas fuel needs to be about 10F (or 5C) degrees above the boiling point of that fuel in order for a canister stove to have decent operating pressure.
Releasing gas out of the canister causes the canister's internal temperature to drop. In other words, an upright canister stove's fuel gets colder as the stove operates.
Conduct of Test
I started both stoves, the Monatauk Gnat first, then the Soto Microregulator. Once both stoves were lit, I opened both valves to their maximum open position and let them burn. Both stoves were on top of a Ridgerest closed cell foam pad.
I let the video run for a combined total of about 20 minutes. The "short" video clip below is from the last three or so minutes of that approximately 20 minute period. The "long" video posted in the appendix was started before the burn began and extends for about 17 minutes.
Discussion
I started the test at a temperature of 31F/-0.5C, about 12 degrees Fahrenheit above the boiling point of the fuel. The flame's sizes show that there was reasonably good pressure at the start of the test.
The Microregulator had a much larger initial flame than the Gnat. Obviously, it would have been a better test to have two nearly identical stoves, one with a conventional needle valve and the other with a regulator valve, but I had no way to get two such stoves. However, even without closely matched stoves, one can assess whether or not a stove's flame has been significantly impacted by the temperature.
Errata: In the video you may hear me say something to the effect that the ambient temperature is equal to the boiling point of the fuel. While that would have been true at sea level, the video was shot at ~6000'/1825m elevation, therefore the ambient temperature was actually about twelve degrees above the boiling point of the fuel.
In the video, I said something about the canisters being perhaps above the ambient temperature because they had been in my pack. On further reflection, I realized that I had taken the canisters out well before the test was started. The canisters were resting on a snow free metal surface that had been in the open all day. The canisters were undoubtedly at ambient temperature at the start of the test.
Observation
At the end of the test period, both stoves had similarly sized, very small flames. The Soto Microregulator offered no discernible advantage in cold conditions, as I define cold (see above definition).
Concluding Remarks
No criticism of the Soto Microregulator stove is intended here. It is one of the nicest built upright canister stoves that I have. It is craftsmanship at its finest. Again, my only point here is that I could not establish that there was any advantage to a regulator valved stove in cold conditions as I define cold, above.
I'm not sure what Soto was trying to show in their video. Soto is based in Japan. There may be some language barrier here. People here in the US have taken Soto's video to mean that the Soto Microregulator has an advantage in cold weather. I could discern no such advantage in cold conditions (as I define cold) nor is there anything in the chemistry or physics of either the stove or the fuel that would suggest such an advantage.
I would be very open to hearing from Soto a response to this blog post. In particular, I would love for them to describe in detail a set of conditions under which a regulator valve stove might have an advantage over a needle valved stove, an advantage that I might be able to corroborate through testing.
I thank you for joining me on another Adventure in Stoving,
HJ
Appendix
In Soto's test, they let the stoves burn for about five minutes. In the "long" video, below, you might want to watch the first six minutes. I start the stoves about a minute into the video, therefore six minutes into the video is about five minutes of burn time. I think you'll see that at five minutes into the burn, both stoves have significantly reduced flame sizes as compared to their respective flame sizes at the start of the test.
The Bobcat stove system from Flat Cat Gear.
Note: The carbon felt "hat" atop the pot and the simmer ring to the right are optional extras.
The Bobcat stove system is just that, an integrated stove system designed to work with a 1300 ml titanium pot from Evernew and other compatible pots (see Appendix "B" for list).
The Bobcat system consists of three major components:
Base plate
"It's a Snap" windscreen/pot support with support pin.
Stove (currently there are five stove options)
And two "optional extra" components:
Simmer ring
Flat Cat "hat" (an insulating layer of carbon felt that fits over the pot lid).
Primary Components
Let's walk through the system. First, all of the components fit inside the pot.
A Bobcat System, with all the components inside the pot.
Looking inside, we can see there's plenty of room for the primary components, the windscreen/pot support, the base plate, and a stove. There's also room for things like a simmer ring, firesteel, spoon, fuel (shown here with an ESBIT tab), etc.
Bobcat system components inside an Evernew 1300 ml pot along with an ESBIT tab for scale.
Let's spread the major components out:
The major components of the Bobcat stove system along with an ESBIT tab for scale.
Top: stove. Bottom left: It's a Snap windscreen. Bottom right: folded base plate.
To the right of the base plate can be seen a pot support pin which is basically part of the windscreen.
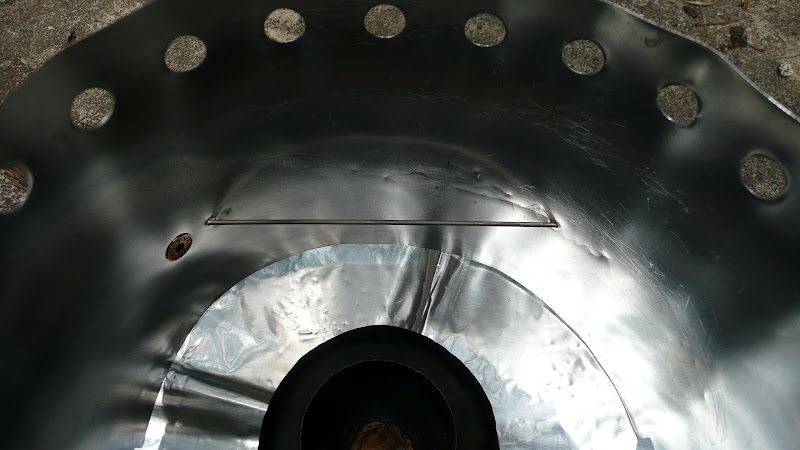
First, there's the base plate, which is simply a circular sheet of aluminum that when unfolded sits underneath the stove and windscreen. The base plate helps reflect heat towards the pot and also helps prevent any ground scorching. Wisely, Jon Fong, the designer behind Flat Cat Gear, has included a small circular cut out at the point in the center where the base plate folds. This makes the base plate far easier to fold and prevents a point of failure I've seen in other, less well designed base plates.
The base plate of a Bobcat stove system.
Next, there's the appropriately named "It's a Snap" windscreen which rolls up into a fairly compact package that fits inside the pot when laid horizontal.
The "It's a Snap" windscreen/pot support
As it's name might suggest, the windscreen snaps to itself to stay closed,
The closure snap on an "It's a Snap" windscreen
The "It's a Snap" windscreen snaps to itself to stay closed
And to maintain it's fully open position.
The two snaps shown hold the windscreen in position for normal operation.
Once the windscreen is snapped together, it is placed on the base plate, and the stove is placed inside.
An assembled base plate and windscreen with a stove inside.
The small pin that you see at the right in the above photo comes with the system and is inserted through holes in the back of the windscreen.
The pot support pin inserted through the holes in the windscreen.
The pot is then placed within the windscreen. The rear of the pot is supported by the pin, and the front of the pot is supported by the pot's handles.
An Evernew 1300ml pot inside an "It's a Snap" windscreen (with a pot support pin).
The pin is supposed to keep the pot at the optimum height above the stove. In actual practice, I found that simply resting the lip of the pot on the rim of the windscreen was a very stable set up, and I could not detect any change in stove performance. YMMV.
An Evernew 1300ml pot resting on the windscreen (no pot support pin in use)
As I mentioned, there are five stoves produced by Flat Cat Gear that work well with the Bobcat stove system.
The Iso Clean stove -- which cleanly burns all types of alcohol including isopropyl ("rubbing") alcohol.
There is also a version of the Epicurean Ti stove, the Epicurean Ti UL 15 which weighs a mere 7g.
This review will cover the standard Flat Cat stove and the overall Bobcat system. Subsequent reviews will cover other stoves and the use of the Bobcat system to do dry baking out on the trail.
A delicious triple berry muffin, baked out on the trail using the Bobcat system from Flat Cat Gear.
See my article at Seattle Backpackers Magazine for more on ultralight baking!
Optional Components
In addition to the major components, there are couple of optional extras. First, there's the simmer ring. The simmer ring is just that, a ring, that when used with the Flat Cat stove steps down the output of the stove such that simmering is possible. Note that the simmer ring is only for use with the Flat Cat stove.
A simmer ring (left) and a Flat Cat stove (center, on the base plate)
The simmer ring works very well, but I did encounter some problems in very cold, very windy weather where the stove went out when using the simmer ring. I consider those conditions exceptional conditions, conditions in which any low flame stove might struggle. Even in those tough conditions, the Flat Cat stove itself did just fine (without the simmer ring), and I had a nice hot meal.
Stove testing in windy, freezing weather at 10,000+ feet (3048+ meters).
For further information on the simmer ring, see the lighting and simmering demonstration video later in this review.
The second optional extra is the Flat Cat "hat" which is a circular piece of carbon felt that fits over the pot's lid.
A Flat Cat "hat"
The Flat Cat hat, when placed over the pot lid acts as an insulator. In studies I've read, the greatest heat loss is through the top of any pot. The logical place to put insulation is on top. If you insulate just the top of the pot alone, you have a disproportionately large gain in heat retention. However, recall that with the Bobcat set up the windscreen protects the sides of the pot, so you've really got a good set up for "cozy cooking" -- where the hot contents of a pot are left to further cook inside the pot after the stove burns out. Cozy cooking is particularly helpful when re-hydrating foods.
The Flat Cat hat:
Helps elevate the internal temperature during dry baking
Facilitates "cozy cooking".
Keeps food warmer if dishing out food to multiple people or dishing out seconds.
Can be used as a pot holder
Can be used as a ground insulator in cold weather.
I find myself really liking the Flat Cat hat. I love how my food stays warmer longer inside my pot and continues to absorb more water when doing things like cooking rice or pasta.
General Remarks
I spoke with Jon Fong, the man behind Flat Cat Gear. His philosophy is light weight gear with a particularly strong emphasis on ease of use. With the Bobcat system, I think he's struck a good balance between light weight and ease of use. Is it possible to find a lighter weight set up? Of course, but gear from Flat Cat really is easy to use (refer to the video below). Some ultralight set ups are just a plain hassle to use. With the Bobcat system, I can get right to cooking.
The Bobcat system is is also quite efficient. The design of the windscreen a) protects the flame, b) traps heat near the pot for good heat transfer, and c) controls air flow for an efficient burn and convective heat transfer. The windscreen also provides a stable platform for the pot while saving weight since no separate pot support is required. And, as mentioned above, the windscreen helps retain heat after the stove burns out which helps in re-hydration or just plain keeping supper warm between servings.
The low profile design of the Flat Cat stove makes the stove easy to store. The wide open top of the stove makes the stove easy to light with a firesteel (see video, below). The short stove also means that the pot doesn't have to sit particularly high, so a shorter windscreen can be used. That shorter windscreen then conveniently fits inside the pot.
The Flat Cat stove itself is really solid, perhaps the most durable alcohol stove I've seen, even stronger than a Trangia stove.
Video Demonstration -- Lighting and Simmering
I mentioned in my general remarks that one of the things that I really like about the Flat Cat stove is how easy it is to light with a firesteel. I thought I'd demo just how and why it's so easy. I'll also do some simmering in this demo.
Clarification: The simmer ring does not come standard with the Bobcat system. The simmer ring is an optional extra.
Summary
The Bobcat stove system from Flat Cat Gear. What's good about it:
Easy to use
Everything stores inside the pot
Stable
Efficient
Good wind resistance
Highly flexible (bake, boil, or simmer)
The Flat Cat stove is extremely durable.
What's bad about it:
The windscreen is a little stiff (minor complaint). A lighter windscreen would roll more tightly, but of course a lighter windscreen might not be as durable.
The Flat Cat stove is maybe a little bit heavy at 32g. The titanium version is of course lighter at 21g (Note: I have not tested the titanium version). Both versions are of course lighter than even the lightest gas stoves, but if you're a die-hard gram weenie, then perhaps this isn't the stove for you.
The Bobcat stove system from Flat Cat Gear: Highly recommended.
HJ
Appendix "A" -- Component Weights Update 24 Feb 2013: I've added "stated" vs. "measured" weight columns. The "stated" weights are the weights listed on FlatCatGear.com. The "measured" weights are per my gram scale. The weights differ by less than one percent.
Note: The first total all the standard items and the pot. The final line includes all the optional extras. All weights were measured in grams and then converted to ounces. Some rounding error may result.
All told, the standard system weighs about 1/2 pound, including the pot.
Item
Stated Grams
Grams Measured
Stated Ounces
Ounces Measured
Flat Cat Stove
(Standard)
32
32
1.1
1.1
"It's a
Snap" Windscreen
51
52
1.8
1.8
Base Plate
9
9
0.3
0.3
Support Pin
3
3
0.1
0.1
Sub Total
95
96
3.4
3.4
Evernew
1300ml UL pot
130
130
4.6
4.6
Total (Without Extras)
225
226
7.9
8.0
Simmer Ring (optional)
16
15
0.6
0.5
Flat Cat Hat*
(optional)
9
11
0.3
0.4
Total (With
Extras)
250
252
8.8
8.9
*Possible
spilled food on mine
Appendix "B" -- Pots Compatible with the Bobcat Stove System
Evernew Ultralight 1.3 liter titanium pot (ECA-253)
Evernew Non-Stick 1.3 liter titanium pot (ECA-423)
Evernew pot/fry pan combination (ECA-418)
REI Ti-Ware series of 1.3 liter pots (actually an Evernew pot but with the REI label).
Open Country 2 quart pot.
Additional pots can be made compatible with the use of "extension stakes". I have not tested the use of "extension stakes," so I can't comment about their use. Extension stakes weigh 4g each.
Appendix "C" -- Testing Locations
San Gabriel Mountains, various locations. Primary testing area. Elevations as low as 2,000'/600m
Verdugo Mountains and surrounding area. Elevations as low as 600'/180m
Sierra Nevada Mountains, vicinity of Devil's Postpile N.M. and Mammoth Lakes. Also Lake Isabella. Elevations up to and exceeding 10,000'/3048m.
San Jacinto Mountains. Elevations up to and exceeding 10,000'/3048m. Temperatures down to 32F/0C. High winds.
San Bernardino Mountains. Elevations up to and exceeding 10,000'/3048m.
Well, I ain't dead yet, ;) but 2012 was a tumultuous year for me. I got let go from a job I had held for 21 years and was left to flail about in the "new economy." I spent a total of 6 months unemployed. My repeated searches for employment and getting my skills a bit more polished led me to all but abandon Adventures In Stoving, much to my chagrin. I did do a bit of blogging on my personal hiking blog (Hikin' Jim's Blog), but I just didn't have the time or energy to do any organized stove testing or blogging.
Henry Coe State Park
I just got back from the annual GGG last week at Henry Coe State Park (The GGG is a group backpacking event organized through Backpacking Light), and I got pretty fired up (if you'll pardon the pun) about exploring the technology and variety of backpacking stoves once more. My "jobs" these days are all contracts -- with end dates, not traditional jobs, so I have to "make hay while the sun shines" and put in a lot of hours when the opportunity to work arises. I never know how much time I'll spend between periods of employment. Despite my very real constraints, I hope to have something to offer to the general and ultralight backpacking community in 2013.
The Kovea Spider (KB-1109), the outstanding (in my opinion) remote canister stove of 2012
Stick around; I've got lots more to show you,
HJ
Notes on Advertising on My Blog.
I do allow advertising on my blog. My blog is mainly a hobby, but I do derive some limited financial remuneration from the blog, an average of $1.70 per day in 2012. I view the blog as "self supporting" in that it pays for itself in terms of fuel for my stoves and perhaps allowing me to occasionally purchase a stove that I have a particular interest in. Basically, your presence here helps to pay for the content that you view (and helps me to continue my hobby), so I thank you for joining me on my Adventures in Stoving.
Ancient limber pine, just off the Pacific Crest Trail (PCT)