QuietStove.com

Friday, May 3, 2013

Fire Safety – Alcohol vs. ESBIT?

Currently, there are three active wildfires burning within a one hour drive of where I live.  None of these that I know of were caused by a hiker, but here's one that was:  The Hewlett Gulch Fire (you might want to turn the sound down if you're at work; he cusses under his breath).

From a newspaper article:
The U.S. Attorney's Office ... announced that Fort Collins resident [individual's name withheld] has been cited for causing timber to burn without a permit. [The individual] is accused of starting the fire on Monday, when a stove he was using while camping along the Hewlett Gulch Trail lit the blaze. The stove was a small, backpacking-style stove that burns alcohol.  [emphasis added]
First, let me lay my bias out on the table:  I like alcohol stoves.  I like that they're ultra light.  I like that they're simple to use.  I like that there's very little on them that can go wrong.  I like that they typically burn cleanly and have very little (if any) smell.  I like that they're essentially silent.  I like that I can buy fuel in bulk.  All my "go to" set ups for solo backcountry travel are alcohol based.
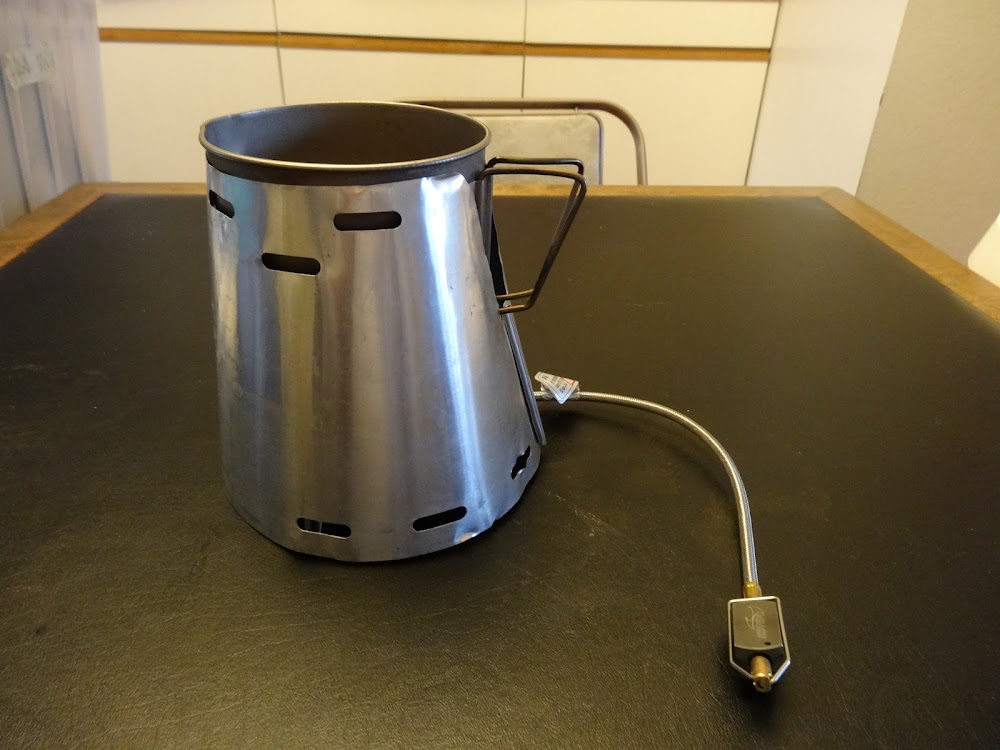
A Trail Designs Ti-Tri Sidewinder with an alcohol stove, one of my favorite UL cooking set ups.
Are alcohol stoves safe?
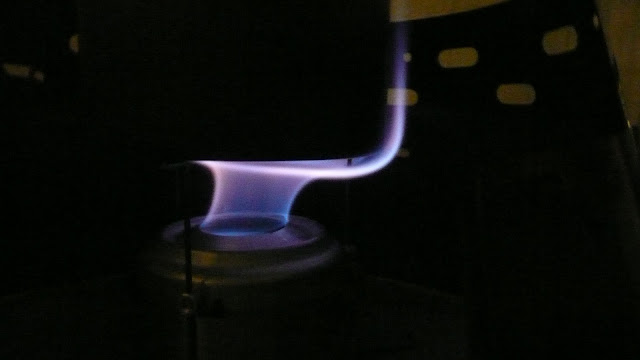
So, first issue:  Are alcohol stoves safe?  I mean is the fire shown in the video above just a fluke?

I think it depends a bit on the design of the stove.  I've personally never used a "tippy" or unstable alcohol stove -- but not all alcohol stoves are equally stable and safe. Note:  An alcohol stove that uses an absorbent wicking material (e.g. carbon felt or similar) would probably be safer, depending on how much alcohol was added to the stove.

I'm always very careful about how I use a stove.  I've never felt like I was endangering the forest (that I love), but realistically not everyone is as careful, and, even if I'm careful, no amount of care is ever 100%.  What if I knock it over?  What if a strong gust of wind tips it over?  Flaming alcohol everywhere.  Sometimes I'll use a full ounce (~30ml) of alcohol at a time.  If spilled, that could spread over an area that I might not be able to extinguish. Some fellow hikers have challenged me on the safety of alcohol stoves.  I have to admit that I don't have a good rebuttal.

There's another hazard besides simple spilling:  refueling.  The flames of alcohol typically cannot be seen during daylight hours.  Stories abound of people trying to refuel a stove that they thought was no longer burning only to have huge flames burst out as they poured alcohol into a burning stove.  And where does that now flaming container go when things catch fire?   Most of us would drop it or throw it, which could be a real disaster.   Always feel for heat with your naked hand before refueling an alcohol stove.  Do NOT depend on being able to see the flames.  See also this cautionary video:

Are alcohol stoves permitted?
Now, the second issue:  Are alcohol stoves permitted?

From the Sequoia National Forest website:
Allowed are: lanterns and portable stoves using gas, jellied petroleum, or pressurized liquid fuel outside of developed recreation sites or campgrounds, but only with a valid California Campfire Permit (available free of charge).
Other National Forests in California say essentially the same thing, and in speaking with others around the western United States, these seem to be pretty much the standard rules.  In other words, alcohol stoves are generally not permitted in National Forests in the western US.  Note:  Always check with the particular land management agency for the area you wish to visit; there are always exceptions to general rules.

So, canister gas, pressurized liquid fuel, and jellied "petroleum" are allowed, but typical liquid alcohol stoves are not.  By "jellied petroleum," they mean Sterno which is actually jellied alcohol not jellied petroleum.  In other words, non-liquid alcohol stoves are allowed.  See also Appendix I, Jellied Petroleum, below.

Is ESBIT safe?
ESBIT on the other hand cannot spill and cannot spread.  ESBIT does not emit sparks or embers that can float off and create a spot fire.  ESBIT does not smolder and then burst back into flame.  Moreover, ESBIT can blown out easily by mouth, much as one might blow out a candle.  I'm not enthralled by the smell of ESBIT, nor do I like the sticky residue it leaves on the bottom of my pot, but absent information to the contrary, I'd have to say that ESBIT is the safer alternative to alcohol for ultralight cooking set ups.
Burning ESBIT in an ultralight cooking set up
Is ESBIT permitted?
Now, is it permitted?  Well, I guess a strict reading of USFS websites might lead one to conclude "no."  However, I feel it is in the same class as jellied "petroleum" (see Appendix I, below).  ESBIT is a fuel that has a) been chemically rendered incapable of spilling and b) can be readily extinguished -- just as easily as a can of Sterno with it's lid.  It's a bit unclear whether the Forest Service is a) just unaware of ESBIT type fuels b) actually intends to ban ESBIT, or c) permits ESBIT since it has the appropriate characteristics (cannot spill and can be readily extinguished).  From a technical perspective, ESBIT is certainly at least as safe as a white gasoline stove and in many ways is safer.  I think there's a bit of gray area here and that the Forest Service should either state outright that ESBIT is banned and why or should state explicitly that it is permitted.  For now, in keeping with the spirit of the regulations, I believe that ESBIT is generally permitted.

Concluding Remarks
I admit that I dislike the ban on alcohol stoves but, grudgingly, I'm getting won over, particularly in times of high fire danger. And ESBIT seems pretty rock solid safe.

The websites of the various National Forests of the western United States are a textbook example of poor writing.   There is a profound lack of clarity on the topic of fire regulations, which I find somewhat shocking since fire is a subject of great importance.  What I've done is to visit a number of National Forest websites.  Only in the aggregate do they start to make sense.  I've quoted the Sequoia National Forest website above since it is one of the clearest.  I believe that I have faithfully rendered the the "spirit of the law" in the above blog post, but there is some room for question.  In the final analysis, the United Forest Service isn't very clear about exactly what the regulations are.  You should always consult directly the land management agency for the area(s) you intend to visit and use a stove.  I do have a general summary listed in Appendix II, below.

Thanks for joining me on the journey,

HJ

Appendix I -- Jellied "Petroleum"
All of the Forest Service websites seem to talk about "jellied petroleum."  Jellied petroleum is commonly known as napalm and is used with great effect as a weapon of war; flame throwers use jellied petroleum.  There are no known examples of backpacking type stoves that use jellied petroleum.  So what is the Forest Service talking about?  Let's look at the San Bernardino National Forest's website which has a helpful FAQ section:
Why are jelly petroleum-fueled stoves okay and campfires aren’t?
Gas, liquid, and jelly petroleum-fueled stoves can be extinguished by turning off the fuel source to the stove. Jelly petroleum-fueled stoves can be extinguished by putting a metal lid over the container. This makes their use much safer than campfires. Ashes or hot briquettes can blow outside of the fire pit; these embers can easily start a wildfire. Also, visitors might discard ashes or hot charcoal briquettes before they are completely cool, which could cause vegetation to ignite later after they are gone. Wood, charcoal, or any solid fuel fires are not allowed within the San Bernardino National Forest outside developed campgrounds, picnic areas, yellow post sites, and special use permitted sites in agency-provided fire rings or designated sites at any time of the year.  [emphasis added]
Looking at the above and at other National Forest websites, it becomes clear that they mean Sterno type fuel, which is jellied alcohol not jellied petroleum.

The Cleveland National Forest's web page on Wilderness areas is even more explicit, mentioning the Sterno brand by name:
Campfire, barbecue or hibachi use is not allowed. Propane or sterno fuel stoves are allowed.  [emphasis added]
Notice that the above only mentions propane and sterno.  Does this mean that butane stoves are illegal?  How about white gasoline?  Kerosene?  This is what I mean when I say there is a profound lack of clarity on the topic of fire regulations. Again, one must take the various National Forest websites in the aggregate in order to make sense of them.

Appendix II -- Key Regulations Summary
As I mentioned in my concluding remarks, above, I've visited quite a number of National Forest websites.  If one reads enough of them, in the aggregate, they begin to make sense.  Regulations vary some forest to forest, but generally the below are true.  These regulations are from California National Forests, but regulations in other western National Forests are similar.
  • Backpacking stoves (of any type) are considered by the US Forest Service to be a form of campfire.
  • In the state of California, a California Campfire Permit is generally required in order to operate a backpacking stove.  In some areas, a Wilderness Permit is acceptable in lieu of a Campfire Permit.
  • Pressurized liquid petroleum stoves with a on/off device or valve are generally permitted.   Example:  An MSR Whisperlite stove is permitted
  • Canister gas stoves with an on/off device or valve are generally permitted.  Example:  A Snow Peak Gigapower stove is permitted.
  • Jellied alcohol stoves are generally permitted.  Example:  A Sterno stove is permitted. ESBIT type fuel is not mentioned.  From a technical perspective it has the same characteristics as Sterno (cannot spill and can be easily extinguished), but ESBIT is a bit of a gray area.  I believe ESBIT is in keeping with the spirit of the regulations.  Ask any two different rangers and you'll probably get two different opinions.  At the very least, it's safe from a technical perspective and won't start a wildfire.
  • Liquid alcohol stoves are generally NOT permitted.  They probably are permitted where wood fires are already permitted, but the National Forest websites aren't particularly clear on this point.
  • Wood stoves are generally NOT permitted except where wood fires are already permitted.

Appendix III -- Other Fire Regulations
  • From the Mendocino National Forest website:  "Permits must be signed by an adult eighteen years of age or older."  Apparently, fires are prohibited unless a permitted adult is present.
  • From the Angeles National Forest:  "During high fire danger, additional fire restrictions may be imposed. Before your visit, check with a local Forest Service office for current fire restriction information."
  • From multiple National Forests:  "Clear all vegetation in a five foot radius" and "a shovel is required to be present."  How much the shovel regulation is enforced in backcountry areas is subject to question.  My assumption is that a potty trowel will be sufficient.  A five foot radius seems a bit excessive for a backpacking stove and is hardly a "Leave no trace" practice, but that's what the regulations call for.

Wednesday, May 1, 2013

Blog Status, 1 May 2013

Personal News
Out of work again.  Sigh.  In my industry, IT, it seems that most work these days is project based work.  I just completed a four month contract where I was working sometimes seven days per week, sometimes to midnight or even later, but now I'm unemployed.  Such is life.  At least the project was successful.

I'm ready for a break, but I hope I'll find work soon.  The extra time will hopefully help me get to some posts I've been wanting to write for some time now -- and allow me to do more hiking.  Because of work, I've really had to curtail my hiking trips, particularly in March.  :(

Recent Hiking
I did get out this past weekend to the San Gorgonio Wilderness in Southern California.
Yours truly, in the San Gorgonio Wilderness
I spent some time in a seldom visited corner of the wilderness.  It's great that there are areas like this that are visited by relatively few but yet are close to a major urban area like Los Angeles.

You can see my trip report, if you're interested:  East Barton Flats to Grinnell Ridge Camp.  I had a great time exploring a cross country short cut and checking out a hidden and generally unknown spring -- a valuable resource in a dry area like Southern California.
Hidden Mosquito Spring
A Trail Ambassador
I've become a "Trail Ambassador" for Gossamer Gear, an ultra light equipment company.
So, what exactly is a Trail Ambassador?  It's a collaboration between an individual such as myself and Gossamer Gear.  Basically, I get to try out Gossamer Gear products and in return Gossamer Gear gets some exposure.  People who know me know that I've been trying to lighten up (a lot!) in terms of my carry weight on trips over the last half dozen years or so.  I'm excited about forming a mutually beneficial relationship with a great gear company whose products I've already been using for several years.  Can you spot the Gossamer Gear logo on a piece of my gear in my recent trip report?  :)

The only down side perhaps is that Gossamer Gear really isn't a stove company, so I probably won't be doing a lot of stove reviews on their gear.  I will be using their packs, accessories, etc, and hopefully you'll see them crop up from time to time in my posts.

The State of the Blog
Adventures in Stoving is doing well.  Around the end of February,  Adventures in Stoving passed the half million mark in terms of site views.  That means that over 500,000 people have come to view the information presented here in just a little over two years.  I think that's pretty good for an individual's hobby blog.

Let me share a little graphic with you:
The above is Google Blogger's monthly count of visits to Adventures In Stoving.  I started in January 2011.  Things got off to a slow start, but by fall, 2011, readership had climbed to over 40,000 per month.  I then lost a job that I had held for 20+ years in January 2012.  I perforce accepted a job that required me to drive over 100 miles (160 km) per day in Los Angeles traffic.  My blogging suffered and so did readership.  In 2013, I got a new project to work on, one that was much closer to home.  My blogging picked up again and readership is now slightly above where it was when I got that distant job.  I thank you for hanging in there with me.

With gratitude and appreciation,

HJ


Wednesday, April 17, 2013

Canister Gas Stoves – Recommendations and Efficiency

I got a note recently, below.  I responded individually, but there were some good questions, so I thought I'd expand just slightly and turn it into a blog post.
Hi Jim, 
It was great meeting you at the GGG at Henry Coe [State Park].  Just wanted to ask - what's your current best (good fuel efficiency, low CO emissions, low weight, etc.) sit on top canister stove, and your current favorite remote stove (the Kovea Spider or other)?  Been narrowing down stoves and cooksets and really appreciate your advice.  And for remote stove, what do you use for your windscreen, a Caldera Cone or other?

Remote Canister Stove Recommendation
The remote canister stove is easier for me to answer because I have such a clear favorite:  The Kovea Spider.  It's a very compact, durable design, and it's a design that just makes sense.  It can be run with the canister upside down for cold weather use.  I really like this stove, but, unfortunately, I don't have carbon monoxide (CO) numbers for it; that's beyond the scope of my capabilities.

The MSR WindPro is also very good, but the WindPro is not nearly as compact.  For a larger group (more than three), I might choose the WindPro since it's wider pot support span will support a little bit bigger pot.

The Kovea Spider, left.  The Kovea Supalite, right.  Both excellent stoves.

Upright Canister Stove Recommendation(s)
And as for upright canister stoves, what would I recommend?  There are an awful lot of good ones.  In terms of efficiency, it's generally more about how you use the stove (see below) than it is about the stove itself.  I happen to like the Kovea Supalite (~56g/2.0 oz depending on the version).  It's reasonably light, reasonably compact, and has good pot stability.  You can get lighter, but I think the pot stability is better on the Supalite than anything lighter that I've seen.  The absolute lightest is the FMS-300t which is 45g/1.6 oz, but it has problems with clogging at the jet.  I can't recommend it (yet) even though it has some nice innovative design features.  I've read that the Optimus Crux has high CO, so you might avoid that if you want to cook in the vestibule.  I generally am not a fan of the MSR PocketRocket even though it's very popular.  I much prefer the newer MicroRocket.  The MicroRocket is a bit more compact than the Supalite.
The MicroRocket is particularly compact -- it will fit in a 550ml mug pot with a canister of gas.

Canister Stove Efficiency (Best Practices)
As for efficiency, with canister gas stoves, both upright and remote, it's typically more about how you use the stove than it is about the stove itself -- at least with the major stove brands.  All bets are off with "no name" stoves that one can buy off of eBay for shockingly low prices.  Caveat emptor.

However, with something like a Caldera Cone with a gas stove, that's another matter.  See the special section on the Caldera Cone at the end.

So, what are those good practices that lead to efficiency?  Well, here's my list:
  • Turn it down.  High heat = inefficient.  This is the number one mistake of canister stove users -- they turn things up too high.  Low heat = efficient.
  • Pick a sheltered spot.  On top of a rock might be convenient, but it's going to be windier up there.  Go behind the rock, and set the stove on the ground.
  • Use a windscreen (yes, even on an upright type canister stove, but not a full 360 degree windscreen) -- be careful to check the canister frequently with your hand.  If it feels hot, take immediate steps to cool things down.  See Canister Stoves and Wind before you use a windscreen.
  • Use a lid.  Tighter fitting is better.  Escaping steam = escaping heat = inefficient.
  • Use a wider pot.  Tall, skinny pots wind up having flames go up the sides, wasting heat.  A wide pot catches that heat.
  • Use a heat exchanger pot.  Usually the heat exchanger weighs more than the amount of fuel you save, but if you really want efficient, a heat exchanger is the way to go.  If on a trip you prevent having to carry a second canister, a heat exchanger can actually save weight overall.
  • Use a darker colored pot (minor compared to the others)

Windscreens -- Upright Canister Stoves
Yes, use a windscreen with an upright canister stove.  Just do NOT use a full 360 degree windscreen AND be really careful.  See Canister Stoves and Wind.

Windscreens -- Remote Canister Stoves
For remote canister stoves, you can use a full 360 degree windscreen safely.  Indeed this is one of the many reasons people use a remote canister stove even though it's heavier than an upright (the other main reasons are pot stability and improved cold weather performance).  With the Kovea Spider, I have just been using a plain heavy aluminum foil (~36 gauge) windscreen from MSR.  It's their standard windscreen for their remote canister and white gas stoves.  Works great.
A Kovea Spider stove with a standard MSR windscreen.
The Kovea Spider with a Caldera Cone
But can the Kovea Spider be used with a Caldera Cone?  Now that is an interesting question.  As a matter of fact it can.  Here's a Spider with a full height Caldera Cone and an MSR Titan Kettle.
A full height Caldera Cone with a Kovea Spider inside
The stove fits inside well.  The pot sticks up about 1cm or so -- not a problem.  In terms of efficiency, I think you could do very well with this set up.  You would want to be very careful to keep the flame low.   An aluminum cone could melt if you turned the heat up high.

Of course there are different styles of Caldera Cone.  Here's a Sidewinder style cone with a 1.3L Evernew pot.  This is a titanium Ti-Tri cone.
Sidewinder Ti-Tri (titanium) Cone with an Evernew 1.3L pot with a Kovea Spider inside
 A sidewinder cone is a shorter cone which is intended to be rolled and stored inside the pot (I really like the sidewinder design).  The pot therefore does stick out more.  Still, this would be a very effective windscreen, and the design of the vents, which control air flow and channel hot exhaust up the side of the pot, would increase efficiency.

You could of course take the pot supports off the Spider to save weight, but then you'd have to figure out a way to suspend the pot at the correct height above the burner.

Thanks for the questions; I hope the answers are satisfactory,

HJ

Sunday, April 14, 2013

The Epicurean Ti ESBIT Stove

ESBIT is a common backpacking fuel.  ESBIT consists of hexamethylenetetramine, which is usually just called hexamine.  ESBIT is generally acknowledged to be the lightest weight method of cooking for backpackers.  In other words, if you want to lighten up, ESBIT might just be the fuel for you.
A typical 14g cube of ESBIT
But cooking with ESBIT is typically either all or nothing -- it's either burning or it's not -- unless you have an Epicurean Ti ESBIT stove.
An Epicurean Ti ESBIT stove from FlatCat Gear
Ultralight Baking with ESBIT
What can you do with low, steady heat from ESBIT?   How about ultralight baking?  Yes, I am serious.
A fresh blueberry muffin baked with an Epicurean Ti stove and ESBIT fuel
I was pretty blown away when I was told that I could bake.  I mean, come on, baking with ESBIT and an ultralight set up?  Now, that's cool!
A fresh-baked triple berry muffin.  Yum!
Today, I just want to cover the Epicurean Ti stove in detail, but if you're interested in ultralight baking with ESBIT, please see my article in Seattle Backpacker's Magazine:


Features
I've been using the Epicurean Ti stove for about nine months now, and I'm super impressed with it.  First of all, it bakes and simmers.  Yes, an honest-to-God simmer using ESBIT.  That's no mean feat.  Simmering with ESBIT is just another example of the creative mind of Jon Fong over at FlatCat Gear.

Second, it eliminates (in simmer mode) all but the smallest amounts of the typical residue build up on the bottom of your pot.  My Ti pot is pretty beat up, so I don't know if you can see it well or not, but there's none of that sticky brown residue that ESBIT typically leaves behind.
The Epicurean Ti stove pretty much eliminates the brown residue of ESBIT when used in simmer mode
Third, when in simmer mode, the Epicurean Ti stove all but eliminates that nasty fishy odor that burning ESBIT produces.  I have however caught an occasional faint whiff when the wind gusts for a moment.  Still, it's like night and day the difference between using another stove and the Epicurean Ti in terms of smell.

Modes
The Epicurean Ti stove has two modes:  high and simmer.  Point the holes down for high, and...
An Epicurean Ti stove in high mode (holes down)
 ...point the holes up for simmering (and baking).
An Epicurean Ti stove in low mode (holes up)
In high mode, the ring portion of the stove focuses the heat, giving you better efficiency.  Note that on high you still do get the brown residue and odor.  Can't have everything I suppose.  In low mode, you can get 45 minutes or more burn time with a very controlled low heat.

So, now wait a minute.  Those little vent holes?  I mean come on.  How much of a difference can they really make?  Well, let's see.  Here's a photo with the holes down (high mode).  Note the height of the flame above the windscreen.
The Epicurean Ti stove operting in high mode
Now, here's a photo with the holes up (low mode).
The Epicurean Ti stove operating in low mode
As it turns out, the mode makes quite a bit of difference.

Weight
And what's the "weight penalty" for all this?  A mere fourteen grams -- the same weight as one cube of ESBIT.  Flat Cat Gear lists a weight of 19g for the Epicurean Ti stove, but I double checked just now, and my gram scale at home says 14g.  There may be some variation stove to stove.

Of course there are lighter ESBIT stoves, but very few ESBIT stoves have the kind of flame control that the Epicurean Ti stove has.  If however you did want a lighter weight option, there is the UL15 version of the Epicurean Ti stove which weighs only seven grams.  Note:  I have not used the UL15 version.

Wind Protection
Now of course ESBIT has to be used with a windscreen.  Trying to cook with ESBIT without a windscreen is often an exercise in futility.  You can use your own set up or purchase a very well tuned complete system from Flat Cat Gear, the Bobcat Stove System.  In my post on the Bobcat stove system, I show the Flat Cat stove, which is an alcohol stove.  For use with ESBIT, you would just swap out the alcohol stove and use the Epicurean Ti stove instead.  The Bobcat system works equally well with either stove.
The Bobcat stove system
Other Brands of Fuel
Of course there are other brands of hexamine fuel including Stansport and Coghlans.  The advantage of some of the other brands is that they are cheaper than the name brand, ESBIT.  But Stansport and Coghlans offer smaller, round fuel tablets, not the lozenge shaped tablets from ESBIT.
A box of round Coghlans brand hexamine fuel tablets
In my testing, I found that Coghlans brand works just as well as ESBIT; I just had to use two of the small Coghlans tablets instead of one ESBIT tablet.  The burn time is just slightly longer with two Coghlans tablets.  The Coghlans tablets are significantly cheaper in my area than ESBIT brand, so even though I have to use two tablets for every one ESBIT tablet, Coghlans is cheaper overall.  Coghlans does leave an odd ash behind.
The odd ash left behind by Coghlans brand hexamine fuel tablets
Tips for Use
Be sure to scrape the base plate of the stove clean between uses.  Mounding left behind by old fuel can cause the fuel to burn differently (typically hotter) which can leave you with a burnt supper.

Concluding Remarks
So there you have it, the Epicurean Ti ESBIT stove, an ESBIT stove that actually give you options in how you cook with ESBIT type fuel -- and opens up whole new possibilities in terms of things like ultralight baking.

The Epicurean Ti ESBIT stove from Flat Cat Gear.
What's good about it:
  • Flame control with ESBIT!
  • Can be used for ultralight baking
  • Residue on bottom of pot eliminated in simmer mode
  • Fishy smell eliminated in simmer mode
  • Light and effective
  • Easy to use
  • Can accommodate different brands of ESBIT type fuel
  • Compact, easily packable
What's bad about it:
  • At $27.50, maybe it's a little bit pricey, but it is of course titanium, and Ti is not cheap.  But there's no other ESBIT stove that I know of that offers this kind of flame control.
The Epicurean Ti ESBIT stove from Flat Cat Gear.:  Highly recommended.


Thanks for joining me on another Adventure in Stoving,

HJ

Thursday, April 11, 2013

A Little (Reactor) Levity from MSR

The MSR Reactor is of course a serious stove for those who travel into difficult conditions -- but that doesn't mean we can't have a little fun with it -- as shown in the humorous video from MSR, below.
An MSR Reactor
 Watch as supposed stove czar "Randy" compares the Jetboil to the Reactor.

Fortunately for that poor intern's sake, this video is mainly humorous and not real -- but there's some real content there. In winds that will blow out a Jetboil, the Reactor hardly even misses a beat.

On MSR's blog, there's a lot more factual information after the video. I'm not in a position to completely corroborate MSR's testing, but it certainly fits with what I've experienced with these two stoves.

What's my take on the Reactor vs. the Jetboil?  Here are my reviews of the stoves shown in the video:
The 1.0L MSR Reactor
The JetBoil Sol (aluminum version)

The Jetboil is lighter.  The Reactor is far and away more windproof.  Both are good water boilers.   Neither is a good stove for more than simple cooking.

HJ

Monday, April 8, 2013

Canister Stoves and Wind

I got a note from someone recently:
Hey Jim,
I'm really enjoying your adventures in stoving website.
I'm new to canisters, obviously, so I'm trying to play catch-up. I'm sure this is answered somewhere on BPL or on your website. But would you mind answering these 2 newbie questions?
1) Can the flame on a canister stove get blown out by the wind?
2) In your experience, is a windscreen valuable on an upright canister stove?
This is assuming the windscreen shields the canister from the heat source instead of reflecting the heat towards the canister. thanks for your advice and experience on this topic and others.
Yes, a canister stove absolutely can get blown out by the wind. Some Scouts were camped next to me when I was out doing some stove testing of the new 1.0L MSR Reactor. They took great interest in the Reactor when I explained to them that it was the most windproof upright canister stove, remarking "our Jetboils were blowing out on our last trip in the San Jacinto Wilderness."  And the Jetboil is actually more wind resistant than the typical upright canister stove.

Now, as to the second part of your questions, "is a windscreen valuable on a canister stove?" In a word, yes -- and for more reasons than just to keep your stove from actually blowing out.

First and foremost of course you want to prevent your stove from blowing out, but that's actually fairly rare.  Good site selection should prevent most full blow outs. 

Second, though, you want to prevent the wind from shifting your flame. You want that flame well centered under your pot. Take a look at this photo:
A flame shifted to the right by a very slight puff of wind
Notice how a light breeze has shifted the flame to the right. Where is the heat going? Well, it's not fully going into your pot. And what happens in a heavier wind?  Heavy winds can really play hob with your flame.  A windscreen can significantly reduce flame shifting.

Third, the windscreen helps trap heat. The flame heats the air that surrounds it. That hot air will help transfer heat to the pot, particularly if the windscreen channels the hot air up along the sides of the pot. Remove that windscreen, and the hot air gets dispersed by normal air circulation or wind.  Notice how in the photo below that the hot air around the flame is completely free to disperse into the surroundings. 
A very exposed, unprotected flame.   Note how the sides are completely open.
Lastly, the one time you really do have to worry about your flame getting blown out is on very low flame settings.  Using a windscreen allows you to use a low flame without having your stove blow out altogether, thus giving you greater control over your cooking. 


Why a windscreen?
You want to use a windscreen to
  • Prevent your stove from blowing out
  • To keep the flame centered (i.e. prevent flame shifting)
  • To trap the heat near the pot.
All of the above contribute to greater efficiency, faster speed, greater control, and, in higher winds, the ability to cook at all.

What kind of windscreen?
Ah, that's all very well and fine, Jim, but what kind of windscreen should I use?  Well, first, do NOT use a full 360 degree windscreen on an upright canister stove. An upright canister stove is a canister stove that screws directly into the canister (sometimes also called a "top mounted" canister stove).  If you fully surround the stove, you could trap so much heat that you overheat the canister and cause an explosion, which could have severe if not deadly results.

Here's a windscreen that I've found useful:
A windscreen made of quadrupled heavy aluminum foil.  Note the partial opening to prevent overheating.
Note that in the photo above that there is snow to the left of my stove.  It was January when I took this photo and I'm atop an 8,000+ foot/2400+ meter peak.  The gap I left in the windscreen is fairly small, which is fine for such a day.  ALWAYS, ALWAYS, ALWAYS monitor the temperature of your canister with your hand when using a windscreen with an upright canister stove.  If the canister feels hot, take immediate action to prevent overheating.  Open up the windscreen, turn down the stove, or even stop cooking if need be.  DO NOT allow the canister to overheat.  That would be, um, bad.  Bad as in a potential stay in the the hospital -- or worse.  Note that every manufacturer says not to use a windscreen in any form for this very reason.  I think a windscreen is reasonably safe if you consistently and frequently monitor the canister temperature with your hand, but keep in mind that you are going against the manufacturer's recommendations.  Nothing prevents a serious accident but you and your good sense.  The benefit though is of course significantly lower fuel use, faster cooking, and in some cases the ability to cook at all.  In significant winds, an upright canister stove may not be able to bring water to a boil at all, no matter how hard your try, without a windscreen.  The lawyer who wrote the warning on your stove probably didn't have to worry about that.  You do.  Windscreens are reasonably safe if you are diligent but potentially deadly if you are not.  Fair warning.

An aluminum foil windscreen made from multiple sheets of foil.  
The windscreen in the above photo is made out of heavy household aluminum foil of the type you can get at any grocery store.  I use three or four sheets folded at the edges to hold them together.  Note that it's light and needs to be braced with rocks in heavier winds.  It's not super durable, but will hold up for multiple weeks worth of hiking with reasonable care.  I fold mine in half lengthwise, roll it around a water bottle, and put the resulting bundle into a bagel bag for protection before putting it in my pack.
My windscreen rolled and wrapped, ready for packing.
Crafter's foil, also called tooling foil, of about 36 or 38 gauge is more durable.  I've found crafter's foil available on eBay.  Titanium foil is better still, albeit pricier.  Some have used aluminum roofing flashing to good effect although flashing is a bit heavier.

Note that you need a screen of sufficient height to accommodate the sizes of canisters you will use.  A 110g canister is far shorter than a 220g canister which is in turn far shorter than a 450g canister.  A windscreen for an upright canister stove on a 450g canister is so tall that it's frankly a royal pain in the posterior.  I'm not sure I can really recommend the above shown type of windscreen with a 450g canister.

Naturally, there are a lot of other ideas beyond the simple windscreen I'm showing here.  I address some of those ideas in a another blog post:  More Windscreen Ideas

Al foil as a windscreen
GOOD
  • Cheap
  • Easy to get
  • Easy to work with
  • Light

BAD
  • Needs to be braced with rocks in moderate to high winds
  • Not all that durable (but not all that bad either with reasonable care)

It's cheap, easy, and available, so experiment away. If you find it's not working for you in terms of durability or stability, then by all means seek out tooling foil, flashing, or titanium foil.

I hope you find this helpful,

HJ

Thursday, April 4, 2013

Blog Status, 4 April 2013

Things are going reasonably well here at Adventures in Stoving.  We just passed half a million site views in early March, about 2 years after starting.  Readership was over 40,000 site views last month which is the highest it's been since I had to put the blog essentially on hold April 2012 - January 2013 while I worked a job that required me to commute 100 miles a day.  I'm now working closer to home, and I'm able to get back to blogging.

Speaking of work, I work for a bank that's going through a merger.  We're working 7 days per week to get the job done by the end of April, which doesn't leave me a lot of time to get out on the trail.  Things may be just a little sparse between now and the end of April, but I've got some good stuff that I've prepared ahead of time, so stay tuned.

The Adventures In Stoving team, out on the trail.
 On other fronts, I wanted to make you aware of an interesting KickStarter project called Hot Fingers.  Hot Fingers is the brain child of budding industrial designer Mike Oldani.  I'll let Mike speak for himself:


I haven't tried the product myself, but I like to encourage innovation.  If you're of a mind to, why don't you kick in a buck or two for the project?

My thanks as always to you, my readers.

HJ

Saturday, March 30, 2013

Kovea Enters the US Stove Market

Kovea is the best known brand that you've never heard of (if you're an American).  Kovea has been making high quality stoves and other gear for names like MSR and Snow Peak for some time.  I had heard of the Kovea name (and it's excellent reputation) from friends overseas.
The MSR PocketRocket (left) and the MSR MicroRocket (right), both commonly said to be made by Kovea for MSR
But Kovea has never sold stoves under it's own name in the US.  True, you could get them on eBay, but not from any US based retailer.
The Kovea Spider, a first class stove
Well, all that has now changed.  Kovea has announced it's first venture in selling its stoves (and other gear) directly in the US market through a collaboration with  The Gear House, a Colorado based retailer.  Other retail agreements may follow.  Among the interesting offerings is the Alpine Pot which appears to be Kovea's answer to the Jetboil.  I'd love to test one of those some time.
The Kovea Alpine Pot stove system


If you've read my recent review of the Kovea Spider, you'll know that Kovea is putting out good stoves at competitive prices.  I think Kovea is a stove company to watch.

Thanks for joining me on another Adventure in Stoving,

HJ

Monday, March 25, 2013

The New, Lighter 1.0L MSR Reactor

MSR has just released (January, 2013), a new, lighter weight version of their Reactor stove system, with a 1.0L pot.  Think of it as a "mini Reactor" (my name for it, not MSR's).
The original Reactor (1.7L), left, and the new "mini" Reactor (1.0L), right.
A Substantially Lighter Version
Now, I know what you're thinking, "well, of course it's lighter, it's smaller."

Yes, I understand that, but I mean this one really is lighter, substantially lighter, lighter than you would expect just based on size alone.  Typically, a larger pot is actually lighter per unit of volume.   For example, my 0.9L Primus LiTech kettle weighs 164g, which is a ratio of 0.182g/ml.  My 1.5L kettle of the same brand and type weighs 219g, which is a ratio of 0.145g/ml.  Yes, the larger kettle is heavier overall, but it's lighter per unit of volume.

The original Reactor pot weighs 341g (without lid), which is a ratio of  0.20g/ml.  The new Reactor pot weighs 172g, which is a ratio of 0.17g/ ml.   So even though smaller pots usually weigh more per unit of volume, the new Reactor actually weighs less per unit of volume.  The weight savings here aren't just from a smaller pot but rather from a redesign.  Note:  Both the original and the new mini Reactor use the same burner.

Update 25 March 2013:  MSR informs me that there is also a newer version of the 1.7L Reactor pot that has the same welded fins as the new 1.0L Reactor pot.   The newer version of the 1.7L Reactor pot is lighter by about three ounces (~80g) than the original 1.7L Reactor pot.  If you have the newer version of the 1.7L Reactor pot, your weight savings will not be quite as substantial if you switch to the 1.0L Reactor pot.

OK, so the new Reactor is lighter than just what we would expect based on the smaller pot size, how did they do it? Well, clearly MSR set out with lightening up in mind.  The heat exchanger, a significant source of weight, has been revamped.
The original Reactor, left, and the new "mini" Reactor, right
Just take a look at the above photo.  The number and thickness of the heat exchanger fins has been reduced.  Notice also that on the original Reactor, the heat exchanger fins and pot appear to be of one piece where in the new mini Reactor the fins are clearly welded on.  The net effect of these changes is significant:  The mini Reactor is a just plain lighter set up.   The mini Reactor is so much lighter that you notice it right away when you pick up the pot.

Now, MSR may face some criticism from some quarters for this design change.  In the original design, the entire heat exchanger fin was in contact with the pot.  In the new design, the fin only contacts the pot at the weld.  And of course there are fewer fins.  Clearly, there is going to be some reduction in heat transfer.  Indeed, MSR lists the boil time for one liter of water as 3.0 minutes for the original design but 3.5 minutes for the new design.

I would answer such criticism as follows:
1.  Everything in life is a tradeoff.  In order to lighten things up, the heat exchanger had to be redesigned.
2.  Entrainment of hot exhaust gasses continues undiminished (more on this in Appendix II).
3.  The level of heat transfer effected is still exceptional – far above that of a "plain" pot.

So, yeah, you're giving up some degree of efficiency, but you're gaining a much lighter system, a system that still works exceptionally well at transferring heat.  Beyond that, if you're really worried about that lost little bit of heat transfer efficiency, then just go out and buy the original version and carry the extra weight.  MSR will continue to offer both versions, so take your pick.  It's the best of both worlds, really.

Update 25 March 2013:  As I mentioned above, there is a newer version of the 1.7L Reactor pot available.   The newer version of the 1.7L Reactor pot still has higher efficiency than the 1.0L version.  The original version of the 1.7L Reactor pot has been discontinued.

Now, I listed "entrainment of hot exhaust gasses" as one of the things that contributes to the Reactor's amazing heat transfer efficiency.  Just what the heck does that mean?  Please see Appendix II, below, for an explanation.

New Features
Not only is the new pot lighter, but they've added some new features and options.  They're all nice, but I think the first is actually pretty important, particularly for serious climbers:  MSR has come out with a hanging kit.
A 1.0L mini Reactor in the new hanging kit
I'll review the hanging kit separately, but for now let me just say that the kit works well and that the kit is designed to fit all pot sizes for the Reactor system. Note:  I've only tested the hanging kit with the 1.0L sized pot so far.

Another great new feature:  They've added a pour spout.  Yeah, it's just a little thing, but darn is it handy.  Thank you, MSR!  I for one appreciate MSR's attention to detail.
The pour spout on the new 1.0L MSR Reactor pot
In conjunction with the pour spout is a new feature on the lid:  A drinking hole/strainer. 
Holes on the lid of the new 1.0L MSR pot can be used for drinking or as a strainer.
The knob on the lid has been changed.  The new knob can be used to hold the lid.  This may not be such a big deal for hikers and backpackers, but this might be really useful for climbers.
The knob on the pot lid can be used to suspend the lid
Now notice also that there's a hole in the center of the knob.
The hole in the center of the knob can accommodate a coffee press
MSR is now offering a French press that fits the new 1.0L pot.  Fresh morning coffee, anyone?  Nice!  I'll review the coffee press in an upcoming post.  Note:  MSR is also offering a separate, larger French press attachment for the original 1.7L Reactor pot.

Packability
OK, so it's smaller and lighter while still being efficient, and it's got some nice new features and optional extras.  That's all great, but can I still pack everything inside the pot like I could with the original version? 

Well, as a matter of fact, yes, you can still pack everything inside.  But, pay attention:  Along with the new 1.0L version of the MSR Reactor, MSR also introduced a new canister format for their 4 ounce class canisters.  The new canister format is more packable and contains essentially the same amount of gas as their old canisters.  See The New MSR Gas Canister for more details.  You must use the new canisters if you want to pack everything inside the pot.
The new, more packable version of the MSR 4 ounce class canister (which is now 3.9 oz/110g)
To pack things up, first put the included little pack cloth into the bottom of the pot.  This is actually fairly important for reasons that I'll explain in a minute.
First, place the pack cloth into the bottom of the pot.
Then, place the canister in the pot upside down.  Again, you must use the new 3.9oz/110g MSR canisters (or a similar canister of another brand).  The old 4.0oz/113g MSR canisters will NOT fit.  Go ahead and leave the cap on the canister; there is room.
Second, place the canister in upside down.
After that, place the burner, face down, into the pot.  Make sure you put the valve control into the pour spout of the pot.
Third, put the burner upside down into the pot, being careful to point the valve into the pour spout.
It's a tight fit, you may have to give it just a bit of a shove.  Now, here's where that bit of pack cloth comes in handy.  The end of the valve spindle will scratch up the pot. 
Scratches in the pour spout from the end of the valve spindle
So rather than scratch up your pot, merely position one corner of your pack cloth such that it protects the pour spout, like so:
Use the pack cloth to cover the tip of the valve spindle and protect your pot from scratching
Voila!  Problem solved.

It's a tight fit, but everything does fit, and you've got a very compact unit.

Capacity
So, the pot is billed as a 1.0L pot, and if you fill the pot right to the brim, yes you can fit a liter in there.  On the other hand, MSR recommends that you put only 0.5L in the pot at a time.  What?  Only use half the capacity of the pot?  What gives?  Well, the Reactor is one of the most powerful backpacking stoves in existence.  You can get a violent boil very quickly, a boil that could overtop the pot in the blink of the eye and presents a very real scalding risk.  And boiling hot water hitting a canister?  Yipes!  The pressure inside the canister could go through the roof.  Your stove could flare up or behave in unexpected, dangerous ways.  Not something I'd want to risk!

That said, I think a careful user, a user who kept the stove turned down and watched the pot like a hawk, could easily boil 0.75L at a time or maybe even 0.8L.  However, if you boil more than 0.5L at a time, you are going against the manufacturer's recommendations and you do so at your own risk.  The consequences of a boil over could be quite severe if your canister becomes overheated.  Beware!

Who the Heck Needs a Reactor?
People often ask me:  "Who the heck needs so much stove?"  Indeed, who does need such a powerhouse?

Well, perhaps not someone who is traveling in comparatively benign conditions.  But for those who travel in heavily windswept areas, particularly mountaineers who venture into high altitude, exposed terrain, the wind proofness of an MSR Reactor makes it just the stove you want.  The Reactor is the most wind proof upright canister stove, bar none.  When other stoves fail to even bring a pot to the boil, the Reactor hums along as though nothing unusual were happening.  If I were on a barren, windswept, high altitude plateau, there is no upright canister stove that I'd rather have.  Indeed, it is MSR's contention that the Reactor is the most windproof stove of all classes.  I haven't yet been able to corroborate that with my field testing, but it's certainly a credible claim.

But there's another application where the power of a Reactor can be properly brought to bear:  snow melting.  Think about it:  You pull into your camp for the night.  You need to melt enough snow for drinking and cooking that evening as well as enough water for your next day.  You might need as many as six liters.  That takes a lot of time.  The Reactor's power and efficiency can be a real asset for those who need to get into the bag ASAP and get up early for an "Alpine start."

I think therefore that the Reactor will appeal most to serious climbers and mountaineers, but there will certainly be an appeal to anyone who faces significant winds or needs to melt snow quickly.  In it's new compact, lighter format, the Reactor may also hold appeal to adventure racers.

Concluding Remarks
I bought an original Reactor several years ago.  To be honest, I really haven't used it all that much.  Is it a bad stove?  No, not at all, but I'm generally not willing to carry all that weight unless I really need it.  If I'm not going to need to melt some serious snow or expecting really windy conditions, I'm going to go with something lighter. With the new version, I expect to get a lot more use out of the stove.

The new version is certainly going to appeal to soloists, particularly serious climbers and mountaineers, but a Reactor is so stinkin' fast that I think the 1.0L pot can still be of use to a small team that wants to travel light and fast.  One just needs to "re-imagine" how to use the system. Instead of cooking everything at once, make small but quick courses.  It would take a bit of getting used to and a bit of thinking through in advance, but the new mini Reactor is fast enough to make it practical and would allow a small team to have real weight and space savings


The new 1.0L MSR Reactor 

What's good about it?
  • Significantly lighter than the original 1.7L pot (and also lighter than the newer 1.7L pot, but not as dramatically)
  • Great new options (hanging kit, coffee press)
  • Nice new features (pour spout, drinking holes)
  • Most windproof upright canister stove known to humankind, period (true of all Reactor sizes)
  • Powerful snow melting capabilities (true of all Reactor sizes)
What's bad about it?
  • Slightly less efficient (but hey, just go buy the 1.7L version if you really need that level of efficiency)
  • Like all upright canister stoves, the Reactor is adversely affected by cold weather.  Assume that you can go no colder than 20F/-7C with propane/isobutane fuel unless you know the "tricks."  See Appendix III, below, for further information.  
  • The burner can only use Reactor specific pots (true of all sizes)
The new 1.0L MSR Reactor:  Highly recommended

I thank you for joining me for another Adventure in Stoving,

HJ


Appendix I – Component Weights

ItemGrams MeasuredStated GramsOunces MeasuredStated Ounces
1.0L Pot1721976.16.9
Burner1781796.36.3
Lid36361.31.3
Pack Cloth440.10.1
Total39041613.814.7
Update 25 March 2013:  I've weighed my 1.0L pot at least ten times now.  I get 172g.  I talked to MSR.  They weighed a pot there in Seattle and confirmed 197g.  That's a difference of 25g (nearly an ounce).  I'm not sure what the issue is here.  My pot seems fine, but maybe I got an odd pot?  If I can, I'll head to a local store and see if I can measure another pot, but these are new, so I haven't seen them in any stores yet.  If you decide to purchase one, don't count on your pot being 172g; it may be 197g.  Regardless of the precise weight, the system is well designed, well put together, and is clearly lighter than the original Reactor. 


Appendix II – Entrainment of Hot Exhaust

What do I mean when I say that the Reactor "entrains hot exhaust gasses?"

Well, first let's take a look at the Reactor system.  How does air flow through the system?  Look at the exhaust vents built into the pot itself.  Notice that the vents are well up the sides of the pot.  This is important.
The exhaust vents on a Reactor pot.
 The hot gases produced by combustion exit through these vents.

OK, if that's where the exhaust goes out, how does air enter the system?  The burner nests tight against the bottom the pot.  Air can't come in around the sides of the burner.
The burner on a Reactor nestles up inside the pot.

So how does the air get in?  Through  the burner.  Take a look at a Reactor's burner.  Air is entering the system through the air inlet holes in the sides of the burner (well, specifically through two Venturi type ports on either side of the valve, but the essential idea is that the air comes in through the burner assembly).
Vent holes in the sides of the burner funnel air into the Reactor system.
OK, so we've got fresh air entering through the sides burner, proceeding through the combustion area of the burner, flowing along the heat exchanger fins, then up the sides of the pot, and finally exiting through the exhaust vents.  Note that the exhaust vents are well above the bottom of the pot.
Airflow in a Reactor system.
Blue = cool.  Red = hot.
With a conventional pot, the hot exhaust from the burner just flows out around the bottom of the pot and dissipates into the surrounding air.  With the Reactor, the hot gasses are trapped inside the heat exchanger assembly and channeled along the sides of the pot.  The hot gasses cannot exit until they reach the exhaust vents.  These hot exhaust gasses transfer additional heat to the pot, heat that is normally lost in other set ups.  The trapping of the hot output from the burner is what I mean by "entrainment of hot exhaust gasses" and is something that is unique to the Reactor among canister stoves.  This entrainment of hot exhaust gasses is part of what gives the Reactor its very high efficiency.

Appendix III – Cold Weather and Canister Gas Stoves

Canister stoves are generally limited in their operational temperature range to about 20F/-7C at sea level towards the end of the canister if you use propane/isobutane fuel (but there are "tricks;" see the article list, below).  I emphasize "at sea level" here because the higher you go, the colder you can operate a canister stove.  Generally, you can operate 2 Fahrenheit degrees colder per thousand feet of elevation that you gain (About 1 Celsius degree per 300m gain).  Of course with a fresh canister, you can go colder than that, but performance will fall off as the canister empties.  It is difficult if not impossible to determine how soon the performance will drop off as the canister empties, so I recommend the practice of assuming that you can go no colder than 20F/-7C at sea level with propane/isobutane fuel.  Note that 20F/-7C is the coldest temperature that you can operate at, so don't expect to start at 20F/-7C and be able to cook for long with a half empty canister; canisters get colder as you use them.  Note also my emphasis on using a propane/isobutane fuel.  You cannot use regular butane fuel in cold weather and expect decent results.  You must use a fuel that contains isobutane.

Sound complicated?  Don't despair!  It does take some getting used to, but it's actually not too bad.   For "tricks" to operating in cold weather, please see:   Cold Weather Tips for Gas Stoves

As alluded to above, it matters which brand of gas you buy for cold weather.  Please see:
What's the Best Brand of Gas for Cold Weather?

I've got a whole series of related articles if you'd like to read up.  Here's the whole list: