 |
| The Dragon's Head |
QuietStove.com

Friday, September 21, 2012
A New Blog
I've got a new blog. Odd as it may seem, sometimes I actually go hiking. Yes, it's true. I don't just sit around and play with stoves all day. If you're interested in a trip report from my recent ascent of Bighorn Mtn (10,997'/3352m) and The Dragon's Head (10,866'/3312m), take a look at my new blog: Hikin' Jim.
HJ
Friday, September 7, 2012
What's the Best Gas Stove?
Recently, I got asked "what's the best gas stove?" In my ever-so-helpful way, I replied "it depends." :)
While that might seem a bit evasive, it really isn't -- it really does depend on what you, the user, want to do with the stove and under what conditions.
In an effort to better answer my friend's questions, I put together the following concerning the question of the best canister gas stove:
HJ
Note: Prices are shown in US dollars and were current as of the date of publication and reflect MSRP. Prices may vary by retailer.
While that might seem a bit evasive, it really isn't -- it really does depend on what you, the user, want to do with the stove and under what conditions.
In an effort to better answer my friend's questions, I put together the following concerning the question of the best canister gas stove:
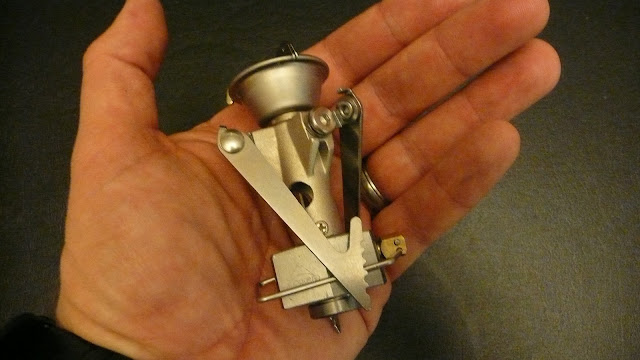
- For colder weather (from about 50F/10C down to about 0F/-18C), the MSR WindPro (187g/6.6oz; $100) is a good choice. Since the WindPro is a) a remote canister stove and b) has a generator (pre-heat loop), it can be run with the canister upside down. Because it can run with the canister upside down, a WindPro can run in temperatures about 20F lower than typical canister stoves. The WindPro is also, as the name indicates, much easier (and safer!) to shield from wind and handles big pots well. The down side is that the WindPro is more expensive, heavier, and bulkier than other stoves. I myself probably wouldn't buy a WindPro unless I were intending to do some colder trips, doing gourmet cooking, or cooking for larger groups (3 or more). The Primus Express Spider (198g/7oz, $70) is a similar stove with similar characteristics. The Kovea Spider (KB-1109) is a lighter version (168g/6oz; $52.90) of this class of stoves and shows great promise. However, the Kovea Spider to my knowledge is not available in the US; you might be able to get a Kovea Spider on eBay. Yes, the Kovea Spider is a little lighter than other stoves in this category, but the real story here is that the Kovea Spider is particularly compact. The Kovea Spider is my favorite stove of 2012. Look for a review here of the Kovea Spider soon.

The new Kovea Spider (KB-1109)
My review of the original WindPro is available here on Adventures in Stoving; the only real difference between the original Windpro and the new (2012) Windpro II is that the Windpro II has a rotating coupler at the valve which makes it easier to invert the canister.
I have not yet reviewed the Primus Express Spider.
An MSR WindPro


- For lightweight, the Snow Peak LiteMax (54g/1.9oz, $60) is a favorite of mine. The new MSR MicroRocket (73g/2.6 oz, $60) is also good and is quite compact. There are lighter gas stoves out there, like the Fire Maple FMS-116T (48g/1.7oz, $50). The FMS-116T is a good stove and is currently the world's lightest production canister stove, but I find the FMS-116T to be a bit bulky for what it is. Note that the FMS 116T is typically sold as the Monatauk Gnat or the Olicamp Kinetic Ultra outside China. The down side to these lightweight stoves is that a) they have limited pot stability if you're using a bigger pot, b) they have no wind resistance, and c) it's not safe to use a windscreen with them unless you really know what you're doing and are very careful. I've got an article on windscreens at Seattle Backpackers Magazine as well as a blog post on windscreens if you're interested. A word of warning: Do NOT ever let the gas canister of your stove get hot when using a windscreen on a canister stove. Overheating the gas canister could lead to a potentially deadly explosion. I have not yet reviewed the Snow Peak LiteMax. My review of the MSR MicroRocket is available at Seattle Backpackers Magazine. I have not yet reviewed the FMS-116T.
An MSR Micro Rocket

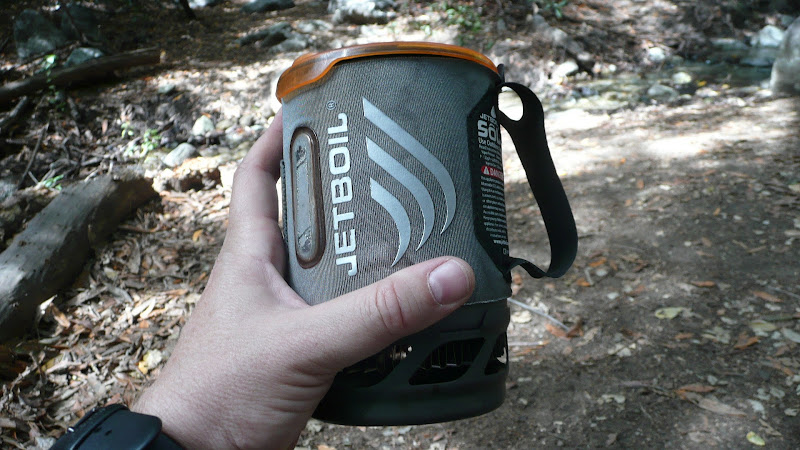
- For convenience, the Jetboil can't be beat. Just clip the pot to the stove, screw on the gas, press the auto ignitor, and go. Not only is it convenient, but the Jetboil has some built in wind resistance, and the Jetboil is also really efficient. Your gas goes a looong way, but don't expect that efficiency to result in any weight savings. You'd have to be on a fairly long trip before the weight of the fuel saved by using a Jetboil would be greater than the weight of the stove itself. The downside to the Jetboil as you may have already guessed is that the Jetboil is heavy when compared to other upright canister stoves. The new Jetboil Sol (312g/11oz, $120) is a significant improvement over the first generation Jetboils in terms of both weight and bulk, but I would not recommend the Ti version of the Sol which only saves about one ounce in weight yet costs $50 more. The Ti version of the Sol has an aluminum heat exchanger with which there have been some melting problems reported. I wrote a review of the Jetboil Sol for Seattle Backpackers Magazine if you're interested.
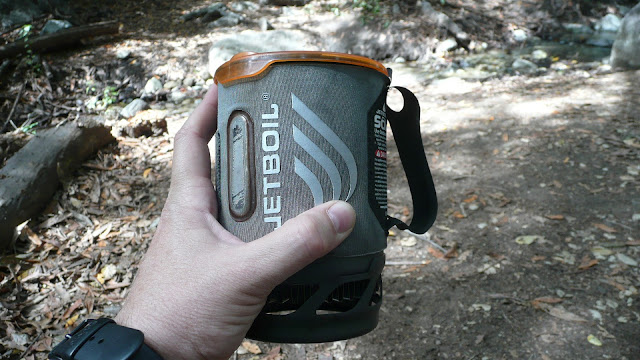
The new Jetboil Sol
- For "bombproofness", the MSR Reactor (496g/17.5oz, $160) can't be beat. If I were on a windswept plateau at 13,000 feet in a howling wind, I can't think of a stove I'd rather have. Not only is it highly wind resistant, it's also blazing hot, making it an excellent snow melter. The downsides of the Reactor are a) high fuel consumption (if run on high), b) poor simmer control, c) high cost, d) weight, and e) bulk. However, if you intend to go into extreme conditions, the Reactor is worth it. The Reactor is very popular with moutaineers who tend to melt a lot of snow and go into extreme conditions. My review of the Reactor is available here on Adventures in Stoving.

The MSR Reactor

- For value, I really like the Snow Peak GigaPower GS-100 (92g/3.25oz, $40). For $40.00 bucks, it's tough to beat unless you want to buy something direct from overseas. Yes, there are other stoves that you can buy for $40.00 or even less, but not of this quality. The GigaPower GS-100 is just an all around excellent design. Many consider the GigaPower GS-100 to be the "gold standard" of small, lightweight canister stoves, yet it is only $40.00. Any time a new canister stove comes my way, the first stove I compare it to is a GigaPower. The GigaPower is compact yet very sturdy and has excellent pot stability for its class. The GigaPower is my benchmark for lightweight canister stoves. I have not yet reviewed the Snow Peak GigaPower, but I have previously recommended it as a good "value for the dollar" stove here on Adventures in Stoving.
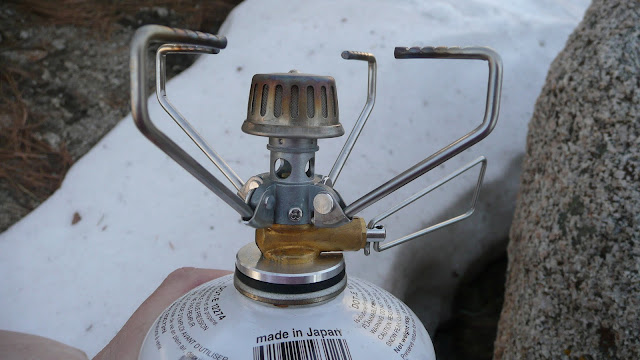
The Snow Peak GigaPower, an excellent stove and an excellent value

HJ
Note: Prices are shown in US dollars and were current as of the date of publication and reflect MSRP. Prices may vary by retailer.
Sunday, June 17, 2012
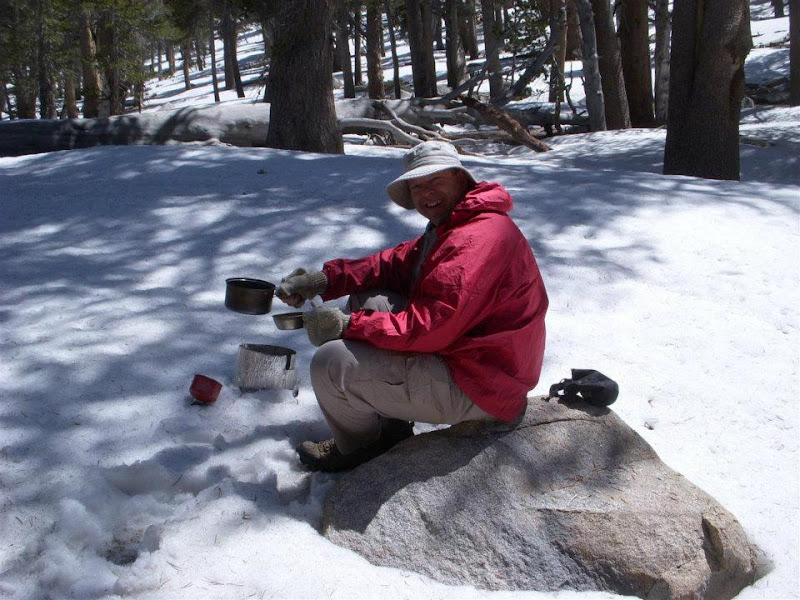
Happy Fathers Day
Happy Fathers Day from all of us here at Adventures in Stoving
Hope all you fathers out there had some adventures of your own this day.
HJ
 |
| The Adventures in Stoving Team on the trail in Monrovia Canyon |
HJ
Friday, June 15, 2012
California, Stoves, "Campfire" Permits, and ESBIT
I live in California in the United States. I thought I'd comment about what is and is not permissible with respect to stoves, fires, and fuels in the backcountry here.
Unfortunately, there are a welter of jurisdictions including state parks, national parks, city parks, national forests, county parks, and Bureau of Land Management areas. Each of these may have their own rules and restrictions. Even different units of the same overarching agency will have differing rules.
However, there is one thing that is generally required in California across the various jurisdictions: the California Campfire Permit. Basically, outside of a developed campground, to have any kind of fire (a wood fire or a camp stove), you have to have a campfire permit. And, yes, you read that right; you have to have a permit in order to operate a camp stove in the backcountry. Based on the name, you would think a campfire permit would be for wood fires alone, but, no, a campfire permit is for any type of fire, including all backpacking type stoves.
It's easy to get a permit; just click on the above link, print it, fill it out, and sign it. You don't have to go to a ranger station, pay a fee, take a test, or anything like that. I think they just want you to have the regulations in front of you.
A campfire permit generally allows one to use a woodfire, charcoal fire, or "chemical" stove, but each local jurisdiction places additional restrictions as to where fires and what fuels are permitted. Wood and charcoal fires are generally the most restricted with many jurisdictions confining wood fires to developed campgrounds only. With respect to those restrictions, gas and pressurized liquid fueled stoves are always OK in state and federally controlled backcountry areas, but I have seen local cities prohibit even gas and pressurized liquid fuel stoves (e.g. the City of Monrovia). Jellied petroleum (I assume they mean Sterno type stoves) is also permitted (but who the heck uses a Sterno stove?).
Alcohol and hexamine (e.g. ESBIT) stoves are generally lumped in with wood fires and are typically more restricted. Alcohol and wood stoves are prohibited in many backcountry areas in California, especially in Southern California. The rule of thumb is: Where wood fires are permitted, alcohol stoves are permitted; where wood fires are not, alcohol stoves are not. Unfortunately, the Forest Service lumps ESBIT in with alcohol and wood even though ESBIT is very different (and very safe). See the Appendix below for further discussion on this topic.
SUMMARY
HJ
APPENDIX
So why so many restrictions on alcohol and ESBIT type stoves? Well, the San Bernardino National Forest website has a helpful Q&A section from which I quote:
Q: Why are jelly petroleum-fueled stoves okay and campfires aren’t?
A: Jelly petroleum-fueled stoves can be extinguished by putting a metal lid over the container. This makes their use much safer than campfires. Ashes or hot briquettes can blow outside of the fire pit; these embers can easily start a wildfire. Also, visitors might discard ashes or hot charcoal briquettes before they are completely cool, which could cause vegetation to ignite later after they are gone. Wood, charcoal, or any solid fuel fires are not allowed within the San Bernardino National Forest outside developed campgrounds, picnic areas, yellow post sites, and special use permitted sites in agency-provided fire rings or designated sites at any time of the year.
So, based on the Forest Service's above answer, a fuel that can be reliably extinguished, whose flame cannot be spread by wind, and does not leave behind by-products that might start a fire is an appropriate fuel for backcountry use. Based on the Forest Service's own answer, I'd say that ESBIT is an appropriate fuel for backcountry use. Burning ESBIT can be reliably extinguished by blowing it out; ESBIT flames are not spread by wind, and ESBIT leaves behind no by-products that might start a fire. I think ESBIT gets lumped in with wood fires simply because the land agencies aren't familiar with it. Bureaucracies being what they are, it probably won't happen, but it sure would be nice if the various agencies that have jurisdiction over backcountry areas would take a second look at ESBIT.
With alcohol stoves, I understand the restrictions a little bit more (note that I said "understand" not "like"). Alcohol can spill and spread flames, and many alcohol stoves cannot be extinguished once lit.
Unfortunately, there are a welter of jurisdictions including state parks, national parks, city parks, national forests, county parks, and Bureau of Land Management areas. Each of these may have their own rules and restrictions. Even different units of the same overarching agency will have differing rules.
However, there is one thing that is generally required in California across the various jurisdictions: the California Campfire Permit. Basically, outside of a developed campground, to have any kind of fire (a wood fire or a camp stove), you have to have a campfire permit. And, yes, you read that right; you have to have a permit in order to operate a camp stove in the backcountry. Based on the name, you would think a campfire permit would be for wood fires alone, but, no, a campfire permit is for any type of fire, including all backpacking type stoves.
It's easy to get a permit; just click on the above link, print it, fill it out, and sign it. You don't have to go to a ranger station, pay a fee, take a test, or anything like that. I think they just want you to have the regulations in front of you.
A campfire permit generally allows one to use a woodfire, charcoal fire, or "chemical" stove, but each local jurisdiction places additional restrictions as to where fires and what fuels are permitted. Wood and charcoal fires are generally the most restricted with many jurisdictions confining wood fires to developed campgrounds only. With respect to those restrictions, gas and pressurized liquid fueled stoves are always OK in state and federally controlled backcountry areas, but I have seen local cities prohibit even gas and pressurized liquid fuel stoves (e.g. the City of Monrovia). Jellied petroleum (I assume they mean Sterno type stoves) is also permitted (but who the heck uses a Sterno stove?).
Alcohol and hexamine (e.g. ESBIT) stoves are generally lumped in with wood fires and are typically more restricted. Alcohol and wood stoves are prohibited in many backcountry areas in California, especially in Southern California. The rule of thumb is: Where wood fires are permitted, alcohol stoves are permitted; where wood fires are not, alcohol stoves are not. Unfortunately, the Forest Service lumps ESBIT in with alcohol and wood even though ESBIT is very different (and very safe). See the Appendix below for further discussion on this topic.
SUMMARY
- Print and carry a California Campfire Permit
- Gas and pressurized liquid fuel stoves are almost universally permitted for backcountry use
- Expect greater restrictions on wood and charcoal fires
- Alcohol and ESBIT stoves are generally lumped in with wood fires -- and are more heavily restricted
- Generally, in an area where wood fires are permitted, alcohol and ESBIT stoves are permitted; where they are not, alcohol and ESBIT stoves are not.
- Always check with each local jurisdiction as to the specific rules governing your type of stove or fire
HJ
APPENDIX
So why so many restrictions on alcohol and ESBIT type stoves? Well, the San Bernardino National Forest website has a helpful Q&A section from which I quote:
Q: Why are jelly petroleum-fueled stoves okay and campfires aren’t?
A: Jelly petroleum-fueled stoves can be extinguished by putting a metal lid over the container. This makes their use much safer than campfires. Ashes or hot briquettes can blow outside of the fire pit; these embers can easily start a wildfire. Also, visitors might discard ashes or hot charcoal briquettes before they are completely cool, which could cause vegetation to ignite later after they are gone. Wood, charcoal, or any solid fuel fires are not allowed within the San Bernardino National Forest outside developed campgrounds, picnic areas, yellow post sites, and special use permitted sites in agency-provided fire rings or designated sites at any time of the year.
So, based on the Forest Service's above answer, a fuel that can be reliably extinguished, whose flame cannot be spread by wind, and does not leave behind by-products that might start a fire is an appropriate fuel for backcountry use. Based on the Forest Service's own answer, I'd say that ESBIT is an appropriate fuel for backcountry use. Burning ESBIT can be reliably extinguished by blowing it out; ESBIT flames are not spread by wind, and ESBIT leaves behind no by-products that might start a fire. I think ESBIT gets lumped in with wood fires simply because the land agencies aren't familiar with it. Bureaucracies being what they are, it probably won't happen, but it sure would be nice if the various agencies that have jurisdiction over backcountry areas would take a second look at ESBIT.
With alcohol stoves, I understand the restrictions a little bit more (note that I said "understand" not "like"). Alcohol can spill and spread flames, and many alcohol stoves cannot be extinguished once lit.
Tuesday, June 5, 2012
Blog Status 5 Jun 2012
Rumors of my demise are greatly exaggerated. :)
Yes, I still exist even though I haven't been blogging much lately. My new job requires a good deal of commuter travel. Commuting more than 2 hours a day in heavy Southern California urban traffic seems to have sapped my energy to the point where blogging isn't very appealing, even blogging on a fascinating subject like stoves.
Time also is far more dear. With my old job, I had in effect an extra 2.5 hours per day. Those extra 2.5 hours per day are now a thing of the past. Still, I hope to periodically post some updates, and who knows my job situation may change again. I'm still getting out and dealing with interesting stoves, stoves which I think are worthy of your attention, stoves that I'd like to share with you.
My first priority is of course to keep my family fed, clothed, and housed. My stove blog will never make any real money, and I'll never come anywhere close to being able to earn a living through blogging, so my blog is and will remain just a hobby. My family must of course come first. I do hope you understand and will bear with me.
In order to whet your appetite, here are a few previews of coming attractions:
 |
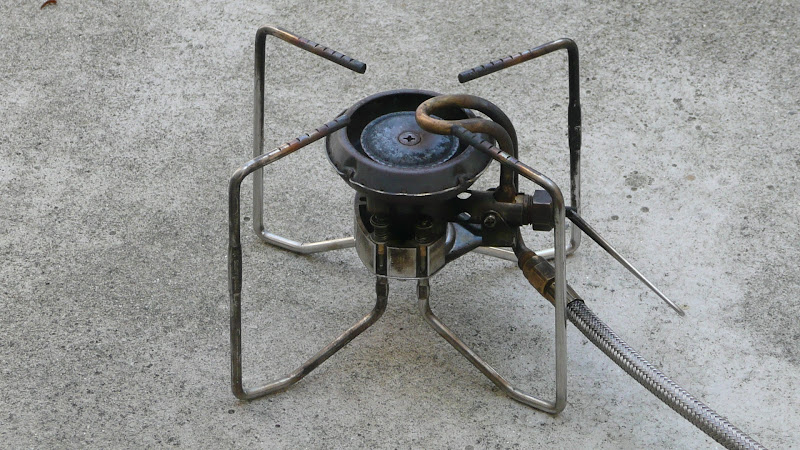
| The new Primus OmniLite Ti (Right) |
 |
| Baking on the trail. |
 |
| Snow melting 101 |
 |
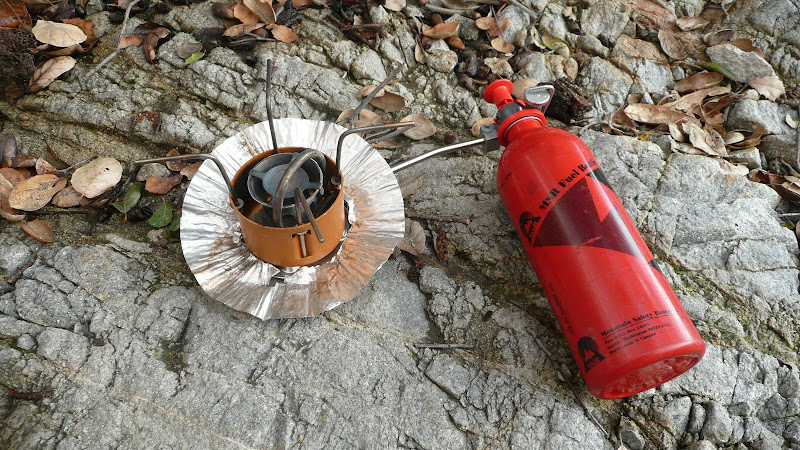
| The Snow Peak white gas stove (a personal favorite) |
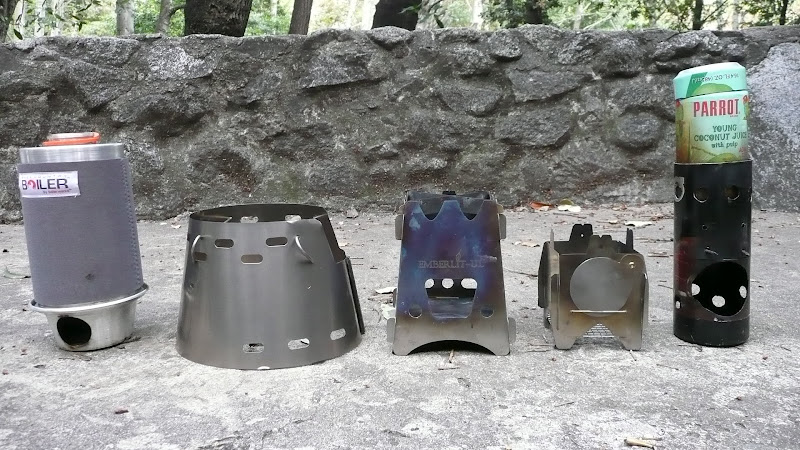 |
| Wood stoves compared |
Stay tuned!
HJ
Friday, April 13, 2012
Gas in Cold Weather: The Myth of "Fractioning"
I'd like to dispel a myth that's out there: the myth of "fractioning."
Supposedly, if you've got a typical canister of gas (i.e. containing propane and some form of butane), in cold weather (temps below the vaporization point of all but the propane), only that fraction of the fuel that is propane will burn. Supposedly.
Here's an example of the myth: You have a canister that is 70/30 butane/propane. Propane vaporizes at -44F/-42C; butane at +31F/-0.5C. Now, say it's 20F/-7C out. According to the myth, only 30% (that fraction of the mix that is propane) will burn off.
That's the myth. What really happens? Well, take a 70/30 canister out in 20F/-7C weather and burn it until it's empty. Now weight it. You'll find the weight is lower than if only 30% of the fuel had burned off.
Why? Well, when you mix liquid hydrocarbons, they combine to form a blend. The blend has properties that lie "between" the properties of the constituent fuels. For example, the boiling point of a 70/30 blend of propane and butane will have a boiling point between -44F/-42C and +31F/-0.5C. The math is non-trivial, but if you know the formulae, you can calculate the resultant boiling point. In this case, a 70/30 blend has a boiling point of about 0F at standard pressure (1 atmosphere/1013mBar).
Now there is a little bit of a catch to all this. This "blend" of liquid hydrocarbons in a canister of gas (recall that there's so much pressure inside a cansiter that our gasses liquefy) still has two distinct molecules in it: Propane molecules (C3H8) and butane molecules (C4H10). The propane molecules have a higher vapor pressure than the butane molecules. In other words, the propane molecules tend to vaporize more than the butane molecules in the blend. How does a canister typically work? Well, you draw vapor off the top, and then more of the liquid portion of the fuel vaporizes to replace the drawn off vapor. If the propane is what most readily vaporizes, then the propane will be removed from the blend more rapidly than the butane. This is called "preferential" vaporization. Because the propane is vaporizing faster than the butane, your blend will change over time as the canister empties. As the blend changes, so will the vaporization point. Toward the end of the life of the cansiter, all the propane will be gone and only your secondary fuel will remain.
Uh, isn't this "preferential" vaporization the same as "fractioning?"
No, not at all. Remember that the myth of fractioning calls for only the propane to burn leaving behind all of the butane. What happens in reality is that the blend vaporizes some butane and some propane throughout the life of the canister until the propane is gone. Yes, you will reach a point where all of the propane is gone and only butane remains, but the fact of the matter is that you will be burning off far more fuel than if only propane alone were burning.
With fractioning (if it were true), you could only burn of 30% of the fuel in a 70/30 canister. With preferential burning, you burn more like 75% of your fuel before you wind up with nothing but butane left (the actual amount burned varies with altitude and temperature of course).
This brings up two important points:
1. Don't use canisters with regular butane in cold weather. Eventually all your propane will burn off, leaving behind whatever else is in your canister. If you've got isobutane (vaporizes at +11F/-12C) as your secondary fuel you've got a 20F (10C) degree advantage over a canister that has regular butane (vaporizes at +31F/-0.5C) as its secondary fuel.
2. Stoves that can handle running with the canister upside down (inverted canister stoves) draw fuel off the bottom of the canister. If you're drawing fuel off the bottom, you're only drawing liquid. If you're not drawing vapor, then it doesn't matter which fuel vaporizes at what rate. Inverted canister stoves start and end with the same fuel blend. If you start with 70/30, you end with 70/30, and your vaporization point stays low, allowing you to run your stove in much colder weather than a conventional upright (screws onto the top of the canister) gas stove. With an inverted canister stove, you can burn all of your fuel in cold weather (assuming that your blend's vaporization point is sufficiently high for the weather).
So, there you have it: What's really going on in that canister of yours in cold weather. I hope this puts the myth of "fractioning" to bed.
I thank you all for joining me on another Adventure in Stoving,
HJ
Related articles and posts:
- Cold Weather Tips for Gas Stoves
- What's the Best Gas for Cold Weather?
- Gas Stoves: How Cold Can I Go? <==Most comprehensive article on canister gas and cold
- Canisters, Cold, and Altitude: Gas in a Nutshell
- Canister Stoves 101: Thread Care
- Gas Blends and Cold Weather Performance. (Why not just use propane?)
- The "Super Gnat" (Camping Gaz or threaded canisters with one lightweight stove)
- Backpacking Gas Canisters 101
- Gas in Extreme Cold: Yes or No?
- Gas in Cold Weather: The Myth of "Fractioning"
- Stoves For Cold Weather I (Upright canister stoves) – Seattle Backpacker's Magazine
- Stoves for Cold Weather II (Inverted remote canister stoves) – Seattle Backpacker's Magazine
Monday, April 9, 2012
Wood Cooking Clean Up
Ever find yourself holding back on using a particular pot or pan for wood cooking? I mean they do get pretty darned black if you use them on a wood fire. Sometimes I hesitate to use a pot I usually use with gas or alcohol on a wood stove because I don't want to get the darned thing all black.
Well, hold back no longer. There's a simple trick out there that can get your pot clean again after cooking on a wood fire. The trick? Dish soap.
Yep, that's right, just simple old dish soap. Smear on a thin layer before you head out. A little dish soap makes clean up go so much easier.
Why bother you say? It's just going to get dirty again? Well, and that is one way to handle it. You could just pack your blackened pot in a sealed plastic bag so soot doesn't get all over. But I use my pots with multiple fuels (gas, liquid, alcohol, wood, and hexamine). A coating of soot will insulate your pot from the flame, and you'll have to use more fuel to heat things up. So, for me, when I'm done with some wood cooking and want to switch to another fuel, I clean my pot.
How well does it work? Let's have a look.
I'm just going to use an old scrubber type sponge here. You probably could use steel wool on a steel or titanium pot. A word of warning: Whatever you use to clean, you're going to get it very dirty. You'll probably want to throw the scrubber sponge away afterwards so it won't get other things dirty. Either that or you'll have to have a designated scrubber sponge for really dirty clean ups.
So, here's my pot. Pretty black. Just waiting to get all over the inside of my pack, and pretty inefficient since heat is going to have to penetrate that coating before it heats the pot.
Let's try a quick scrub with some soap and hot water.
Say, that's not too shabby for a few quick scrubs with an old scrubber sponge. Makes quite a difference.
Let's try to clean the worst spot, the bottom of the pot.
Hey, now that's quite a difference between the upper half of the pot that I've cleaned and the lower half that I have not.
Now, I'd be a liar if I said that it came off like magic. Nope; it just doesn't work that way. It takes some real elbow grease. And, even when I finished cleaning the pot, there were still some little spots of black in the cracks and such. But try cleaning a pot that's been used for wood fired cooking without first putting some dish soap on it. The soot is not going to come off anywhere near as easily.
So there's your wood cooking clean up tip: Smear a little dish soap on the exterior of your pot before you start cooking. You'll be glad you did come clean up time.
Thanks for joining me on another Adventure In Stoving,
HJ
Well, hold back no longer. There's a simple trick out there that can get your pot clean again after cooking on a wood fire. The trick? Dish soap.
 |
| Putting a thin layer of dish soap on a pot before cooking with wood helps tremendously with clean up |
Why bother you say? It's just going to get dirty again? Well, and that is one way to handle it. You could just pack your blackened pot in a sealed plastic bag so soot doesn't get all over. But I use my pots with multiple fuels (gas, liquid, alcohol, wood, and hexamine). A coating of soot will insulate your pot from the flame, and you'll have to use more fuel to heat things up. So, for me, when I'm done with some wood cooking and want to switch to another fuel, I clean my pot.
How well does it work? Let's have a look.
I'm just going to use an old scrubber type sponge here. You probably could use steel wool on a steel or titanium pot. A word of warning: Whatever you use to clean, you're going to get it very dirty. You'll probably want to throw the scrubber sponge away afterwards so it won't get other things dirty. Either that or you'll have to have a designated scrubber sponge for really dirty clean ups.
So, here's my pot. Pretty black. Just waiting to get all over the inside of my pack, and pretty inefficient since heat is going to have to penetrate that coating before it heats the pot.
 |
| A rather sooty pot that has been used on a wood fire |
 |
| A few scrubs, and bare metal starts to appear |
Let's try to clean the worst spot, the bottom of the pot.
 |
| Quite a marked contrast between the cleaned and the uncleaned sections of the pot |
Now, I'd be a liar if I said that it came off like magic. Nope; it just doesn't work that way. It takes some real elbow grease. And, even when I finished cleaning the pot, there were still some little spots of black in the cracks and such. But try cleaning a pot that's been used for wood fired cooking without first putting some dish soap on it. The soot is not going to come off anywhere near as easily.
So there's your wood cooking clean up tip: Smear a little dish soap on the exterior of your pot before you start cooking. You'll be glad you did come clean up time.
Thanks for joining me on another Adventure In Stoving,
HJ
Sunday, April 8, 2012
Blog Status, 8 Apr 2012
Well, I've found a job. After about a quarter of a year's worth of unemployment, I'm quite grateful. There's just one catch: The work is in the next county over, and I'll be commuting, at least for the short term, a couple of hours each way. Necessarily, my hiking and therefore my blogging is going to be greatly reduced. Gone will be the mid-week evening hikes to test stoves. Also, chores and such that I could do on a weeknight will perforce be pushed to the weekend, reducing my time there. A pity, but work is necessary if I'm to feed and house my family and all that.
So, just an update. I intend to keep blogging, just at a less frequent rate.
I thank you for joining me on these Adventures in Stoving,
HJ
So, just an update. I intend to keep blogging, just at a less frequent rate.
I thank you for joining me on these Adventures in Stoving,
HJ
Friday, April 6, 2012
How Much White Gas Do I Need?
How much white gas should you bring on your trip? That's actually going to depend a lot on your style of cooking, your stove, the conditions, etc, but let's take a look and see what we can come up with.
Don't use white gas? No worries. For canister gas, check out my post How Much Canister Gas Do I Need?
The white gas stove I've used the most is my MSR Whisperlite. I'll be using my experience with my Whisperlite to generate the numbers that follow.
A word about style: On most of my backpacking trips, I keep cooking fairly simple. Most of the time, I'm boiling water for re-hydrating foods and making hot drinks. I almost always have tea in the morning and cocoa in the evening. I normally boil at least two cups and more typically three cups per boil. Simmering for the most part is kept to a minimum, but I do simmer sometimes to re-hydrate things at higher altitudes. I don't typically have a hot lunch, but I almost always have a hot breakfast and supper.
Over time, I've noticed that I use something on the order of 1.5 fl oz (44ml) of white gas on a solo trip per day. For two people, I find my usage is something on the order of 2.25 fl oz (67ml) per day. If I'm melting snow, I figure on roughly doubling those amounts. These amounts include fuel used for priming. These amounts are the amounts I expect to use. Particularly in winter, you should plan for the unexpected. I typically bring an extra day or two's worth of fuel on winter trips.
So what does that equate to in terms of fuel bottles? There are a lot of different sized fuel bottles out there. I'll list some common sizes, and you can hopefully adjust from there.
A note on fuel bottles: MSR, Sigg, Primus, Optimus, Snow Peak, and Brunton fuel bottles all have the same threads and are generally interchangeable. However, you should always test your particular stove with the particular fuel bottle you intend to use before your trip. My Primus pump fits in my MSR fuel bottle, but the opposite is not true: My MSR pump does not fit in my Primus bottle. The threads on the Primus bottle are compatible, but the threads start down too low in the neck of the bottle for my MSR pump to engage.
Most manufacturers recommend that you use only their fuel bottles with their stove. That's fine, and you can't go wrong with that, but that recommendation is more about legal liability than it is about the technical requirements of running a stove. Generally, any fuel bottle designed by a reputable stove company for use with a pump should be fine, provided that it has compatible threads.
I would not use "no name" fuel bottles or drink bottles as a fuel bottle for a pressure stove. Note: Coleman and Soto fuel bottles have proprietary threads and are not interchangeable with any other brands.
Now, fuel bottles: I'm going to list MSR's bottle simply because that's what I have a lot of. MSR has three bottles:
10 fl oz "working" capacity, 11 fl oz total capacity (300ml, 325ml)
20 fl oz working capacity, 22 fl oz total capacity (600ml, 650ml)
30 fl oz working capacity, 33 fl oz total capacity (900ml, 975ml)
Note that there is a "working" capacity and a total capacity. Why two different capacities? Well, when you run a pressure stove, you need some air space in the bottle for it to work right. MSR always marks their bottles with a fill line. Do not fill past the fill line. The capacity up to the fill line is the working capacity. The capacity up to the physical top of the bottle is the total capacity. For running a stove, use the working capacity. For storage and transport, you can fill the bottle to the total capacity.
Examples (assuming 1.5 fl oz/47ml per day)
10 fl oz (~300ml) = 6.5 days
20 fl oz (~600ml) = 13 days
30 fl oz (~900ml) = 20 days
For almost all of the trips that I've done, a 20 fl oz/600ml bottle has been plenty.
The only time I've really wanted a 30 fl oz/900ml bottle was when I was doing a lot of snow melting. At home, I use 30 fl oz/900ml bottles for storage. If I were going to buy just one bottle, I'd probably buy a 20 fl oz/600ml sized bottle. For short trips, I'd carry a bottle with a lot of empty space in it. for longer trips, I would fill the bottle. If all you take is short or weekend trips, you might consider a 10 fl oz/300ml size. If I did a lot of winter trips, or wanted bottles for storage, the 30 fl oz/900ml size make a lot of sense.
Now, these are my numbers. The only way you're going to know how much fuel you're going to use is to get out there and do some trips. These numbers are somewhat conservative by design, but you might want to carry a little extra fuel until you get it dialed in. Be aware that in windy and cold conditions, your fuel usage may go up. Hopefully these numbers will give you some rough idea of how much fuel you might want to bring along.
I thank you for joining me on another Adventure in Stoving,
HJ
Don't use white gas? No worries. For canister gas, check out my post How Much Canister Gas Do I Need?
The white gas stove I've used the most is my MSR Whisperlite. I'll be using my experience with my Whisperlite to generate the numbers that follow.
 |
| My MSR Whisperlite |
Over time, I've noticed that I use something on the order of 1.5 fl oz (44ml) of white gas on a solo trip per day. For two people, I find my usage is something on the order of 2.25 fl oz (67ml) per day. If I'm melting snow, I figure on roughly doubling those amounts. These amounts include fuel used for priming. These amounts are the amounts I expect to use. Particularly in winter, you should plan for the unexpected. I typically bring an extra day or two's worth of fuel on winter trips.
So what does that equate to in terms of fuel bottles? There are a lot of different sized fuel bottles out there. I'll list some common sizes, and you can hopefully adjust from there.
A note on fuel bottles: MSR, Sigg, Primus, Optimus, Snow Peak, and Brunton fuel bottles all have the same threads and are generally interchangeable. However, you should always test your particular stove with the particular fuel bottle you intend to use before your trip. My Primus pump fits in my MSR fuel bottle, but the opposite is not true: My MSR pump does not fit in my Primus bottle. The threads on the Primus bottle are compatible, but the threads start down too low in the neck of the bottle for my MSR pump to engage.
Most manufacturers recommend that you use only their fuel bottles with their stove. That's fine, and you can't go wrong with that, but that recommendation is more about legal liability than it is about the technical requirements of running a stove. Generally, any fuel bottle designed by a reputable stove company for use with a pump should be fine, provided that it has compatible threads.
 |
| An Optimus Nova stove in use with an MSR fuel bottle. Works just fine. |
Now, fuel bottles: I'm going to list MSR's bottle simply because that's what I have a lot of. MSR has three bottles:
10 fl oz "working" capacity, 11 fl oz total capacity (300ml, 325ml)
20 fl oz working capacity, 22 fl oz total capacity (600ml, 650ml)
30 fl oz working capacity, 33 fl oz total capacity (900ml, 975ml)
Note that there is a "working" capacity and a total capacity. Why two different capacities? Well, when you run a pressure stove, you need some air space in the bottle for it to work right. MSR always marks their bottles with a fill line. Do not fill past the fill line. The capacity up to the fill line is the working capacity. The capacity up to the physical top of the bottle is the total capacity. For running a stove, use the working capacity. For storage and transport, you can fill the bottle to the total capacity.
Examples (assuming 1.5 fl oz/47ml per day)
10 fl oz (~300ml) = 6.5 days
20 fl oz (~600ml) = 13 days
30 fl oz (~900ml) = 20 days
For almost all of the trips that I've done, a 20 fl oz/600ml bottle has been plenty.
 |
| A 20 fl oz/600ml MSR bottle in use with an MSR XGK II stove |
Now, these are my numbers. The only way you're going to know how much fuel you're going to use is to get out there and do some trips. These numbers are somewhat conservative by design, but you might want to carry a little extra fuel until you get it dialed in. Be aware that in windy and cold conditions, your fuel usage may go up. Hopefully these numbers will give you some rough idea of how much fuel you might want to bring along.
I thank you for joining me on another Adventure in Stoving,
HJ
Wednesday, April 4, 2012
Canister Stoves 101: Thread Care
Don't screw on your canister stove too tight.
Why not?
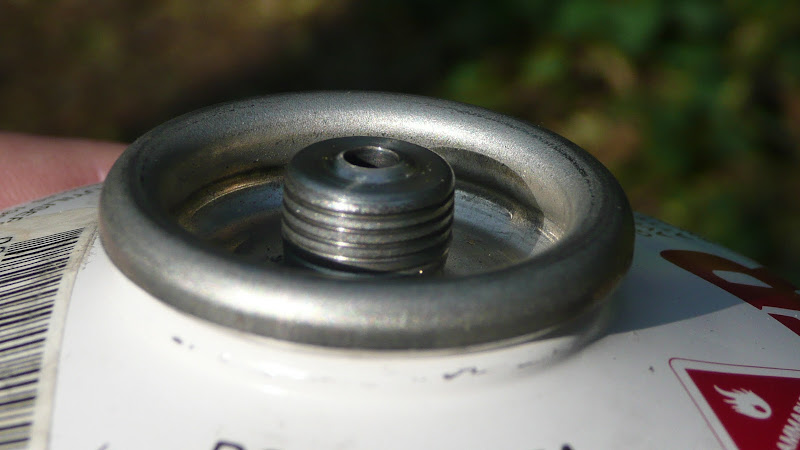
Well, take a look at the threads on a canister some time.
 Notice how the threads do NOT go all the way out and form a sharp line. These threads are rounded off. That means that the only part of your stove's threads that are going to grip the canister is the very tip (very outer edge) of your stove's threads.
Whoa! Wait a minute. Do you mean to tell me that the only thing holding the stove on to a canister is the edge of the threads?
Yes, that's what I'm saying. And that's a fairly thin bit of metal. Too much pressure will put excessive wear on your stove's threads. Heavy users have reported threads so worn that stoves have literally fallen off the canister. Once your stove's threads are so worn that they no longer grip the canister, you're pretty much out of luck; you have to replace the stove.
So, Canister Stove Thread Care 101:
The main thing to remember with canister stoves is that a little care goes a long way. Keep things clean, don't over tighten, and be careful how you screw on the canister.
I thank you for accompanying me on another Adventure in Stoving.
HJ
Why not?
Well, take a look at the threads on a canister some time.
Whoa! Wait a minute. Do you mean to tell me that the only thing holding the stove on to a canister is the edge of the threads?
Yes, that's what I'm saying. And that's a fairly thin bit of metal. Too much pressure will put excessive wear on your stove's threads. Heavy users have reported threads so worn that stoves have literally fallen off the canister. Once your stove's threads are so worn that they no longer grip the canister, you're pretty much out of luck; you have to replace the stove.
So, Canister Stove Thread Care 101:
- Don't over tighten. If you're getting good gas flow and no leaking, that's tight enough.
- Use the little cap on your canister. Sure, it's a hassle to keep track of the little plastic cap, but dirt, sand, etc on the canister's threads could screw up that nice stove you've got.
- Keep the threads clean on your stove. Keep it wrapped in a bandana or something to keep crud out of the threads. I normally keep my canister stove wrapped up and in my cook pot when it's in my pack. Some stoves come with a little pouch or case which may be a good alternative if you don't store your stove in your pot. Don't wrap your stove in something that sheds a lot.
- Inspect the threads on your canister. If there's damage on the canister threads, get a new canister (if available). It's not worth it to use a damaged canister which might screw up your stove.
- Do NOT cross thread. Make sure you thread the canister on correctly and that it turns smoothly. If it feels "funny," stop and check. Cross threading is a great way to damage your stove.
The main thing to remember with canister stoves is that a little care goes a long way. Keep things clean, don't over tighten, and be careful how you screw on the canister.
I thank you for accompanying me on another Adventure in Stoving.
HJ
Related articles and posts:
- Cold Weather Tips for Gas Stoves
- What's the Best Gas for Cold Weather?
- Gas Stoves: How Cold Can I Go? <==Most comprehensive article on canister gas and cold
- Canisters, Cold, and Altitude: Gas in a Nutshell
- Canister Stoves 101: Thread Care
- Gas Blends and Cold Weather Performance. (Why not just use propane?)
- The "Super Gnat" (Camping Gaz or threaded canisters with one lightweight stove)
- Backpacking Gas Canisters 101
- Gas in Extreme Cold: Yes or No?
- Gas in Cold Weather: The Myth of "Fractioning"
- Stoves For Cold Weather I (Upright canister stoves) – Seattle Backpacker's Magazine
- Stoves for Cold Weather II (Inverted remote canister stoves) – Seattle Backpacker's Magazine
Tuesday, March 27, 2012
Canister Refiller -- WARNING
I've been seeing a particular canister refilling device on eBay lately as a "MacCoupler Liquefied Gas Refill Adaptor Gas Charging Valve Inflatable converter" [sic]. This particular device is just downright dangerous and in general should be avoided. I'll explain why I say "in general" in a minute.
OK, so what's wrong with this refiller? Well, in case you don't recognize the fittings, this refiller will refill backpacking type gas canisters from a "bulk" propane tank.
Hey, now doesn't that sound like a great idea? Hey! I can take cheap gas out of my bulk propane tank (like for a BBQ) and refill my expensive backpacking canister. Pennies on the dollar! Sweet! What could possibly go wrong?
What could go wrong? A whole lot, and it could be bad, very bad. First, backpacking canisters do NOT contain 100% propane. Standard backpacking type canisters in the US are rated at not more than 20% propane (mixed with 80% isobutane) or 30% propane (mixed with 70% butane). Propane is a very high pressure gas. Put 100% propane in a canister rated for only 20 to 30 percent propane and what do you get? Quite possibly a very nasty explosion.
Oh! I know! If my canister is only rated for 20 to 30% propane, I'll just fill it up to 20% of capacity and leave the rest empty! Duh! Problem solved.
Uh, not exactly. When combined with butane or isobutane, propane actually forms a blend. The resultant blend has a lower vapor pressure than 100% propane. Odd as it sounds, you'll actually have less vapor pressure in a canister with 20% propane and 80% isobutane than a canister 20% full with propane alone. Besides, what good is a canister you can only fill to 20% of capacity anyway?
Basically, you should never fill a backpacking type canister with 100% propane.

But what if you filled a canister to 80% of capacity with butane first? If you filled to 80% of capacity with butane first and were exactingly careful about not exceeding the overall rated capacity, then maybe this adapter would be safe. I'm not saying that it is safe, I'm saying that there's the possibility that the adapter might be safe -- from the perspective of the mix of gasses. The adapter might still have other problems in terms of materials, design, and construction. The very fact that someone put a dangerous refiller like this together suggests that they really don't know about gasses. I have NO confidence that such a person has the ability to build a refiller that is safe in other respects. I'm certainly not tempted to buy one.
Putting it into perspective
Now, am I just a "Nervous Nellie?" Maybe this is actually pretty safe, but you know this is modern society, and we have to protect people from themselves, don't we?
I submit to you that I am no Nervous Nellie. I refill my backpacking canisters all the time (with butane!!). I use a windscreen with my upright canister gas stove. I sometimes use my stove inside a tent. In other words, I do all sorts of things that manufacturers tell us not to do lest doom and disaster overtake us. I do things like refill, use a windscreen, and cook inside my tent because I've studied the objective dangers and found them reasonable for a person who is careful and has an understanding of how to mitigate the dangers. But I will NEVER fill a standard backpacking type canister with 100% propane. It's just too dangerous. Period.
This refill adapter is: NOT recommended (in the strongest possible terms).
I thank you for joining me on another Adventure In Stoving.
HJ
 |
| A very dangerous canister refiller. ** AVOID! ** |
 |
| A "bulk" type 100% propane tank |
What could go wrong? A whole lot, and it could be bad, very bad. First, backpacking canisters do NOT contain 100% propane. Standard backpacking type canisters in the US are rated at not more than 20% propane (mixed with 80% isobutane) or 30% propane (mixed with 70% butane). Propane is a very high pressure gas. Put 100% propane in a canister rated for only 20 to 30 percent propane and what do you get? Quite possibly a very nasty explosion.
Oh! I know! If my canister is only rated for 20 to 30% propane, I'll just fill it up to 20% of capacity and leave the rest empty! Duh! Problem solved.
Uh, not exactly. When combined with butane or isobutane, propane actually forms a blend. The resultant blend has a lower vapor pressure than 100% propane. Odd as it sounds, you'll actually have less vapor pressure in a canister with 20% propane and 80% isobutane than a canister 20% full with propane alone. Besides, what good is a canister you can only fill to 20% of capacity anyway?
Basically, you should never fill a backpacking type canister with 100% propane.

But what if you filled a canister to 80% of capacity with butane first? If you filled to 80% of capacity with butane first and were exactingly careful about not exceeding the overall rated capacity, then maybe this adapter would be safe. I'm not saying that it is safe, I'm saying that there's the possibility that the adapter might be safe -- from the perspective of the mix of gasses. The adapter might still have other problems in terms of materials, design, and construction. The very fact that someone put a dangerous refiller like this together suggests that they really don't know about gasses. I have NO confidence that such a person has the ability to build a refiller that is safe in other respects. I'm certainly not tempted to buy one.
Putting it into perspective
Now, am I just a "Nervous Nellie?" Maybe this is actually pretty safe, but you know this is modern society, and we have to protect people from themselves, don't we?
I submit to you that I am no Nervous Nellie. I refill my backpacking canisters all the time (with butane!!). I use a windscreen with my upright canister gas stove. I sometimes use my stove inside a tent. In other words, I do all sorts of things that manufacturers tell us not to do lest doom and disaster overtake us. I do things like refill, use a windscreen, and cook inside my tent because I've studied the objective dangers and found them reasonable for a person who is careful and has an understanding of how to mitigate the dangers. But I will NEVER fill a standard backpacking type canister with 100% propane. It's just too dangerous. Period.
This refill adapter is: NOT recommended (in the strongest possible terms).
I thank you for joining me on another Adventure In Stoving.
HJ
Monday, March 26, 2012
The New Jetboil Sol
In 2004, backpacking stoves experienced something of a revolution: The Jetboil PCS was introduced. The Jetboil PCS is the very definition of a "game changer" -- The Jetboil PCS really shook up the backpacking stove world (in a good way, I might add).
Has Jetboil rested on its laurels? No, indeed not. Jetboil is now on what I would consider its third generation of stoves, the new, high-tech Jetboil Sol.
I've now completed my review of the Jetboil Sol. Below, I'll list all the blog posts I did in the process of reviewing the stove as well as a to my final review which is hosted on Seattle Backpackers Magazine. Below the links, I'll include a few items that I didn't have space for in the magazine article.
The new version of the Jetboil has a significantly lightened up burner consisting of far less material.
The new burner includes a much improved piezoelectric ignition system.
Included with the pot and burner are the canister legs (stabilizer) and universal pot support. With the first generation of Jetboils, these items had to be purchased separately.
Notice in the below photo that the ground is sloping. With the high center of gravity of a narrow pot like on a Jetboil, one might be worried about the stove tipping over.
The canister legs make the stove significantly more stable on sloping or uneven ground.
The universal pot support locks securely into place. This isn't just some cheesey little metal thing that rests up on top of the burner just waiting to be knocked off. No, when rotated and locked into place, I found that I could suspend the stove from the universal pot support. Now, that is a solid connection!
With the universal pot supports, you can use any pot from any manufacturer (within reasonable size and weight restrictions)
The Jetboil Sol has a lot of nice features, including the ability to do some real cooking (if you're willing to fiddle with the valve a bit -- it's tricky in the lower range of the stove).
I really like what I see in this the third generation of products from Jetboil. If a person wanted to get just one stove that would do pretty much everything for three season cooking, the Jetboil Sol will do you. For temperatures below about 20F (at sea level), I think another stove system might better serve.
I thank you for joining me on another Adventure in Stoving,
HJ
Coming Soon:
A review of the new Jetboil Sumo pot (1.8 liter)
Has Jetboil rested on its laurels? No, indeed not. Jetboil is now on what I would consider its third generation of stoves, the new, high-tech Jetboil Sol.
 |
| The new, compact, lightweight Jetboil Sol |
The new version of the Jetboil has a significantly lightened up burner consisting of far less material.
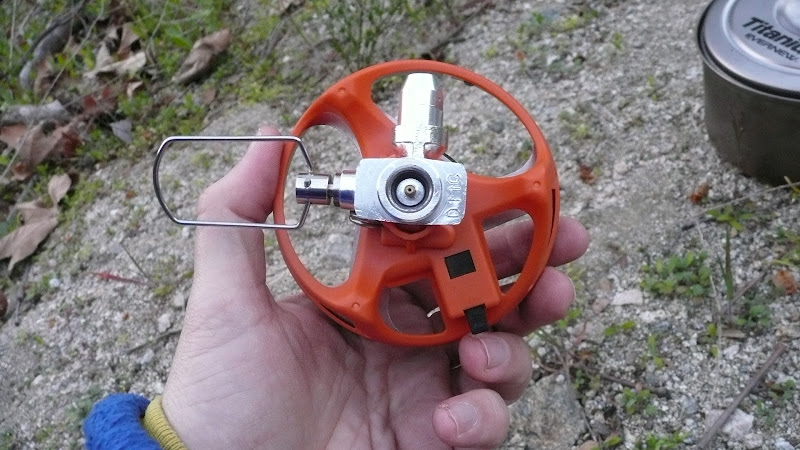 |
| The new burner of the Jetboil Sol |
 |
| The improved piezoelectric ignition of the Jetboil Sol (upper left of burner head) |
 |
| Universal pot support (top) and folded up canister legs (bottom) |
 |
| The canister legs help prevent the stove from tipping over |
The universal pot support locks securely into place. This isn't just some cheesey little metal thing that rests up on top of the burner just waiting to be knocked off. No, when rotated and locked into place, I found that I could suspend the stove from the universal pot support. Now, that is a solid connection!
 |
| You can hold the stove up by the pot supports -- when they're locked in place. |
 |
| A Jetboil Sol with an Evernew 1300ml pot on top |
 |
| Preparing to do some real cooking on a Jetboil Sol |
I thank you for joining me on another Adventure in Stoving,
HJ
All JetBoil related posts
- Titanium JetBoil Sol -- Caution
- Aluminum JetBoil Sol -- Cooking Report #1
- Aluminum JetBoil Sol -- Trail Report #1 and Cooking Report #2
- Aluminum JetBoil Sol -- Cooking Report #3
- Aluminum JetBoil Sol -- Trail Report #2 and Cooking Report #4
- Review: The New Jetboil Sol (on Seattle Backpackers Magazine)
A review of the new Jetboil Sumo pot (1.8 liter)
 |
| The new Jetboil Sumo pot (1.8 liter) |
Monday, March 19, 2012
Canisters, Cold, and Altitude: Gas in a Nutshell
OK, so here's the deal on canisters in cold weather and at higher elevations, in step-by-step form:
1. Choose good gas. For weather below 50°F/10°C, avoid butane mixes. Get an isobutane mix. I've got all the major US brands sized up on my blog in What's the Best Brand of Gas for Cold Weather? Above 50°F/10°C, it typically doesn't matter what brand or blend you buy.
2. Know your limits. Canisters containing isobutane mixes work reasonably well down to about 20F/-7C at sea level throughout the life of the canister if you use good gas (see item #1, above) and good technique (see item #4, below). Now, that's just a number, which isn't a bad number if you just want the short version, but if you want to know more about that number, how I came up with it, and how to plan using it, see Gas Stoves: How Cold Can I Go? Canisters get colder as you use them (canister "chilling") which can negatively impact performance. See item #4, below, for how to compensate for canister chilling.
3. Adjust for Altitude. The higher you go, the lower the outside pressure. The lower the outside pressure, the colder you can operate a canister gas stove. You receive approximately a 1F per 1000' of gain colder advantage (about 0.5°C per 300m gain). The idea that canister gas stoves don't work well at altitude is a myth.
4. Use good technique. Basically, start with a warm canister and keep the canister warm. For "best practices," see Cold Weather Tips for Gas Stoves.
There, in the proverbial "nutshell," is how to deal with cold weather and adjust for altitude for canister gas stoves.
HJ
1. Choose good gas. For weather below 50°F/10°C, avoid butane mixes. Get an isobutane mix. I've got all the major US brands sized up on my blog in What's the Best Brand of Gas for Cold Weather? Above 50°F/10°C, it typically doesn't matter what brand or blend you buy.
2. Know your limits. Canisters containing isobutane mixes work reasonably well down to about 20F/-7C at sea level throughout the life of the canister if you use good gas (see item #1, above) and good technique (see item #4, below). Now, that's just a number, which isn't a bad number if you just want the short version, but if you want to know more about that number, how I came up with it, and how to plan using it, see Gas Stoves: How Cold Can I Go? Canisters get colder as you use them (canister "chilling") which can negatively impact performance. See item #4, below, for how to compensate for canister chilling.
3. Adjust for Altitude. The higher you go, the lower the outside pressure. The lower the outside pressure, the colder you can operate a canister gas stove. You receive approximately a 1F per 1000' of gain colder advantage (about 0.5°C per 300m gain). The idea that canister gas stoves don't work well at altitude is a myth.
4. Use good technique. Basically, start with a warm canister and keep the canister warm. For "best practices," see Cold Weather Tips for Gas Stoves.
Now, in the above, I'm speaking primarily about "regular" gas stoves, the kind that screw right on to the top of a canister. If you have a remote canister stove that is capable of inverted operation (see my Stoves for Cold Weather II article in Seattle Backpacker's Magazine for more information), then the limit in item #2, above, changes from about 20°F/-7°C to about 0°F/-18°C. All of the other items still typically apply. If you want to go out in weather that is that cold, I strongly suggest you do your homework, part of which should be to read Gas Stoves: How Cold Can I Go?
There, in the proverbial "nutshell," is how to deal with cold weather and adjust for altitude for canister gas stoves.
HJ
Related articles and posts:
- Cold Weather Tips for Gas Stoves
- What's the Best Gas for Cold Weather?
- Gas Stoves: How Cold Can I Go? <==Most comprehensive article on canister gas and cold
- Canisters, Cold, and Altitude: Gas in a Nutshell
- Canister Stoves 101: Thread Care
- Gas Blends and Cold Weather Performance. (Why not just use propane?)
- The "Super Gnat" (Camping Gaz or threaded canisters with one lightweight stove)
- Backpacking Gas Canisters 101
- Gas in Extreme Cold: Yes or No?
- Gas in Cold Weather: The Myth of "Fractioning"
- Stoves For Cold Weather I (Upright canister stoves) – Seattle Backpacker's Magazine
- Stoves for Cold Weather II (Inverted remote canister stoves) – Seattle Backpacker's Magazine
Thursday, March 15, 2012
Aluminum JetBoil Sol -- Trail Report #2 and Cooking Report #4
I'd done several cooking reports on the aluminum JetBoil Sol already.
So, I thought I'd do side by side omelettes on two different JetBoil Sol's. I don't have two identical pans, so we'll just have to do the best we can.
The first pan is an MSR Blacklite, which is a very nice, high-quality backpacking pan.
And pan number two is my $5 garage sale special. Not exactly the world's best pan, but let's see if we can get enough flame control from a Jetboil Sol to cook an omelette.
I allow the eggs to set just slightly, and then I add tuna from one of those convenient foil pouches that are so perfect for the trail. I've also tried the salmon, and I have to say that I prefer the salmon. Alas, no salmon today, but we press on. Looks like the eggs are cooking up nicely so far.
Well, looks like the omelette in the Blacklite pan is about done.
And our garage sale pan omelette is fully complete.
So, how'd they turn out? Well, let's have a look.
VERY nice. Both omelettes turned out very well. I got a little more browning on the omelette in the cheap, garage sale pan, but that's to be expected. Both omelettes were very tasty.
Now, I said that both omelettes were tasty. But don't take my word for it, goodness, no! I now turn you over to the very competent hands of the chief tester of the Adventures in Stoving Taste Test Team. Let's see how our ace tester reacts.
The omelette is served:
And the first bite.

And the reaction:
Yes! She liked it! Er, I mean, the omelette passed the highly scientific battery of tests prepared by our Taste Test Team. ;)
Seriously, though, my daughter is an excellent test of the taste of foods. If she doesn't like it, she's not shy about letting you know. If any of you are parents of a two-year-old, you know what I mean.
The bottom line? The JetBoil I tested on was not a fluke. You can cook on a JetBoil, even with a cheap garage sale pan like mine. The JetBoil is a lot more versatile than most people think.
I thank you for joining me on another Adventure in Stoving.
HJ
- Aluminum JetBoil Sol -- Cooking Report #1
- Aluminum JetBoil Sol -- Trail Report #1 and Cooking Report #2
- Aluminum JetBoil Sol -- Cooking Report #3
So, I thought I'd do side by side omelettes on two different JetBoil Sol's. I don't have two identical pans, so we'll just have to do the best we can.
The first pan is an MSR Blacklite, which is a very nice, high-quality backpacking pan.
 |
| Eggs cooking up with the cheese already added in an MSR Blacklite fry pan |
 |
| Eggs and cheese cooking in pan #2, my "garage sale special" |
 |
| Tuna in the MSR Blacklite pan |
 |
| Tuna in the cheap, garage sale pan |
 |
| A finished omelette in an MSR Blacklite frying pan |
 |
| A fully cooked omelette in a garage sale pan |
 |
| Two omelettes, one from an MSR Blacklite pan (left) and one from a garage sale pan (right) |
Best of all? No sticking.
The nice MSR Blacklite pan, as you might expect, was as clean as a whistle. I really like the non-stick coating.
 |
| The non-stick coating in an MSR Blacklite pan works like a charm |
And even my cheap, garage sale pan did a pretty fair job. No burnt food.
 |
| My cheap pan isn't as nice as my MSR Blacklite, but it did a pretty fair job of it. |
The omelette is served:
 |
| "Dad, are you sure this is edible? |

And the reaction:
 |
| "Hey, dad, not bad!" |
Seriously, though, my daughter is an excellent test of the taste of foods. If she doesn't like it, she's not shy about letting you know. If any of you are parents of a two-year-old, you know what I mean.
The bottom line? The JetBoil I tested on was not a fluke. You can cook on a JetBoil, even with a cheap garage sale pan like mine. The JetBoil is a lot more versatile than most people think.
I thank you for joining me on another Adventure in Stoving.
HJ
JetBoil related posts
- Titanium JetBoil Sol -- Caution
- Aluminum JetBoil Sol -- Cooking Report #1
- Aluminum JetBoil Sol -- Trail Report #1 and Cooking Report #2
- Aluminum JetBoil Sol -- Cooking Report #3
- Aluminum JetBoil Sol -- Trail Report #2 and Cooking Report #4
- Final Review: The New Jetboil Sol (on Seattle Backpackers Magazine)
Aluminum JetBoil Sol -- Cooking Report #3
I did some fancier cooking in Cooking Report #1 and Cooking Report #2 -- but I didn't use the Jetboil Sol's "cup." I used a nice MSR Blacklite fry pan.
So, what about the Jetboil Sol's cup? Is it only good for boiling water? Or can it do a little more?
I thought I'd find out.
So, time to try one of my old standard trail meals, ramen noodles with dried veggies. For today's cooking, I'll be using an aluminum Jetboil Sol cup.
OK, so I'll spare you the part about boiling the water. It's safe to say that the Jetboil does just fine there.
Now, the instructions on these noodles say to first boil the water, then add the noodles, and then to cook these noodles over low heat for three minutes. Low heat for three minutes? Can the Jetboil do it? Let's try.
OK, so in go our noodles.
Then let's mix in our dried veggies.
And then, let's cover and simmer for a while. Getting a low flame on a Jetboil Sol is a bit of a trick, but it can be done.
And three minutes later?
Say, now that's not bad at all! Why those noodles and vegetables are positively fluffy. Nice!
And, best of all,
No burning or sticking. Nice! :)
So, is the Jetboil Sol's cup able to be used for more than just boiling water?
Yes, I'd say the Jetboil Sol is up to the task.
Again, please note that I used the aluminum Jetboil Sol cup. This report does not cover the titanium version.
Thanks for joining me on another Adventure in Stoving.
HJ
So, what about the Jetboil Sol's cup? Is it only good for boiling water? Or can it do a little more?
I thought I'd find out.
 |
| An aluminum JetBoil Sol cup |
 |
| One of my typical trail meals, "Sapporo Ichiban" ramen noodles with dried veggies. |
Now, the instructions on these noodles say to first boil the water, then add the noodles, and then to cook these noodles over low heat for three minutes. Low heat for three minutes? Can the Jetboil do it? Let's try.
OK, so in go our noodles.
 |
| Noodles simmering in a Jetboil Sol |
 |
| Noodles with veggies added |
 |
| Low flame on a Jetboil Sol |
 |
| Nicely re-hydrated noodles and vegetables. Yum! |
And, best of all,
 |
| I encountered no burnt on food when simmering noodles for multiple minutes in a Jetboil Sol cup |
So, is the Jetboil Sol's cup able to be used for more than just boiling water?
 |
| Noodles prepared on a Jetboil Sol |
Again, please note that I used the aluminum Jetboil Sol cup. This report does not cover the titanium version.
Thanks for joining me on another Adventure in Stoving.
HJ
JetBoil related posts
- Titanium JetBoil Sol -- Caution
- Aluminum JetBoil Sol -- Cooking Report #1
- Aluminum JetBoil Sol -- Trail Report #1 and Cooking Report #2
- Aluminum JetBoil Sol -- Cooking Report #3
- Aluminum JetBoil Sol -- Trail Report #2 and Cooking Report #4
- Final Review: The New Jetboil Sol (on Seattle Backpackers Magazine)
Subscribe to:
Posts (Atom)