
What's that? Oh, you want a good stove? Yeah, well that's just a bit more complicated. No worries. Let's talk about a few basics of alcohol stove design.
There are many, many types of alcohol burners, but for the purposes of this post, I'm going to limit the discussion to open type burners made from aluminum cans. Open burners are relatively easy to make, effective, and widely used, so it's not like we're limiting ourselves too much.
 |
| Various alcohol stoves prior to testing |
1. Lightweight. Hey, I gotta carry this thing, right? And if I'm going to give up the convenience of gas, then I better be getting something out of it -- like a lighter pack.
2. Efficient. So, what good is a light stove if it eats fuel like an old 450 V8 Chevrolet engine with a four barrel carburetor? Who cares if the stove is light if I have to carry four times the fuel?! The danged thing needs to save me weight, remember? I want a stove that will do the job with a minimum amount of fuel.
3. Effective. Yeah, it has to be light. Yeah, it has to be efficient. But it has to do the job. A stove that won't cook doesn't save me anything. It's got to work. Not negotiable.
4. Minimum "fiddle factor." If I need a degree in mechanical engineering and a Rube Goldberg mindset just to run the thing, then it's not the stove for me.
With me so far? Sure, we can think of more criteria, but those are the basics. Let's go with those and see what we can come up with.
 |
| Preparing to test another set of alcohol stoves |
Now here's where it gets tricky. There are 10,000 ways to slice and dice an aluminum can to make a stove. There are tons of sites out there on the net that list detailed templates. I may post something like that at some point, but that's not my purpose today. What I'd like to do is take a step back and look at a slightly bigger picture in terms of DIY alcohol stove design: What are some of the basic principles involved?
 |
| Testing various open type burners |
 |
| An alcohol stove made from 23.5 fluid ounce/695ml drink cans |
So, what's the problem with the above stove? Poor materials? Poor execution? Not really. It's a design issue. It just burns too darned fast. So how can we slow it down and make it more efficient?
It's hard to tell in the photo above, but that's a bigger than average stove. It's made out of 23.5fl oz/695 ml sized cans. What if we downsized a little bit? Take a look at this stove. It's made out of 7.5fl oz/222ml sized cans.
 |
| An alcohol stove made from 7.5 fluid ounce/222ml drink cans |
So is that the answer? Just use a small can? Take a look at this photo:
 |
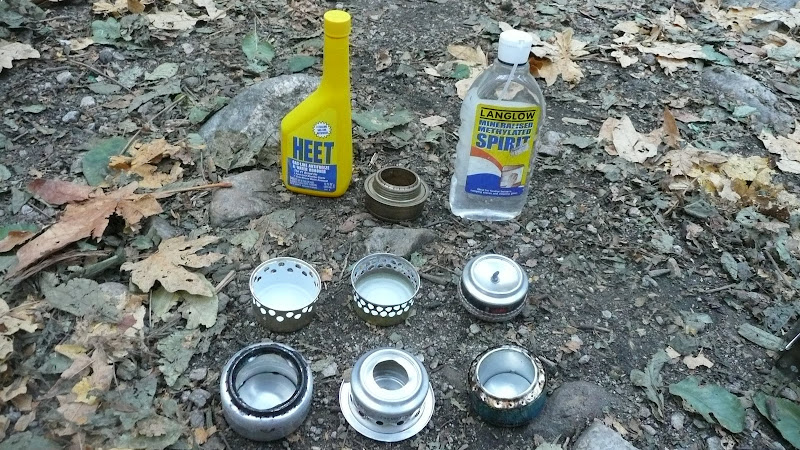
| Various types of alcohol stoves being tested. |
Now, did you notice the brass burner in the photo above? That's no DIY burner; that's a Trangia burner. Trangia has been making alcohol burners since at least 1951, and they're pretty darned good burners. Can we learn anything by looking at a Trangia burner? Let's compare a Trangia burner to the stove we called inefficient in the first photo above.
 |
| An alcohol stove made from 23.5fl oz/695 ml drink cans (left) and a Trangia burner (right) |
OK, now take a look at this photo:
 |
| Alcohol stoves of varying designs. |
Now, take a look at the third stove from the left in the front row. Note how it too has an opening smaller than its width. It's a little hard to tell from that photo, but that's a very tall stove. Recall from lesson three that the height of the burner is important. So, let's fire that burner up and see how it works.
 |
| Testing a tall stove with a small opening. |
Height makes for a more efficient stove, but too tall and your water never boils. There is a relationship between height and opening size, so lesson five: For a practical stove, the optimal ratio between height and opening size is approximately 1:1.
What would a stove with a 1:1 opening size to height ratio look like? About like this:
 |
| An alcohol stove where the opening size is approximately equal to the height of the stove |
 |
| A 1:1 ratio alcohol stove in use |
So review:
1. Fast stoves are fuel hogs; slow stoves are more efficient.
2. The width of the burner matters
3. The height of the burner matters
4. The width of the opening is even more important than the width of the burner
5. For a practical stove, the ratio of the width of the opening to the height of the burner is about 1:1.
OK, there you have it, some basic design considerations for making a practical, efficient open type alcohol burner. There's more to it, such as exactly which template you want to follow, but in the interests of keeping this post shorter than the Encyclopedia Britannica or the New York City phone directory, I'm going to end things here for today.
Thanks for joining me on another Adventure in Stoving,
HJ
Appendix: Standards for DIY Alcohol Stoves
Below are some numbers for you to benchmark your stoves against. These are some fairly high standards. Do not be discouraged if your first couple of stoves don't hit all the numbers. Of course, these numbers are just my thoughts on the subject. Ultimately, your DIY stove must please you.
Weight: A lightweight burner should weigh one ounce (28g) or less. For example, the 12-10 stove from Trail Designs weighs 0.6oz (16g).
Efficiency: An efficient stove should be able to boil 500ml of 20C water using 15ml of alcohol or less in a plain pot (no heat exchanger in other words) with a lid at 1 Atmosphere (1013 mBar) of pressure. Use of a windscreen is permitted (recommended actually). You may vary the height of the pot above the burner as you see fit. About 2cm to 3cm seems to work well in my experience. YMMV.
With respect to to the above efficiency standard, atmospheric pressure is hard for most of us to control. Cut yourself some slack on the atmospheric pressure, but if you live at high altitude on the Tibetan Plateau, just don't crow too much when your stove meets the rest of the criteria.
Effectiveness: Your burner should consistently be able to bring the water to a boil in 10 minutes or less in a wide variety of conditions, e.g. differing air temperatures, wind velocities (within reason), altitudes, etc. Stoves that only work on your work bench at home do not qualify. Your stove should be able to work under typical, real world outdoor conditions. Generally, alcohol stoves work better when the air temperature is at least 40F/5C (that's actually pretty chilly for most alcohol stoves). If your stove continues to work well below 40F/5C, then you've got a real winner.
Minimum "fiddle factor:" Your stove should not require priming and should be able to be fueled from a normal flip top squeeze type bottle in the field without a separate funnel or any other external device. Your stove should light with a common match in one try, a normal Bic type lighter in about one or two tries, or a typical fire steel within about three tries. The point being that it shouldn't be a major hassle to get your stove to light.
Related posts and articles:
- Getting Started with Alcohol
- DIY Alcohol Stoves -- Basic Design Considerations
- Cold Weather Tips for Alcohol Stoves
- Is Ethanol Worth It?
- Caldera Cone Alcohol Stove Review (on Seattle Backpackers Magazine)
- Caldera Cone Review Supplement -- Additional Photos and Technical Appendix with Weights
- The Clikstand Alcohol Stove System Review
- Caldera Cone vs. Clikstand Alcohol Stove Tests
- Trangia 27 Alcohol Stove System Review
- The Caldera Cone's 12-10 Burner
- The Trangia Alcohol Burner
- What's the Best Alcohol for Stove Fuel?
- What Is Meths? (And how is that different than Methanol?)
- Going "Green" with Stoves: Alcohol and Biodiesel
Acknowledgments: I am indebted to many people who shared with me ideas about alcohol stove design. I'm sure I'll forget someone important, but when a debt of thanks is owed, better to remember to thank a few than to thank no one at all. My thanks to: James M, James N, Jon F, Kevin B, Tony B, Turkoker, and Zelph. Particular thanks to Will L. who patiently did the majority of the actual fabrication of the stoves (hey, I'm a blogger not a stove manufacturer. I'm really more of an "ideas" guy, see?). :)
Fascinating stuff, I've found similar effects, however there are many other factors that can influence stove performance.
ReplyDeleteIs there an inner wall in the final stove?
Hi, Jim,
ReplyDeleteYou're right, there are a TON of other factors including but not limited to wind, ground temperature, air temperature, altitude, etc.
Yes, there is an inner wall in the final version.
HJ
man you're blog has done taken off. Nice job HJ!
ReplyDeleteHi, Zé,
ReplyDeleteThanks, bro. Yeah, people are actually reading it. Well, what do you know? ;)
HJ
I think "Fast stoves are fuel hogs; slow stoves are more efficient" is a bit too simple.
ReplyDeleteA faster stove will actually be more efficient. Imagine a very slow stove that heats the pot slower than it loses heat to the environment, this is super inefficient. The shorter the time we are cooking for the less time there is for heat to be lost to the environment.
The problem with what you call fast stoves is that they aren't getting enough oxygen so some of the fuel isn't burned, this is what's happening when we see yellow flames. (There is also the problem that if a flame is too large it goes up the side of the pot.)
The most efficient stove will be a stove that burns at the optimum oxygen to fuel ratio, where all the fuel is being burned properly and we are using all the oxygen we can get our hands on. If the burner has an efficient air to fuel ratio then the more powerful the better as long as it's going to the pot.
Also any ideas on why the height of the stove makes a difference? I know it can affect the pressure in jet style stoves, where shorter gives more pressure hence bigger jets.
My measure of heating efficiency is "how much fuel does it take to boil two cups of water." Yes, it is more complex than that, but "how much fuel does it take to boil two cups of water" IS the bottom line.
ReplyDeleteConsider this: You have two alcohol stoves. Both *burn* with perfect efficiency, but stove number one burns faster (more heat output per minute) than stove number two. Which stove will require more fuel to boil two cups of water? Stove number one will require more fuel.
Why? Because only a certain amount of heat can be transferred from the flame to the water per minute.
Don't get me wrong. Burn efficiency does matter, but overall heating efficiency is the real bottom line, and in terms of overall heating efficiency, a slower stove is generally more efficient unless you get one that is so slow that heat loss to the environment is greater than the heat output of the stove. For most alcohol stoves, burning that slowly just isn't an issue, not even close.
The height of the burner affects how much air is getting into the burner. A greater height reduces air supply which in turn makes the burner burn more slowly.
HJ
Here's an example of two stoves where the faster is more efficient.
ReplyDeleteSay we have a pot that can accept 100J of energy per minute and loses 10J per minute. Our water needs 400J to boil. We have a fast stove that gives off 100J of heat per minute, and a slow stove that gives off 50J of heat per minute. And 1ml of fuel contains 10J.
time to boil (minutes) = (energy required) / (energy in - energy lost)
fuel used (ml) = total stove output / 10
using the equations the fuel used by the fast stove would be
time to boil = 400 / (100 - 10) = 4.44 minutes
fuel used = 4.44 * 100 / 10 = 44.4ml
and the fuel used by the slow stove would be
time to boil = 400 / (50 - 10) = 10 minutes
fuel used = 10 * 50 / 10 = 50ml
All the numbers where made up and it is a very simplified example, but I hope you can see why I think a fast stove can be better than a slow stove. The more efficient stove is the one that can output as much heat as the pot can take. If the stove had given off more heat than the stove could take it would also be less efficient.
Ah. I see what you're saying. And you're right. There are times when a faster stove can be more efficient than a slower stove. I have played with DIY stoves that were so slow that they never even brought the water to a boil. They would go through their entire fuel supply and produce no boil at all. Not efficient.
ReplyDeleteHowever, as a practical matter, relatively few stoves are so slow that this is an issue. As a general, practical rule, slower stoves are *typically* more efficient. Not always, but let's say 95% of the time.
Clearly, though, you are correct and there are definitely times when a faster stove will be more efficient than a slower stove.
HJ
Hi mate,
ReplyDeleteNice roundup of the open alcohol stoves. Any thoughts (or links) on the closed alcohol stoves that are visible in the second picture?
I'm looking at making some of the stoves mentioned, would be great to read some thoughts on those closed ones.
Rogier,
ReplyDeleteI don't yet have enough testing and investigation to put up a full length post on this type of stove (closed jet/pressurized). However, a couple of observations:
1. This type always requires priming. See http://adventuresinstoving.blogspot.com/2011/12/priming-and-alcohol-stoves.html for best technique.
2. This type is actually slightly easier to make than open type burners.
3. Don't screw the thumb screw all the way down. You'll get a better seal at 3/4 in than all the way in.
4. This type is a little harder to fuel. A tube added to the pour spout of your fuel bottle goes a long way toward ease of fueling. See the first photo in this post: http://adventuresinstoving.blogspot.com/2011/12/methanol-safe-handling.html
That's all I've got at this juncture.
So many stoves, so little time. :)
HJ
I bought one of Zelph's Starlyte stoves. It seems pretty decent. I fired it up with 10mL. of 90% Denatured Alcohol and 10% Yellow Heet. It took off right away with a blue flame that had a barely luminous tip. There is no simple way to simmer with it, but I recall seeing something about simmering in some of his posts. I think that I would prefer it without the integral pot stand, but that's the way it comes. The stove flame is easily blown out with a quick breath, so a wind screen will be a neccesity. The windscreen that he includes with the stove is very nice. It's corrugated aluminum that rolls up to a compact package. Overall, I'm quite pleased with it. I'll have to boil some water and see how it works.
ReplyDeleteHi, Bill,
ReplyDeleteThe Starlyte has a very good reputation. Let me know how it goes if you get a chance to give it a spin.
HJ
I've got all of the stuff to build one and I did just that over the weekend. I used glass wool as the filler and the thing actually worked. This little stove has some real advantages as a lightweight, compact way to boil water, but it has some drawbacks. Since the alcohol is absorbed by the filler, you can't pour it out if you don't use all of it. With the integral pot stand, you can't easily cap the stove to keep the fuel from evaporating. You will need to bag the stove or find a canister with a tight fitting lid to store it in. The canister would be additional weight to carry. I think that the best use of this type of stove would be for a day hike. Just something to boil water for coffee or noodles. With a 2 Oz. fuel bottle, it would still almost fit in your shirt pocket.
ReplyDeleteHi, Bill,
ReplyDeleteYes! Alcohol stoves make great little shirt pocket stoves if you're just out on a short day hike or what have you.
The trick with fuel is to learn how much fuel your stove takes to do the normal tasks of cooking that you do. You then bring a little measuring cup and measure out just that amount of fuel. You let the stove burn itself out, and voila! no leftover alcohol.
HJ
That's why I fueled it with 10 mL. I got right at 10 minutes of pretty constant flame and then about 3 minutes of diminishing flame before it went out. It burns about 1 mL per minute. Now I just need to find out how much water it will boil.
ReplyDeleteYeah, definitely play with it. You'll just have to find out what "X" amount of alcohol can do in your particular stove.
ReplyDeleteHJ
Hi, I notices that what matters is not the shape or ratio itself, but instead, the amount of heat that feeds back the stove for the alcohol to volatilize. And thats why you have to pay atention to materials and hole/jets placing... :)
ReplyDeleteExcelent article!!
Hmm. Well, that's a little different from my experience, but if it's working for you, great.
ReplyDeleteHJ
I agree with Emiliano as far as height goes at least. Having flames too close to the alcohol will cause it to burn hotter - too far and it will not burn hot enough. You need to find the sweet spot where the thermal feedback is just right. Of course, it will vary some with the conditions so a person ideally should test at close to same temp they expect, of course.
ReplyDeleteInteresting thoughts. That hasn't been my experience. My observation is that it has a lot more to do with airflow than the distance from the fuel to the flame. YMMV.
ReplyDeleteHJ
Airflow obviously is important also. I'm referring to having the same hole configurations but the holes are at different heights. Having them closer to the fuel burns hotter.
ReplyDeleteAh! I see what you mean. Yes, varying the holes will cause different air flow patterns and alter the thermal feedback of the system, both of which will affect burn characteristics.
ReplyDeleteHJ
you know, it could be that the height of the stove matters, because within the inner wall (mixing chamber?) is where the fuel and air mixing takes place. Having more or less room in the mixing chamber may affect combustion at the jet, by making the combustion mixture more or less efficient.
ReplyDeleteThere are a variety of factors (it gets pretty complex), but yes the volume of the "chamber" affects the mix which in turn effects combustion.
DeleteHJ
Jim,
ReplyDeleteJust wanted to drop you a note and say thanks for all the great information. It really helped when I made my first stove.
http://www.rickacheson.blogspot.com/2012/12/my-first-diy-alcohol-stove.html
Hi, Rick,
DeleteI'm glad you found the post helpful.
Take care,
HJ
I almost burned the barn down. was poring heet in my stove that I thought was burnt out. it shot flaming heet on the table and wall about 5' away. the flames went out without setting anything on fire.
ReplyDeleteWhoa! I'm glad that you didn't set anything on fire. Refilling a stove that is supposedly out is a very common accident. Supposedly a pinch of salt in the alcohol will help you see the flame better, but I haven't tried it yet. Thanks.
DeleteHJ
Nice article. Very interesting.
ReplyDeleteFor my own use, I have found a 4 jet Groove Stove from a 7.5oz (2" diameter) soda can with the entire center cut out and about 1" high works best for me and my mini Trangia pot and a 2.5" stand . I get 2 cups of water boiled in under 5 mins with a shade over 0.5oz fuel used. I like my tea hot and I like it fast.
Ian, 2 cups in < 5 mins with ~0.5 fl oz is really good (I assume fluid ounces). What fuel are you using? What was the starting temp of the water? What was the ambient temperature?
DeleteHJ
Great post and sight; tons of useful information to be found here as well. I noticed you do not have any representations of wick feeding alcohol stoves in your stove line up. Here is a link to information on one of the best alcohol stoves there is out there IMO, which solves the priming, waiting for blooms, and poor below freezing alcohol stove performance problems - the Fancy Feast/Carbon Felt alcohol stove: https: //www.youtube.com/watch?v=6XQVKLlLQjw
ReplyDeleteThe burner I eventually came up with is a little different from Hiram Cook's version, total burner height on my unit is 1 13/16th inches, with no included pot stand so it will fit inside of my Primus 0.9 L Litech Kettle tea pot.
Instead of using a tomato paste steel can as Hiram did for the inner cylinder/pot stand, I found some aluminum body and hair spray cans at the 99 Cent Store that are the right diameter - 2-1/16 to 2-1/8th inches and much more substantial than soda/beer cans. I tried these in both the convex and concave configurations, as well as testing different fill hole diameters, with the best results coming in with the concave shape and a fill hole diameter of 3/4s of an inch, and with 4, 5/32" diameter vent holes drilled below the carbon felt burner line, and 4- weep notches paper punched at the bottom of the cylinder for alcohol access to the carbon felt wick, wrapping the cylinder with a 1 1/2" tall carbon felt wrap, all going into the bent down inner ridge Fancy Feast cat food can.
The Primus .9L pot is 6" wide x 2.2 inches tall, so I'm using a 3-leg s/s bicycle spoke pot stand that is 2 3/4 inches tall, to get the 1" magic sweet spot alcohol flame height, and that has given me a 2-cup / 1 oz of fuel boil time of 4:30, and a carbon felt run out time of 13:45, with a full flame out time of 16:40, which I believe is a pretty efficient burner.
I also found that a simmer ring isn't really needed. Placing a 1 oz. Nivea tin under the Fancy Feast burner reduces the flame to the bottom of the pot distance to 1/2 an inch. On the Trangia burner with a 1/2 inch shorter pot stand, the boil time was lengthened from 5:30 to 14:00 minuets, with a run out time of 23:00 minuets total recorded. Sorry, evidently I didn't record the run out time on the Fancy Feast burner test when I did it at the 1/2 inch flame height, but it seems like the run out time was nearly doubled over what it was at the 1 inch height. I hope this is of some help to any and all who choose to suffer through and read all of this.
I found the Nivea 1/2 inch lift boil and run out time test results. It was done with a 1" DIA. concave fill hole on an earlier inner cylinder prototype. Boil time was 10:00 minuets; carbon felt flame run out time was 16:00 minuets,and full flame out time was 19:00 minuets.
ReplyDeleteI also tested inner cylinders that were both shorter and longer than the length I finally settled on. But the longer ones still had to be short enough to fit inside of my Primus tea pot, which could only have a maximum height of about 1 and 7/8ths of an inch for the inner cylinder's height.
I also tested different fill hole diameters starting with a 1/4 inch hole size, the same as the Mark Jurey Penny Stove fill hole has that I have been using for the last 10 years. Upon ignition, there was a loud bang and the inner cylinder, carbon felt wick, alcohol, and pot with two cups of water in it, were all blown off of the pot stand and out of the pot and stove. The sleeve hit the ceiling with resounding thud. With a 1/2 inch DIA. hole, there was still a loud pop when the alcohol lit, but everything stayed in place that time. I believe the boil time was in the 5 minuet plus range - not good enough to even bother recording. Drilling the cylinder out to 11/16ths of an inch, the pop was a lot quieter and the boil time dropped to 4 minuets and 30 seconds, which was the best time I had gotten up to that point. But the hole was a bit on the rough side and slightly out of round, so I dressed it up with a 3/4 inch wide file that would just pass through the hole when I was done. I retested the boil time with the slightly bigger hole and it held at the 4:30 mark, so I quit right there. Earlier, I had also tested inner cylinders with 1 inch and 1 and an 1/8th inch wide holes. The boil times for those were 4:40 and 5:00 minuets respectively. A short (1 and 5/16ths) inner cylinder with a 1 and 1/4 inch hole clocked in with a 5:30 boil time, with a carbon felt run out time of 13:00 minuets, and a flame out time of 14:00 minuets. I believe it is fairly obvious that there is a pretty linear progression linking fill hole size with the speed of the boil times, with the faster boil times also resulting in faster run out times as well.
The Trangia tests were done with 3-Spoke Bicycle Spoke Pot Stand in a simmer length and a fast boil time height, consisting of 3, S/S bicycle spoke segments with a U-shaped bend at the top of each spoke segment for the pot to sit on, and a 90 degree off set horizontal bend on the bottom, also looped back on itself to hopefully keep the S/S split rings from sliding off of the spoke segments. The split rings were pilfered from an old, no longer used, fishing plug. The purpose of the rings is to keep the spokes together and make them more stable as they rest in the fuel well of the Trangia burner and on the underside of the pot. This makes a tripod for the pot to sit on and the spacing is one spoke every 8 jets. Setting the spokes in between two of the jets instead of on a jet keeps them cooler and robs less heat from the flames. They do not weigh much or take up very much room and can be carried in a plastic bag in your preferred cooking pot. Just some food for thought.
For those who might be interested, I thought it would be good to provide some information on the cost, materials, and construction of the Trangia Bicycle Spoke Pot stands.
ReplyDelete1. The stainless steel bicycle spokes cost a dollar a piece from a bicycle shop a few days ago, plus tax of course. I asked for 14 gage, straight, not budded. Which was enough material to make 3 complete pot stands, so if you make a mistake on your first try it is not the end of the world. The bicycle axle Hub end of the spoke already has a flange 90 degree bend in it that can be used as the pot support head, the other end of the spoke is threaded, and if you got the spoke nuts to join the spoke to the bicycle rim, they might also have some stove related uses. On my first stand, I used a brass tube provided by a ball point pen ink refill to make the JB-Weld on feet. Subsequent stand's heads and feet were made out of the spoke material itself, which is probably heavier but also a simpler and more elegant solution I believe.
2. The Simmer Stand measures about 3 inches long over all.
3. The Fast Boil Stand measures 3 and 5/8ths inches long over all.
4. Later, I figured out that wood meat skewers cut long and easily cut to length and tested for burner to pot flame height made a great non-material wasting way to determine the pot stand shank length. Of course you have to add in the bend, head, and foot pot support material needs to the shank length, which adds on about another inch or so of total material length needed.
5. All the bends were made with the aid of vice-grip pliers and hand pressure, and two pairs of pliers were better than only one, with the second pair having a narrower set of jaws. A hammer was also useful to tighten the bends and flatten the stands after bending. I used the back blank portion of a big file as an anvil, lacking the real thing.
6. Once the stand has been used, the head end will change color, making it east to tell the top of the stand from the bottom. To set the completed stand into the burner fuel well, slide the split ring up toward the head end above half way. Then splay the feet slightly apart as you lower the stand into the tank. The feet will probably not all come out properly aligned. If not, pull the offending leg up slightly by the head and rotate it back into the proper alignment, then lower it into the wall/bottom juncture and space it out properly, repeat as needed with the remaining legs. It may take a bit of fiddling to get all 3 legs properly aligned. But once you achieve alignment, the stand is surprisingly stable and secure. By now the need for the 90 degree foot offset bend should become readily apparent, which is another way to tell the heads from the feet on these pot stands. And I tried to curve the foot bottoms to match the curve of the tank wall. Here, shorter feet are easier to make and steady than longer ones are.
Conclusion: There you have it. Probably more than you ever needed or wanted to know on how to make and use Trangia Bicycle Spoke Pot Stands.
I tried 2 hole diameters to try and make it more like a trangia (light up from the top rather than preheat from the bottom outside). The smaller hole presents risks when lighting as the gas expands on ignition and pushes fuel out through the jets - which lights as well. Probably worse in warm weather. Not advised for use under a fly sheet in bad weather or near expensive clothing and sleeping bags.
ReplyDeleteIf fibre glass loft insulation in there it would reduce that but then its sucking up fuel that should be at the bottom ready to go up the outside wall to the jets.
I recently looked at the Toaks capilliary stove and thought about using a thin layer of fibre glass insulation around the edge inside - between outside wall and internal wall. This would suck up fuel in the place where its needed and preheated. As very thin walls dont suit soda can design I also want to try more solid hairspray aluminium bottles. A thin double wall to try and copy the Toaks stove and if needed, thin fibreglass woll layer between to suck up the fuel.
A lot of stove designs I tested were not so different in burn time and boil time. The best were the original closed soda can (except for preheat needed) and open top for easy lighting. I had double walls in them anyway and baffles in that to reduce wind effects and improve preheat.
Good projects, all, Ando. I hope you'll take the time to drop by here again and report your findings.
DeleteHJ
16 Oz. Bud Light Aluminum Bottle / 5.5 Oz. V8 Can Sub 4 Min. Burner
ReplyDeleteFuel Cup: The Bottom of Bud Aluminum Bottle cut @ 1 7/16” height over all length.
Inner Cylinder: Remove the paint if desired while the can is full and then empty it. Invert the can and drill a hole in the center of the concave surface and in large the Fuel Fill Port Hole to 7/8 of an inch in diameter, then cut the over all length to1 ¾ inches. Add 3 to 4 half round fuel vents to the bottom (open side) on the inner cylinder with a ¼” paper hole punch, and your Inner Cylinder is complete.
Ceramic Fiber Paper Wick Source: https://www.fire-parts.com/products/ceramic-fiber-paper-gasket-sheet Cost: $ 9.95 Shipping, $8.00 Priority Mail 2-3 Days or so.
Making The Wick: The material comes as a 1/8” thick X 12” wide X 24” long sheet. Measure up 1 ½” inches and draw a line with a pencil and a straight edge across the 12” width side, then cut off the 1 ½” wide X 12” long strip with scissors. Now measure L to R, 1/4 “ inch in at the top of the strip, and 3/4” of an inch in at the bottom of the strip, and draw a diagonal line between the two marks. Now measure and mark 7 and 1/8” inches down from each diagonal mark and mark a second time, and draw a second diagonal line, then cut on the two diagonals and the wick is complete.
Putting The Burner Together: Roll the wick around something like a broom handle and insert it into the Bud Fuel Cup and release. The Wick will spring out and keep it going in that direction by forcing it out and against the walls and down into the U-shaped junction of the bottom and sides of the fuel cup. The wick will overlap slightly when you meet the juncture point, so keep working it around until the two ends drop down into place with a little prodding. Now what you should have is a fuel cup with a ring of wick material that sticks up about 1/8” of an inch above the top edge of the aluminum fuel cup.
With the fuel vent side of the Inner Cylinder turned down, start to insert the inner cylinder into the fuel cup/wick assembly. This will be a tight fit and it will not go in all the way by itself. A thin, narrow knife blade stuck between the protruding metal edge and the wick material and worked around it will pull the wick material out enough get everything thing in. When everything is straightened up, gently push the inner cylinder down into the wick until the bottom of the inner cylinder meets the bottom of the metal fuel cup and you can see the wick slightly sticking out of the fuel vents, which you will be able to see by looking down through the Fuel Fill Port Hole.
Curing The Burner: The Ceramic Fiber has an organic binding agent included in it as part of the manufacturing process that has to burn out before the wick will work as intended. The binding agent will leave a sticky amber residue behind on the metal surfaces above and below the exposed wick, which can be cleaned away with alcohol and a cloth. On the first burn, the flame will sputter, spark, and flare up considerably. Things will settle down on each successive burn and all of these problems should be gone in 3 to 4 or so burns.